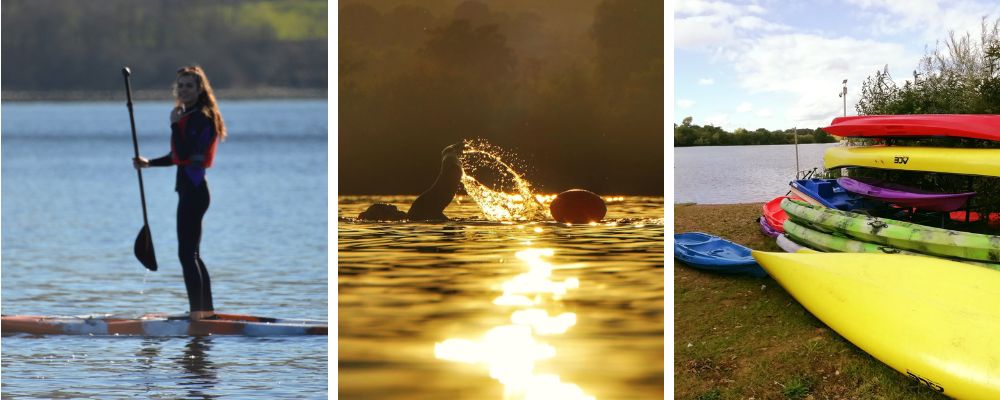
The BIG news we’ve been sitting on for the past few months can finally be announced! Woodland Classroom are moving, to a new venue. It’s a home which is somewhere quite unlike anywhere else.
Just north of Wrexham lies an ambitious project like no other, Park In The Past. It’s a place where not only can you explore woodlands or try your hand at water-sports, but you could also stumble across a full-size Roman fortress! As we said, this place is special.
Set in the ancient Welsh landscape, the park comprises 120 acres of outstanding natural beauty offering woodlands, wetlands, meadows, footpaths a magnificent 35-acre lake and the gorgeous River Alyn winding through it. To find out more about the venue, visit their website here.
The aim of Park In The Past is to create a totally unique visitor attraction. There is the country park itself which local people are encouraged to explore and enjoy the nature trails. Then there is the historic aspect where the project seeks to recreate an ancient landscape, winding the clock back to the Roman invasion of Britain. This is where the Roman Fort Build comes in. Visitors can walk amongst the construction site of a full-size timber and earthwork fort recreated using traditional techniques wherever possible. It’s pretty impressive!
Above: It’s not uncommon to see a Roman soldier wandering the pathways. Visitors can explore the fort build and seek out the ‘neolithic’ stone chamber.
Our blend of bushcraft, woodland skills and outdoor education marries well with what the team on site are trying to achieve here, complimenting what is already on offer.
Phil Hirst, one of the Park Directors told us; “All of the team at Park in the Past are really delighted to welcome James and Lea Kendall from Woodland Classroom to our heritage and conservation attraction in January 2023. Our new partnership will extend the range and quality of inspiring experiences for visitors. James and Lea’s unique approach to engaging with Mother Nature and forgotten country crafts will greatly enhance our ability to improve the mental health and wellbeing of our communities. We can’t wait to get started!”
James Kendall, Head Bushcraft Instructor at Woodland Classroom shared his enthusiasm; “We are extremely excited to be working with Park in the Past and can’t wait to be able to offer our courses and events at this fantastic venue. We will be bringing our established programme of bushcraft, wild food foraging, forest school and nature-based wellbeing to this site as well as a whole host of new courses for people who want to develop their outdoor skills or deepen their connection with nature.”
If you want to check out our upcoming courses and events, you can do that right here.
“Park in the Past brings so many new opportunities for us with a huge space offering woodland, meadows and scrubland, not to mention the lake which could enable us to offer bushcraft combined with canoeing in the future – two things that go so well together. Where else can you be exploring woodland one minute and then stumble over a Roman fort? The ongoing experimental archaeology projects here are great opportunities to link in our traditional woodland skills and greenwood crafts also. We are also looking forward to lending our experience of sustainable woodland management and working toward improving biodiversity on site as part of our ongoing activities.”
Above: The site features a 35 acre which hosts a range of water sports. There is also opportunity for pond dipping and river studies with our groups.
Park in The Past is managed by a Community Interest Company which has been set up to restore and manage the former Fagl Lane Quarry. The project aims to establish a balance between the sustainable management of habitats reserved exclusively for wildlife, and the sensitive utilisation of the site for commercial, educational and interpretative purposes. Park In The Past aims to create a balanced mixture of safe wildlife havens as well as areas for people to safely enjoy the site.
Park In The Past is easily accessible from the A55 North Wales Expressway. Chester City Centre is only 20 minutes drive away. Central Wrexham is just 15 mins drive away. The site is also within walking distance of Hope railway station.
The venue has lots of exciting plans for the future including the construction of a Celtic village and farm, a state-of-the-art visitor centre and a growing educational programme for schools focusing on ancient British history. As time goes on this venue is going to get better and better.
Above: The park is haven for wildlife and the woodlands are being managed with a view to improving biodiversity for the future.
Some people have asked us what this all means for Woodland Classroom offering courses and hosting groups at both Erddig and Chirk Castle. We’ve had a strong relationship with the National Trust, having hosted our courses at these venues since 2016 and we will continue to offer Felin Puleston Outdoor Centre at Erddig as a venue for outdoor education. In addition, a number of our bushcraft and foraging courses will still be hosted at Chirk Castle as it is a site which offers a completely different set of flora and fungi to Park In The Past. This way we can demonstrate the diversity that different sites can offer to the bushcrafter or forager. However, Park In The Past will become our principle home going forward.
Look out for more announcements over the coming months for our new course programme, venue launch event and the development of our new Bushcraft Basecamp and Forest School activity areas at Park In The Past. Our sincerest thanks go out to Paul and the rest of the Park In the Past team for letting us come and play in their sandbox.
If you are interested in bringing your school class, group or family along to a session with us at Park In The Past for a session with us then do get in touch.
We’re excited for the future and can’t wait to share this new venue with you all.
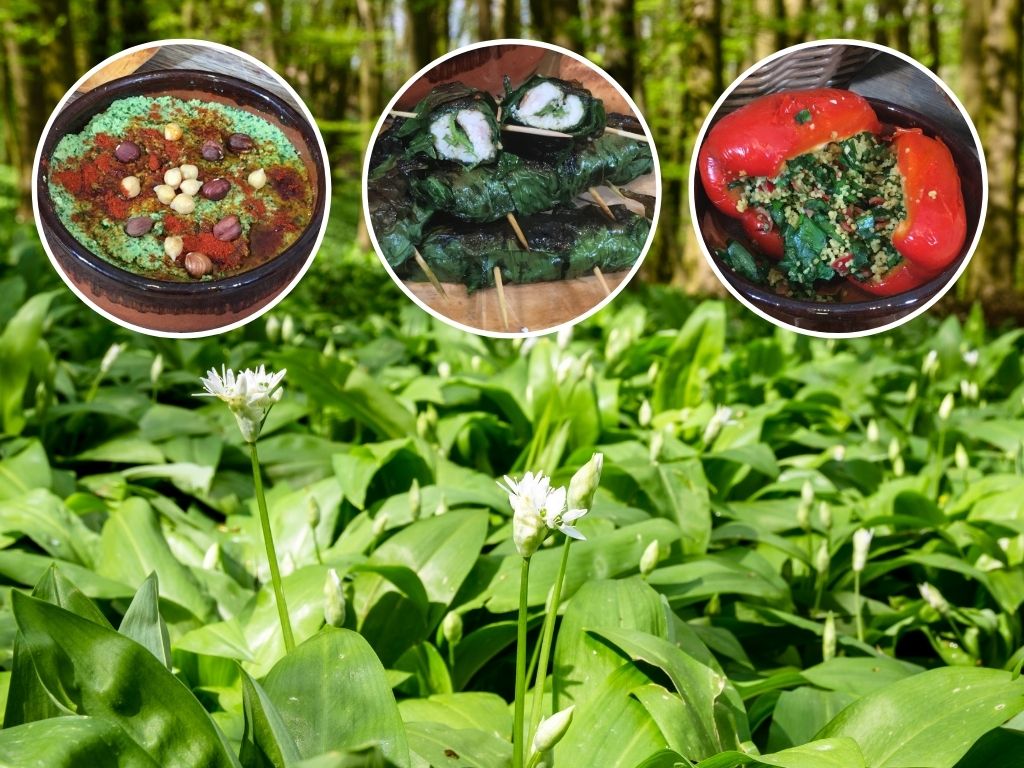
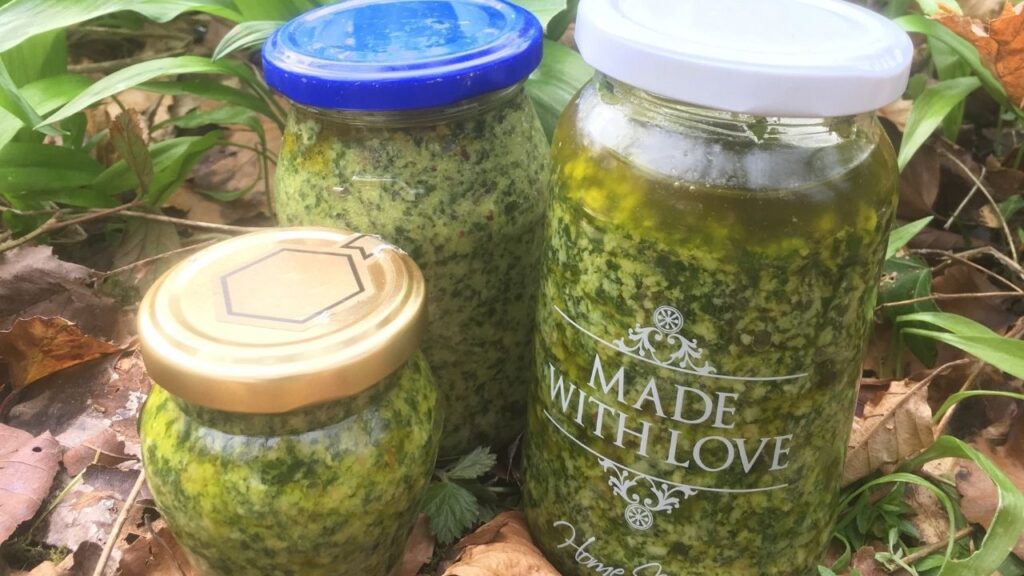
Spring has sprung and with it comes one of the edible plants for the forager, wild garlic (Allium ursinum). Most people who have dabbled in foraging will know wild garlic (or ramsons) as a great plant to start with as it’s simple to recognise and use in cooking. It’s one of our absolute favourite wild foods. Not only because it tastes great but because it’s so versatile. So, it’s a shame that the main recipe you see online again and again is wild garlic pesto. There’s so much more to it than that, as you’ll see. We’ve done the trial and error, so you don’t have to and in this blog we have made a list of our top 11 recipes for you to try at home. And yes, pesto is included below too.
If you prefer to watch rather than read, you should have a look at our video 11 Easy Wild Garlic Recipes here, where we go into even more detail on ingredients, quantities and methods. We also put together a spicy Indian banquet bursting with wild garlic flavour. Check it out!
Every part of this plant is edible; leaves, stem, flower and bulb. So with that in mind there’s a bunch of ways we can use the plant. As a general rule, if you’re cooking wild garlic you want to treat it like spinach, don’t over cook it but throw it into a dish near the end so it doesn’t wilt too much and lose it’s flavour and goodness. Now, on with the recipes…
Recipe 1: Sandwich, Toastie or Wrap
Let’s start with something simple, if you haven’t got the time to make a whole meal why not incorporate the goodness of wild garlic into something as easy as a cheese sandwich, toastie or wrap. This way you get all of the benefits without any of the faff. Why not use it as a replacement for lettuce or spinach for a fresh garlicky addition. Don’t use too much – it’s pokey stuff!
Recipe 2: Wild Green Mayonnaise
This is a super easy way to incorporate all your essential greens into your diet by adding them to a spread. Mayonnaise is a favourite, and I can then add it to sandwiches or use it as a healthy dip. Just shred the wild garlic and stir it into your dip of choice. If you want to push the boat out why not add a few more wild greens; garlic mustard, hairy bittercress, chickweed, nettle (blanch the leaves first) and cleavers are all in season now and are just as good for you!
Recipe 3: Wild Spring Salad
This is another easy recipe to incorporate wild garlic into. If you’re a fan of salads and making them interesting and delicious, why not add some shredded wild garlic? I’ve found that all parts of the plant can be used in the salad to add some interesting flavours and textures. The stems have a real crunch to them and make a substitute for beansprouts. You could substitute lettuce with wild garlic leaves, but you might find you want to bulk it out a little with some shop-bought leaves, or later in the season why not use the wild garlic seeds (lightly toasted) to add a sharp pep of garlic to your salads.
This is another great recipe to experiment with your wild greens, why not add some cleavers, nettle, ground elder or ground ivy. You could also add some fresh edible wildflowers like primrose, gorse or dog violet to give your salad a pop of colour.
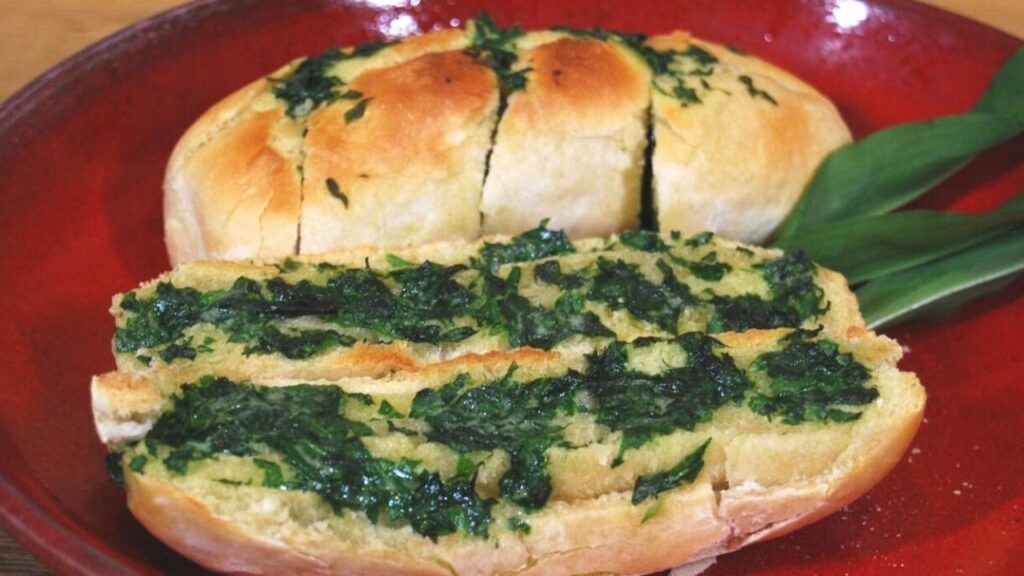
Recipe 4: Wild Garlic Bread
This is a great way to get some wild food into your kids. Most children love garlic bread and this is a classic recipe that is just so moreish it could quickly become your favourite wild garlic recipe. It’s also unbelievably easy; chop up the leaves fine and mix with butter. Next, simply cut some horizontal slices into a bake-at-home baguette and add a dollop of the garlic butter to each gap. Stick it in the oven as per the pack instructions and you’re done. This of course goes great with Italian food.
Recipe 5: Wild Garlic Pesto
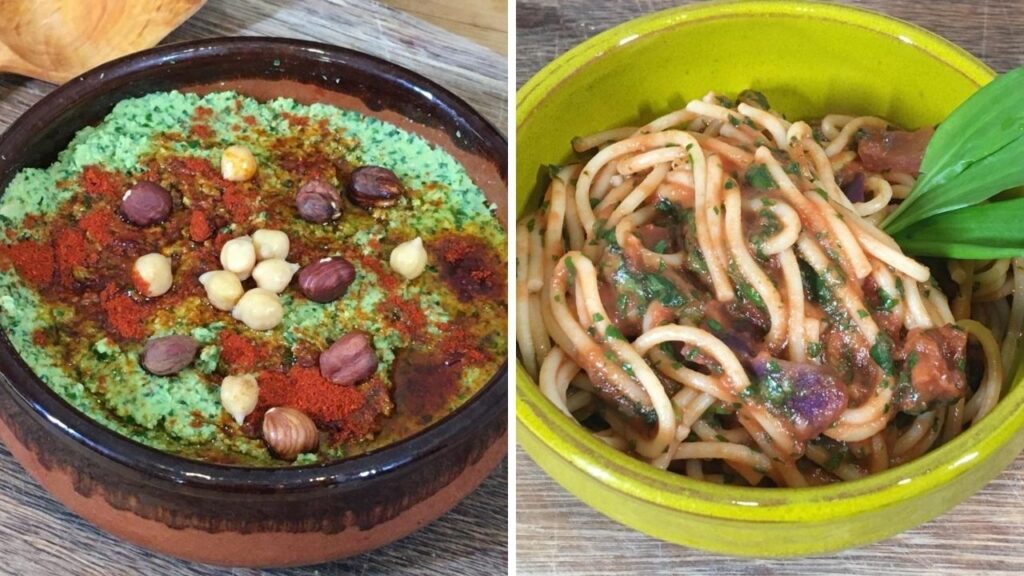
This recipe needs the least description or introduction as you’ll find recipes for this all over the web. It’s such a classic and one of the easiest recipe there is. In a nutshell you replace the basil in your standard pesto recipe with wild garlic to make a subtle garlicky pesto that can be used in a range of ways. Mixed into pasta is the most obvious use but you could spread a little onto a cheese toastie, mix it into a rice dish or as a filling in a pastry. We’ve made our own pestos that bit more wild by replacing the pine nuts for chopped hazelnuts.
Recipe 6: Wild Garlic Kimchi
We think this beats pesto hands down any day. This recipe is one of our favourites of the year, so much so that we even have a whole separate video on how to make this. You can check out that video below and also learn about the fantastic health benefits of eating kimchi. Kimchi is a Korean side dish, traditionally of fermented vegetables with ginger and chilli and is incredibly good for gut health. We’ve substituted the radish and cabbage for wild garlic leaves.
Fermenting is a fantastic way of preserving and extending the season for wild foods into the whole year. Not only this but the process of preserving our foods is something our ancestors would have practised regularly in order to have the food they would’ve needed to survive winter, it’s an essential skill and connects us with our predecessors and their way of life. It’s often the case that we can put little thought into what we eat, but fermenting foods helps us foster a deeper connection with the earth and importantly, our food. I would highly recommend trying this if you want to enjoy wild garlic beyond spring. A jar of this stuff doesn’t last long in our household.
The reason kimchi is so good for us is that it creates live, healthy bacteria which goes into our gut and aids in digestion, boosting the immune system and overall health of the body. The bacteria encourages everything to function as it should. In order to ensure there is no harmful bacteria fermenting in the kimchi it’s important to sterilise your equipment before you start, this can be done in a hot wash in the dishwasher, but you’ll need a more thorough sterilisation of the jar you’ll be fermenting in.
For this dish you will need a generous helping of wild garlic as it will reduce down quite a lot. If you want the full recipe and step-by-step instructions on how to make this fantastic dish check out our video tutorial here.
Recipe 7: Pasta Sauce
This is another really easy way to incorporate healthy greens into your diet with minimal prep time. We’ve made a tomato based sauce, but you can incorporate wild garlic into any pasta dish you want, and with any combination of vegetables, there’s a lot of creative freedom with this recipe. We’ve also chosen to make a batch of this sauce and jar it for later use, which means we pre-cooked the vegetables we added, but you can make enough just for one portion of pasta and simply add it all to a pan. Once left in the fridge this sauce should last for a week or so.
We added fried onions, chopped basil and sun dried tomatoes alongside the garlic to a base of chopped tomatoes, stirred all together and jarred. Alternatively, you could make a pea pesto and stir in your garlic leaves, broccoli, peas and fennel for a vibrant green sauce, or mushroom and garlic leaves with a splash of cream for a warming mushroom sauce. Bear in mind that any dairy products used will mean the sauce won’t keep as long.
If you pre-make your sauce and add it to the pasta once it has cooked, stir it in for only a couple of minutes, if the wild garlic leaves are cooked for too long they will lose all their structure and goodness. Similarly, if you’re cooking a sauce from scratch, add the garlic leaves last thing so they’ve just wilted.
Recipe 8: Baked Hummus
Just like regular shop bought hummus, this dip goes really well on toast or with some vegetable sticks, but this recipe adds the beautiful taste of wild garlic too. We bake this hummus to soften the sharpness of the raw wild garlic but if you don’t mind strong garlic flavours with your hummus why not give it a go without cooking it. Again, this recipe is very simple, just add some shredded wild garlic leaves into your favourite hummus recipe and bake.
Baking it also gives the top layer a really lovely crust that adds some lovely texture. As well as adding wild garlic we’ve made this really unique by drizzling a little oil and adding some hazelnuts before baking to really make a showstopper of a dip. If you’re extremely organised you might have foraged and stored your own hazelnuts last autumn but if not (which is most of us) the shop bought ones will do instead.
Recipe 9: Wild Garlic & Elf Cup Stuffed Pepper
These stuffed peppers can be eaten as a side but really they take centre stage, they’re visually very vibrant and beautiful. We use couscous as the main filling and as well as wild garlic we take advantage of another seasonal delight; the scarlet elf cap mushroom (Sarcoscypha austriaca).
We pre-cooked the couscous and made a batch of the filling so we can make as many stuffed peppers as we want. Just remember when you’re cutting your pepper you want to remove a circle around the stalk and scrape out the seeds without damaging the structure, then simply add your filling and roast in a pan.
You can switch the filling up as well, why not use rice instead of couscous, or add a little wild garlic pesto and mozzarella for a lovely cheesy filling.
Recipe 10: Wild Saag Aloo
This is one of our favourite additions to the Indian feast we prepared, its delicious and the wild garlic really enhances the flavour of all the spices. We swap out the spinach you would typically put in this dish for the wild garlic, so you do need quite a lot as it will reduce as it cooks. Equally this would work very well using nettle instead of spinach. You can get the full recipe and method by watching the video.
As a side dish this goes really well with our other Indian themed recipes; the chicken tikka parcels, stuffed peppers and pakoras. If you want this as more of a main attraction why not have this on some naan bread with mango chutney. Let us know how you get on with this dish.
Recipe 11: Chicken Tikka Parcels
This one is a little different, using the wild garlic in a new way. This is a really interesting way to incorporate wild garlic into a meal; wrap garlic leaves around strips of chicken to make a parcel that can be fried in a pan, cooked on a bbq or roasted directly on hot coals over an open fire.
Marinade diced chicken in tikka paste with a little oil. Next pick the largest wild garlic leaves you can find wrap several layers around a few chunks of chicken. The wrapped leaves can be pinned into place with cocktail sticks but if you want to be authentically wild you can whittle a pointed end onto foraged sticks as a makeshift skewer. Once cooked, any burnt outer leaves can be peeled away, leaving a succulent garlicky parcel which surrounds the juicy chicken. If you prefer you can substitute chicken breasts for a vegetarian alternative.
The fantastic thing about this dish is that you can use any combination of spices to make it fit with a range of cuisines, the tikka curry powder we use in this recipe makes it a perfect addition to a foraged Indian feast. You could also try making a herb mix of rosemary, oregano, thyme and basil to make a side for an Italian dish or turmeric, cumin and nutmeg as part of a mezze platter.
For anyone who loves simple, outdoor cooking, using the leaves in this way eliminates the need for a pan or grill. The leaves and skewers used are all biodegradable of course and any waste can go back to the woods. This recipe really feels like a connection to our ancestors and how they would’ve cooked, it’s simple and connects us to our roots, so give it a go.
Discover More Wild Food
If all this talk of foraging has your mouth watering then you can find more inspiration from us with more good wild food stuff including; blogs, videos, outdoor courses and online courses too. If you haven’t checked out our YouTube channel already, be sure to do that here.
You can immerse yourself in the world of foraging through our outdoor courses hosted in beautiful National Trust estate woodlands in North-East Wales. Or if that’s too far afield for you we also host regular online workshops, live through Zoom where we focus on wild foods of the season and give you delicious recipe ideas, foraging tips, and expertise from special guest speakers. If this all sounds interesting, check out what’s coming up on our Events page right here.
Another way to get instant access to a whole backlog of wild food & foraging videos, recipes and pre-recorded workshops is to join our Tribe over on Patreon. In return for supporting our mission, our patrons get access to loads of exclusive resources. You can join the Tribe from as little as the price of a cup of dandelion coffee, just £3.60 per month. Find out about all the benefits right here.
Until next time, good luck with your own foraging journey.
Have you ever wanted to learn skills that would help you thrive in the wild, from how to read the landscape to lighting a fire with natural materials? My name is Emily Fox and I was asked to write about my experience attending a Bushcraft Skills Weekend with Woodland Classroom.
Woodland Classroom host outdoor courses that cover everything from tree identification, foraging and outdoor survival skills, but in reality those lines often blur as there is so much cross-over in these subjects, so I was looking forward to a little of everything. In this blog I’ll be taking you along with me as I tell you what I got up to in my weekend in the woods. To check out what other outdoor courses we have coming up click here.
I’m already a pretty outdoorsy person, I’m really into my climbing and love hiking, especially around Snowdonia and the Lake District.
I spend a lot of time hiking and running around in the woods wherever possible and have even managed a little wild camping, so I’m used to being outdoors. I saw the bushcraft weekend as an opportunity to really step up my skill level and become better at understanding the land around me and how to survive if I found myself short on anything on a wild camp or out in the woods. It was something I’d not really done before so I was excited to see what skills I could learn. Having arrived late on the Friday evening though I didn’t know it would be straight into the deep end!
I was offered the option to sleep out in what looked like the ultimate den of sticks… my answer was, of course, yes. My tent, stayed in the backpack.
Above: My home from home for the weekend. Notice the bed of fresh brush which kept me off the cold floor.
Waking Up In A House Made of Sticks
Waking up on Saturday morning after a full, busy week of fast-paced work and modern living to the sun filtering through the pine trees as I lay on a bed of bracken under the canopy of the lean-to shelter was the most relaxing start to the weekend I’ve ever had. It put me right in the zone. I’d jumped at the chance to come and help at a bushcraft weekend in Wales as it sounded like the perfect getaway, and I was even more excited when I was offered an outdoor shelter to sleep in for the night. My lean-to was made of just sticks, leaves and branches, not a plastic tarp in sight, but despite it having rained the whole day before this natural shelter was bone dry and I slept like a baby the whole night!
After introducing ourselves to the group James, our Head Instructor, took us into the woods and asked us to look at our surroundings and share what we could tell about the landscape around us. I was asked to read the landscape; what did I notice about the age of the trees, did I recognise any plant species, how might the land-use have changed over time and where could water possibly be found? This was all about waking up our inner-ancestor and looking at the land through ancient eyes, those people that relied on the land for their survival. We were then tasked with going and having a look to see what natural materials we could gather that could be useful to us. Spruce resin for fire building, blackberries for eating, flexible willow branches for weaving and spruce needles for natural medicine were all things students brought back.
Above: Constructing a kennel shelter. The whole thing is held up by just 3 poles. No rope is used.
Sharp Tools & Shelters
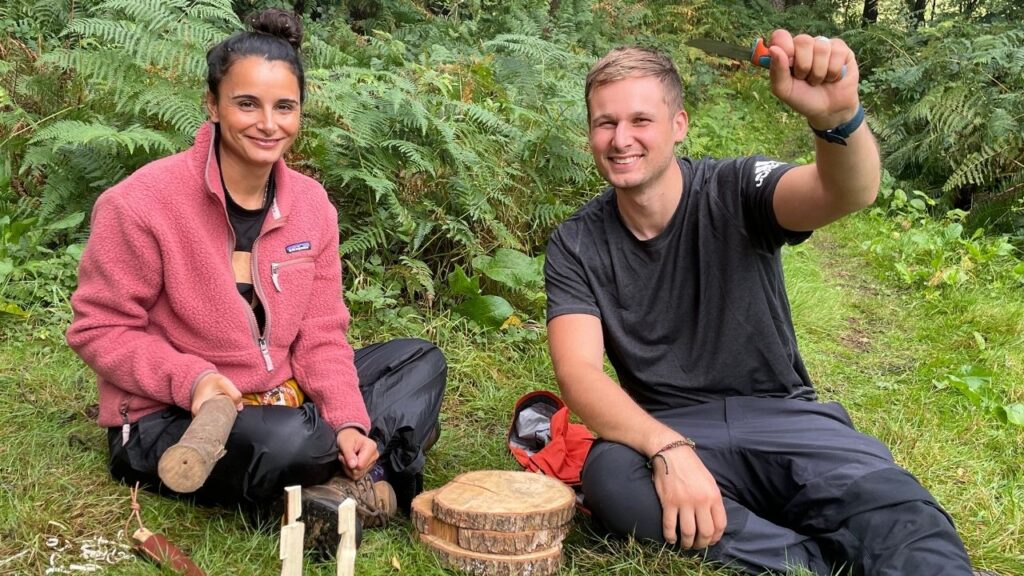
The first activity was to whittle a tent peg from greenwood, something that would come in handy later. James showed us safe ways to use a knife, cutting techniques and knife grips to use in making the peg. I was pleased with my finished peg and tucked it into my backpack for tomorrow. Having shown we were safe with the knives we were allowed to keep them on us for the weekend. Next we were onto natural shelter building, similar to the one I’d slept in last night.
The group was split into two and each team was guided through making a different style of lean-to we split into two groups and got to work building different types of lean-to shelters. James showed us how to use bundles of bracken, like thatching, to make a layered waterproof covering to keep the shelters dry. Working in smaller groups let us be super involved in each activity and allowed us to get to know the people we were working with a lot better. Using these materials was time-consuming, compared to putting up a tent, but they were also surprisingly effective and I got a real sense of achievement from creating this structure. It’s an empowering experience and I can see why bushcraft skills can be addictive – the idea of being able to fend for yourself, accessing “secret” knowledge.
Above: Other folks on the course very happy with their brand new tent pegs.
Playing with Fire
After lunch at basecamp we went back into the woods to start on fire making. We began by looking at all the components we needed to actually light and sustain a fire. The three essential aspects of a fire are heat, fuel and oxygen. I would need all of these things in abundance to keep my fire healthy. I experimented with lighting fires using modern fire-steel and traditional flint & steel. I was given cotton wall and char-cloth (made my baking natural fabrics) and I soon saw that without any substantial fuel the flame only lasted for a few seconds before dying off.
I learned that by adding an accelerant, either something I could bring with me like vaseline or something gathered from the woods, such as spruce resin. My little fire lasted a lot longer, around thirty seconds instead. We then used this principle to find natural tinder, kindling and accelerants before building our own fires, gradually building our firewood thickness until we got from a small flame to our own roaring campfire that could sustain us through the night if needed.
It really is true that once you have a simple roof over your head and a fire going, you can feel at home anywhere. The cup of tea helped.
Identifying Trees in the Dark?!
Just as the sun was setting James ran a night-time tree identification walk. Now this sounds intriguing; how can we possible identify trees in the dark? We took a stroll in the darkening woods to see if we could hone our skills, with James teaching us how to recognise trees based on just the leaf shapes, texture of the bark and shape of the tree against the sky. There were some really interesting conversations about how we each recognised certain trees. For example, someone commented on the fact that the oak tree was easy to identify by its outline because it was often used on pub signs. James encouraged us to closely examine the trees we came across; see what the leaves felt like, how the branches were structured, all whilst encouraging us to draw on what knowledge we already had. I was also encouraged to engage my other senses. I discovered that I could recognise a mature beech with my eyes shut as I could hear the crunch of the thick layer of beech mast beneath my feet – result! James was giving out ‘bushcraft points’ to anyone with correct answers. I earned 5 bushcraft points for remembering that holly leaves further up the tree aren’t spiky because animals don’t graze on them, then lost another two for excessive gloating, oops!
Easy Like Sunday Morning
Another comfortable night in my stick home, with the tawny owls hoots for company. James had explained that by crafting a raised bed from, logs brash and bracken layered up that it raised my body off the cold ground and so added a lot of insulation. It’s said that layers below you are much more valuable than a layer on top when sleeping on the earth.
I started Sunday with a nature-awareness exercise, called the Sit Spot. James talked to us about connecting with nature by taking a moment to sit outside and quietly observe what was happening around us, without expectation or agenda. With that we each slunk off into the woods to find a quiet comfortable spot. I sat for 20 minutes to take in everything going on around me before coming back and reporting what we had seen, heard or felt. It was lovely to start the day by connecting deeply with our environment. Tis is a real contrast to the attitude I adopt when hiking where the purpose of being outdoors is to get from one place to another, rather than simply allowing myself and nature to be.
Above: Hanging out billy can above the fire using campcraft skills. Filtering dirty water using natural materials.
Making My Ultimate Woodland Getaway
The majority of today was all about putting together the skills we had learnt so far. The goal was to be able to set up our own shelters, start a fire and make a cup of tea in our camps. I would need to use my knife for cutting, shelter building skills, I’d need a way to hang my billy can over the fire and I’d need plenty of firewood. Lots to be getting on with.
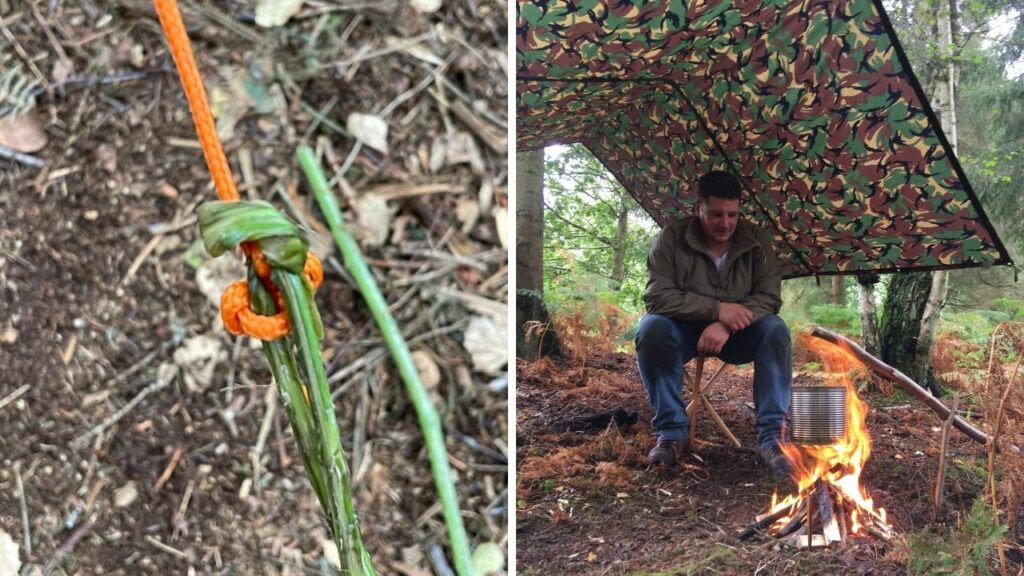
The first activity was to filter water using natural materials we could find in the woods as well as artificial ones to. We would not be drinking the water we filtered aa this should only be done in a real situation, but it was good to see the principles at work. We then worked on making natural cordage using nettles and bramble. This cordage could be used for our shelters or for hanging our billy can. James showed us how to identify the most suitable bits of plant to use and how to dry and braid the strands to make a strong cord which could be used for years.
Since yesterday we all made a natural shelter, today we were given a one-person tarp (called a basha) to rig over our makeshift camps. James introduced me to a couple of knots for getting it all taught. Our group decided to combine the tarp alongside the lean-to I slept out in so we had a covered area for our outdoor fire – very cosy indeed. Our whittled tent pegs and natural cordage came in handy here and we saw how strong this natural fibre really was when put to the test of holding up our shelter.
Next we worked we turned to campcraft skills with the challenge of creating something that could be used to hang our billy can for boiling our brew over the fire. I worked with a couple of others, each of us made a different part of the frame from hazel wood before moving the various components over to our camp. Each group came up with a totally different way of solving the problem which was good to see. My trusty tent peg came in handy to anchor the pot pole. I used my wild cord to make the billy can adjustable so we could lower it down or back up depending on how intense we wanted the boil.
Above: We combined paracord with our bramble cord to tie off our shelter. Matt looking very content in his woodland home.
Making Fire… in Heavy Rain!
It was time for the big finish, practising ancient fire by friction skills. Something I had read about and seen on YouTube but not done myself yet. Now it’s very important that certain components of this traditional fire-starting kit be kept bone dry. We were all set, feeling somewhat confident… and then the heavens opened! We were to make our fires using bow drills and due to the rain coming down we decided to work in teams to increase our chances of success rather than everyone struggling individually in unideal conditions. I get the feeling this is how our ancestors would have pulled together in a real situation… so it’s not cheating.
Once James showed us the technique I was surprised how quickly we achieved smoke and the beginnings of an ember. James tressed how success comes not from powering through to eventual success but using good technique and communication with each other to ensure the best chance of making fire. Unfortunately, for a beginner like me, these were not ideal conditions. The rain was getting heavier and this made it hard for us to create any sparks or for a flame to catch in our tinder nest, but with a little help, we eventually managed to get a roaring fire going and enjoyed a well-earned hot cup of tea from our billy can. Job done!
Above: Me working with my group on fire-by-friction to get a good ember for our fire.
Home & Dry
At the end of the day, we had practiced the skills to go out into the woods and thrive on what we could find around us in a sustainable and nature-focused way.
There was something very rewarding about managing to make the bow drilling a success despite the elements being against us. We were shouting when we finally got it going it was an amazing feeling and even though we were all pretty tired at the end of the weekend I definitely felt like I had learnt so much. It was more than just learning skills to use outdoors, it was changing the way I thought about nature and being creative with how I solved any problems I might face if I was in the woods without certain tools. I’ve definitely caught the bushcraft bug.
Ready For Your Own Adventure?
I can highly recommend this course and I’m looking forward to attending more in the future, especially the Wild Food and Foraging Day. If you’re looking for a quality and fun experience like this then do check out our upcoming courses.
Woodland Classroom host outdoor courses on bushcraft skills, wild food & foraging, nature connection and tree identification all surrounded by the beautiful National Trust estate woodland of Erddig and Chirk Castle in North-East Wales. Courses are available for adult learners, families and private bookings. Get in touch if you’d like to know more.
Emily Fox is our Outdoor Activities Assistant, on placement to Woodland Classroom for 12 months. She hopes one day to run her own outdoor activity business where she can share her passion with others.
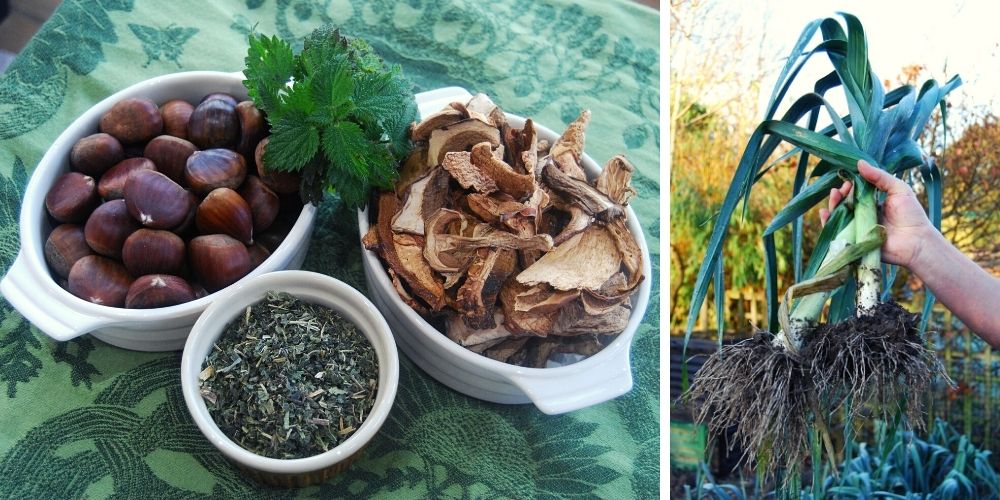
Do you want to bring a little WILD to your Christmas table this year? Learn how to make our delicious Wild Woodland Stuffing which includes foraged ingredients; mixed woodland mushrooms, sweet chestnut, wild garlic bulbs and nettle.
Making this stuffing not only gives you a great excuse to get out in the woods in the run up to Christmas to gather some wild ingredients, but it tastes great and it will be the talk of the table.
This stuffing recipe was created by James and Lea Kendall. We are foragers and outdoor activity leaders based in North Wales. We found that using some of the wild foods that we’d been gathering all year in this stuffing was a satisfying way to celebrate our foraging journey over the past year.
The stuffing gives a strong, earthy flavour. This recipe serves 8 – 10 people, or if you’re a smaller group then there’s enough for turkey and stuffing sandwiches on Boxing Day 🙂
INGREDIENTS
270g breadcrumbs (wholemeal works best)
30g dried wild mushrooms – we used penny buns (ceps), parasols and brown birch boletes
4 bulbs wild garlic, finely chopped, use fewer if you want a less strong garlic flavour
300g cooked and peeled sweet chestnuts, roughly chopped
2 leeks, finely chopped
25g butter, plus extra for greasing the tray
1 tbsp olive oil
15g of fresh nettle tops or dried nettle leaves, finely chopped
2 eggs, beaten
Salt and pepper to taste
METHOD
Preheat oven to 180°C, gas mark 4.
Soak dried mushrooms in 350ml boiling water for 10 minutes so they soften. Drain, keeping the liquid for later, and chop them into small pieces.
Add a few tablespoons of the mushroom liquid to the breadcrumbs, gently mix and leave to soak for 5 minutes until flavoured.
If using fresh nettle tops, pour boiling water over the leaves to kill the stings and leave for 5 mins before draining then chopping finely.
Heat the butter and oil in a pan, add the leeks and garlic and cook until softened. Tip into a bowl and leave to cool slightly.
Stir in the remaining ingredients to the bowl until well mixed up. Season with salt and pepper then form into balls and place onto a buttered tray or dish.
Cook in the oven for 20 minutes until golden and crispy on the outside.
For the ultimate wild Christmas dinner, you could serve this stuffing with roast wild pheasant or partridge.
DISCOVER MORE FORAGING
If you want to get outdoors and learn foraging for yourself then you could come on one of our popular wild food courses.
We host our courses both in the woods in North East Wales and also regularly online through zoom sessions.
Check out our upcoming events to see what wild food courses we’re hosting soon:
James & Lea host wild food and foraging course in North-East Wales. Get in touch to find out more.
A DEEPER LOOK AT THE FORAGED INGREDIENTS
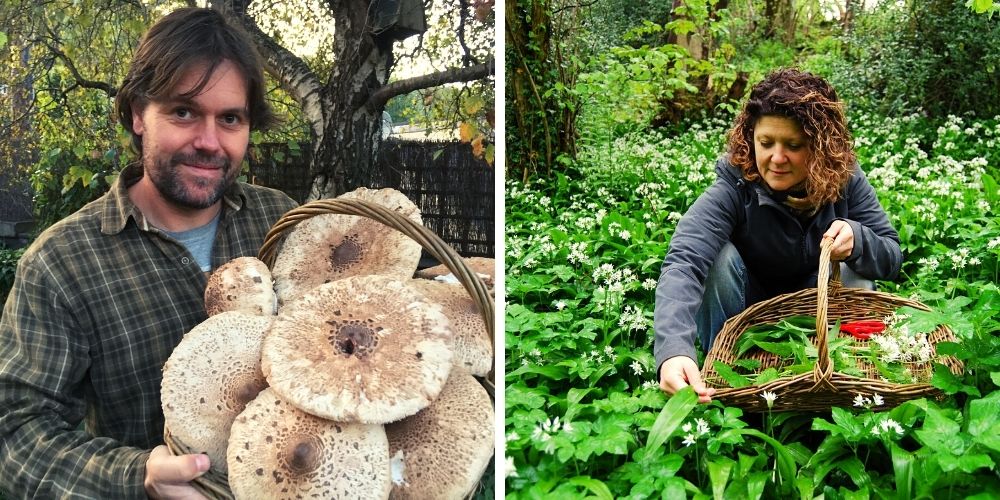
In our recipe we used the following species of wild mushroom; parasol mushroom(Macrolepiota procera), penny bun(Boletus edulis) & brown birch bolete(Leccinum scabrum). These were selected because it’s what we had available dried already. There’s no doubt that the parasols and penny buns have great flavour, however the birch bolete is more bland and not an essential ingredient for your own recipe.
If you don’t have a supply of dried wild mushrooms that you’d foraged back in autumn then you could always buy a pack from the local deli.
When gathering nettles(Urtica dioca) at this time of year, it’s all about beating the frosts so you don’t get withered leaves. Only pick the top four leaves of the nettle and go for the plants which are in good condition and still young. They can be found in December, especially if you look where land has been grazed or cut, so you get nettle regrowth.
Unless you have had the mystic foresight to roast and then freeze some foraged sweet chestnuts back in the autumn, you’re probably going to have to head to the shops again.
Notice the shape of the bulb; tapering at either end and bulbous in the middle. Length is around 5-6cm.
DIGGING UP WILD GARLIC BULBS – GOOD PRACTISE
If you’re thinking of digging up wild garlic(Allium ursinum) bulbs then bear in mind that you’re are actually removing the wild plant from it’s habitats, not just harvesting the leaves which renew each year. So there’s a coupe of things we need to think about here so we’re exercising good practise as foragers:
It is the law in the UK that you need the landowner’s permission to uproot any wild plant.
You should only dig up bulbs from a spot where you know there to be an abundance of wild garlic in the spring, that way we’re only taking a very small amount of what’s in the ground.
If you dig up any other bulbs that are not wild garlic then they must go back where and as you found them.
You can see here that bluebell bulbs are a different shape to wild garlic bulbs too.
Lastly, it’s worth mentioning english bluebell(Hyacinthoides non-scripta) which also grow from bulbs and can often by found in amongst wild garlic at ancient woodland sites. We don’t want to be digging these up and eating them, they are poisonous.
If the bulbs you’re digging up don’t smell strongly of garlic then they’re not what you’re looking for. So, give the bulb a sniff before putting it in your basket. Bear in mind that when handling a lot of garlic your fingers will start smelling of it too so make sure you’re smelling the bulbs and not your fingers 😉
OUR COVID-19 METHOD STATEMENT by WOODLAND CLASSROOM LTD.
Statement updated 22rd Sept 2020
After a break from outdoor activities during lockdown we are now beginning to return to the woods with our exciting range of courses for adults and families, and looking further ahead, for children.
Below we have set out how we are going to do this so that our clients have confidence that we have considered the current situation and are acting responsibly. We will continue to monitor the Welsh Government guidance as and when it changes.
We would like to take this opportunity to thank our good friends at Woodland Ways Ltd. for their support in helping us prepare this method statement.
In Summary
Here’s the essentials of what our customers need to know about how we are currently operating within the government guidance:
All organised children’s outdoor activity days including holiday clubs, birthday parties and outdoor education are currently on hold. We hope to be back with holiday clubs in the new year.
Adult outdoor courses are going ahead with restricted group sizes and social distancing & increased hygiene in place. An additional risk assessment has been written to make us more COVID-19 secure.
We will not be hosting events at National Trust properties until at least 1st September in accordance with the Trust’s own risk assessment. In the meantime, alternative venues are being arranged as appropriate.
We are continuing to expand our offering of online learning covering wild food, tree identification, bushcraft and nature connection.
Our monthly Home Education group, Pathfinders, is planned to start up again from October, but with certain restrictions in place. Contact us to find out more.
We are taking bookings from schools, event organisers and groups for the future, please get in touch to discuss what we can offer you.
Customer Statement
All the precautions and measures put in place that we have listed below are subject to change according to the government guidance. If you have a question, please get in touch. Detailed below is what you can expect from us when undertaking courses and events in Wales.
The safety of our customers and our staff is a primary concern for us.
If you have made a booking for an upcoming course or event and you cannot attend as you are ill or shielding, then we will issue you with a 2 year voucher to use on any Woodland Classroom course, event or product to the equal value of your booking.
We have taken on the Welsh Government’s guidance given: “Sport, Recreation and Leisure; guidance for a phased return” and we have also consulted with our piers in the industry and the Institute for Outdoor Learning, for best practise, of which we are an active member.
As of 23rd July all our adults and family courses will operate with a maximum of 16 participants, using a ratio of 1 instructor to 8 students.
All courses and events will operate with government approved numbers.Note: The current advice in Wales is that groups of no more than 30 can meet for an organised outdoor activity.
Courses Specific COVID-19 Methodology Statement
Activity: Running of all education course activities and events at our established outdoor venues with adherence to Welsh Government specific advice.
Venues included:
Erddig estate, Wrexham
Chirk Castle estate, Wrexham
Aberduna Nature Reserve, Flintshire
Hawarden Estate Farm Shop, Flintshire
Attendance on the course
It is important for all clients that should you, or a member of your household, become or are already unwell with symptoms of coronavirus you should inform Woodland Classroom Ltd. immediately and should not travel to or attend your course. If you are at our venue already then you should cease activity immediately and alert a member of staff whilst taking steps to isolate and remove yourself.
If you are self-isolating as a result of Covid 19, Woodland Classroom Ltd. will forfeit its rights under our terms and conditions to deeming this a cancelation by the client and instead will provide you with a 2 year voucher to undertake that course, or a similar course, within that time frame from your original booking. We recognise these are unusual times, and we want you to book with the assurance that you will not lose your money.
What we expect of you, and what you can expect of us
Prior to the course
Please ensure you have read the kit list and have all items with you. FAILURE TO BRING ANTI BAC HAND GEL AND A PERSONAL FIRST AID KIT WILL RESULT IN YOU NOT BE ABLE TO ATTEND THE COURSE. Clients will be informed of what makes up a Personal First Aid Kit in advance of attending.
Your instructors will have changed into their uniform at the venue to minimise any risk of cross contamination, you may wish to consider doing the same if you are visiting shops/public spaces before the course
Clients must complete a premedical questionnaire and registration form prior to arriving at the course and have this printed out to bring with them.
Meet and greet
Effective from 23rd July until further notice all courses will have no more than 8 clients per 1 instructor, with a maximum of 16 customers in attendance. Ratios will be reviewed increase at the time the government guidance allows.
From the moment of stepping out of the car, we would request that all employees, sub-contractors, apprentices and clients at all times remain 2 metres apart (unless you are from the same household) there should be no hand shaking or other contact with people from outside your household.
Clients will place their signed copy of their registration forms and premedical questionnaire into the plastic wallet provided at the meeting point, confirming to the instructor that you have answered no to all medical questions and understand your responsibilities. Employees will not handle this paperwork for at least 72 hours and therefore we are asking you to be open to the fact that you have read it and have signed the document.
You will be welcomed by the instructor and will be expected to have read the following safety brief:
Safety Brief
The weekend is designed to be fun and no one will be forced to do anything they do not wish to do.
Please respect everyone’s wish to practise social distancing, beyond the recommended 2m guidance, and their choice to wear a mask if they wish to.
Any rubbish that can be burnt should be burnt. If the rubbish cannot be burnt, e.g. metal or glass and plastics, this will need to be taken home with you.
For small cuts you should have a simple first aid kit with you; containing at least plasters and antiseptic wipes. For more serious injuries we have a first aid kit in basecamp and an accident book to record injuries in. All Instructors are first aid qualified. Please note due to COVID-19 our instructors have been told NOT to provide mouth to mouth resuscitation in case of collapse, but to undertake chest compressions only unless directed otherwise by the emergency services, further first aid treatments will be at the discretion of the instructor but may involve them telling you and guiding you how to treat the wound yourself.
If any medical information has changed since making your booking could you please advise an Instructor, all information will be kept confidential and we are interested in where your medication may be.
If lifting heavy items tat require 2 people, please follow good manual handling practise and share your lifting only with some from your own household. If this is not an option, the item(s) cannot be moved.
Due to COVID-19 no activity should take place that involves exertion within a 5-metre space of anyone else (e.g. fire bow)
A pegged out display of 2 metres and 5 metres will be demonstrated
Once it has been agreed everyone is aware of the safety brief, you will then be directed to basecamp with the instructor.
On arrival in camp & for the remainder of your course
You will be provided with a demonstration on handwashing with no running/piped water, everyone will be requested to wash their hands.
For everyone there is a compulsory handwash every 2 hours (using your own anti-bac gel) during the teaching day, water is available for those who wish to handwash more. Handwashing must comply with our handwashing instructions which comply with UNICEF guidelines, a jug should be used to pour the water over the hands of the client into a collecting bowl underneath and then disposed of in a dedicated hole at the edge of camp.
Please note we have provided face guards for any member of staff who wishes to use them, please respect this if an instructor puts one on. This is in no detriment to how we view you; it is the instructor’s personal choice. We are however of the understanding that the outdoors is very low risk.
Each client will be issued with their own equipment (as appropriate) as well as a water supply for the duration of the course – these should not be handled by anyone else outside of your household. This equipment will have been left fallow for 72 hours prior to your course commencing, or if a course has been held within this time frame the equipment will have been disinfected thoroughly.
Any further tools and or equipment that are used through the course (e.g. fire bow kit) should be picked up from the unused pile and placed in the used pile when you have finished with them. These will then either be left fallow for 72 hours or cleaned thoroughly before the next use. Hands should also be washed after each session.
In camps where there is a rustic table, we would request that clients do not use this area. The area will be disinfected after each use by an instructor.
All shared handheld equipment will be disinfected every two hours with the dedicated disinfectant spray, e.g. storage boxes and kettle
All staff & clients should avoid touching their face and if there is a cough or sneeze this should be done into a tissue and disposed of in the fire. If no tissue is available, it should be done into your arm
It is not practical to put up signage within the woodlands however the key messages of social distancing and cleaning will be enforced by the team if necessary. If there is a failure to adhere to social distancing measures, then we will have no choice but to remove you from the course.
In the toilet there is a blue roll and some spray disinfectant, before and after each use we would ask you to wipe down any contactable surface and burn the blue paper with the lighter provided, and then request that you wash your hands.
In times of inclement weather paper towels/blue roll should be used for drying hands when weather does not allow for drying, and then disposed of, ideally in the fire.
You may notice that if there is a rare event where an item has to be passed to you, it may be placed on the ground for you to pick up, this is to ensure social distancing. All instructors are washing their hands within a 2-hour time frame also.
If you are within the clinically vulnerable, or extremely clinically vulnerable category, or if you live with anyone who is in either of these two groups, please consider whether you wish to take advantage of our 2 year postponement offer, we will of course welcome you to this course, or one in the future.
Our risk assessment is relating to COVID-19 is available to view upon request.
In case of emergency evacuation people do not have to stay 2 metres apart if it is unsafe to do so.
Any personal litter should be burnt or removed at the end of the day and taken home.
The evidence suggests that wearing a face covering does not protect you, but it may protect others if you are infected but have not developed symptoms- however the risk is deemed to be extremely low when operating in an outdoor environment. We will leave it at your discretion should you decide to wear a facemask. If you decide that you would like to wear a face covering, we would ask you to follow the below recommendations:
wash your hands thoroughly with soap and water for 20 seconds or use hand sanitiser before putting a face covering on, and after removing it
when wearing a face covering, avoid touching your face or face covering, as you could contaminate them with germs from your hands
change your face covering if it becomes damp or if you’ve touched it
continue to wash your hands regularly
change and wash your face covering daily
if the material is washable, wash in line with manufacturer’s instructions. If it’s not washable, dispose of it carefully in your usual waste
practise social distancing wherever possible
The above is about protecting our team, as well as yourself and your other course participants
Where numbers of participants and activities dictate the need, then a number of fireplaces will be established to maintain social distancing.
Clients will be refused entry on the instructor’s discretion based on appearance of potential symptoms.
Social distancing should take place during ALL sessions. Each session has been re-designed to ensure you have the safest possible experience. If you are at all unsure about how something will operate please contact us prior to the course, or ask the question directly to the instructor during the course.
Last reviewed on 23rd September 2020, using the Welsh Government guidelines updated 20th July 2020.
Calling all tree lovers. Do you ever get overwhelmed by the amount of tree species out there and can’t tell one from the other? Would you love to expand your tree knowledge further and deepen your connection to the natural world? Well, I’m really excited to finally reveal what I’ve been working on for the past year…
THE COMPLETE TREE ID COURSE: An exclusive online course to take you from Tree Beginner to Tree Expert. All led by James Kendall from Woodland Classroom.
I’ve released a sneak preview of the full online course which you can watch here…
As I said, I’ve been filming videos for this course for over two years now, visiting trees in all four seasons, and taking hundreds of photographs. With coronavirus having cancelled or postponed all our outdoor activity work I now have the time to put the whole thing together for you.
I’d love to have your feedback, comments and constructive criticism on the video, as it will really help me highlight what works well and what could be improved for you. Simply drop me an email at hey@woodlandclassroom.com
Here’s what I hope to include in the full online course:
Approx 50 species of trees, both native and common to Britain and Ireland.
Videos of each tree species in winter, spring, summer and autumn – so you can see how the tree changes throughout the year and what to look out for.
Downloadable identification guide ‘cheat sheets’ which you can take out into the woods with you.
Hundreds of photographs, both on location and in-studio, which highlight the distinctive features in each tree.
Regular live webinars/chats with course students so you can get direct contact with me and other learners to help you on your progression from tree novice to expert.
An exclusive facebook group with all students so you can share questions, pictures and experiences.
You will get a certification of completion.
Excuse the pun but… I’ll help you see the wood for the trees 😉
There will be lots more information coming soon but if you’re interested in being one of the first to know when more details are released, drop us an email at hey@woodlandclassroom.com and I’ll sign you up to our Tree I.D. Course Mailing List.
MORE ABOUT YOUR TUTOR
I thought I’d include some more information myself and my professional background so those of you interested in knowing more about your Tree I.D Tutor…
I am the Head Bushcraft Instructor and Forest School Leader at Woodland Classroom. I have been working in environmental education & conservation for over 10 years now. I received the Bushcraft Competency Certificate awarded through the Institute for Outdoor Learning after 2 years of teaching experience and practical study. Before setting up Woodland Classroom Ltd I was the Project Manager for Long Wood Community Woodland, the largest community-owned woodland in Wales, overseeing the management of 300 acres of broadleaf and conifer forest. I am also a former Director of Llais y Goedwig, the voice of community woodlands in Wales.
My approach to teaching has always been with an emphasis on steering my students toward fostering a deeper connection with nature through understanding the landscape around us. Bushcraft skills are an effective way to do this as we learn about using natural materials and how we can live with the land, whilst also connecting with our own ancient past by seeing the land through the eyes of our ancestors.
I have always had an affinity with woods, being at home amongst the trees, and I’ve made it my mission to study under some of the UK leaders in bushcraft, greenwood crafts and sustainable woodland management including; Dave Watson (Woodland Survival Crafts), Ben Law (woodsman, author, and eco-builder) Patrick Whitefield (permaculture teacher and author) and Mike Abbott (author and greenwood craftsman).
Woodland Classroom would like to issue the following statement to provide our customers with an update on our precautions and preparations in light of the Coronavirus (CORVID-19) pandemic.
In-line with the escalating situation and Government guidelines, we have taken the hard decision that we will be postponing ALL our courses and events, for both kids and adults, throughout March, April and May. We will continue to review the situation and advice on a weekly basis looking to June and onwards.
This is an incredibly tough time for us as a small business but it’s important to do the right thing for everyone’s safety. Over the last week, we tried to roll with the punches and keep some of our events going but things have changed so fast in just a few days and it would be irresponsible for us to now host our sessions in the current climate.
Our policy is to re-schedule all courses and events to a point where it is more appropriate. Every client who is booked on to our courses/events in March, April & May will be contacted personally over the next few days outlining our schedule, please be patient with us and respect the fact we are fighting for our livelihoods.
If you have booked onto an event or course that has been affected and you cannot attend the rescheduled date then we will issue you with an 18-month voucher to use on any Woodland Classroom course, event or product.
If you have any concerns or questions, please call us on 07876 794 098 or send an email to hey@woodlandclassroom.com
Stay safe, stay active and remember that self-isolation doesn’t mean you have to stay indoors, but remember that the current advice is to keep 2 metres apart from others. So it’s best to avoid travelling to access nature. Use your garden, local park or green space and please avoid “honeypot” nature spots such as popular tourist destinations. Nature is a healer and strengthener of the immune system and you don’t have to go far to find it.
Lastly, we’d like to say thank you to everyone who has already reached out to us with messages of support, we really appreciate it.
Planning your Summer Camp program for 2019? Struggling to come up with new and engaging ideas? Don’t worry, it can be a tricky process, especially when you want to incorporate original concepts to avoid doing the same old thing.
Between managing staff, organising logistics and marketing your camp, coming up with new program ideas can be challenging. We’re here to help, with our list of 5 activities to make summer camp memorable in 2019.
1. A Minecraft™ Inspired Outdoor Adventure
It’s the video game with over 91 million monthly players and a loyal cult following. Kids love it, so why not encourage them outdoors with a Minecraft™ themed adventure? Designed to get today’s digital generation off their screens and back outdoors, Wildcraft Adventure™ takes the best bits from the video game and transforms them into an outdoor experience they’ll never forget.
It’s a brand new way to engage the digital generation in the kind of outdoor adventures that us adults loved when we were kids. This game includes outdoor classics like den building, fire-lighting and scavenger hunts and combines them with video game elements like scoring points, beating monsters and gathering magical items – it’s like living in a real video game. Plus, players will have to use bushcraft, survival skills, teamwork and problem solving throughout.
“Wildcraft is the best activity we have ever found!” Brenda Sutter, Laurel Tree Charter School, California
It’s designed to be as simple as possible for activity leaders to run with all the tools, resources and guides you need. Find all the details here or watch the video…
Kids love mystery and surprise so, creating original and interesting scientific experiments can be a real winner. You don’t need a physics degree make this happen either, just some common ingredients, clear instructions and the necessary safety precautions. Here’s a few cool ideas to get you started:
Make a Solar Oven Believe it or not, it all starts with a pizza box. Kids will love it!
3. If You Can’t Beat ‘Em, Join ‘Em: Host Themed Days
Yes, you may have done this a hundred times over – but, add a twist and the kids will love it. Get together with your camp counselors and have a think about recent kids movies and trends. From Deadpool and Marvel to Disney and Lego – there’s always a new craze you can get on board with.
Whether you decide to hold a fancy dress day or create activities based on a theme – the options are endless. You can also easily add educational elements in like languages, geography and performing arts.
4. Incorporate Mindfulness
Mindfulness and wellbeing are hot topics for adults at the moment, so why shouldn’t it be for kids too? With the modern pressures of social media and the internet, children need to learn the power of mindfulness just as much as adults. Schools across the US are increasingly incorporating it into the curriculum through a range of activities, so here’s how you can do it at summer camp too:
Combine Mindfulness with Bushcraft
This practice combines nature and ‘rewilding’ to help kids reconnect with the outdoors. By assisting with nature conservation and learning bushcraft survival skills, there are proven benefits that kids’ mental health can improve from the experience.
Practising bushcraft requires children to adopt a mindful approach to their actions as patience, awareness and concentration are all key to mastering activities like knife craft and ancient fire-lighting.
Pair Up Mindfulness and Yoga
Not only does yoga enhance stability and focus, it also aids relaxation and mental wellbeing. Plus, it’s a great way to take a break between daily activities and inject some calm into your program.
Mindfulness and Meditation
Whether you decide to do a seated, walking or guided meditation, it can have a surprising impact on behaviour and mental wellbeing for kids. Here’s a handy article from the ACA (American Camp Association) on how to get started.
“Kids are accustomed to using their senses to experience life. They look, touch, smell, and even taste their way through the world. This natural inclination toward mindfulness makes teaching kids to meditate easier than we thought. In fact, it’s a no-brainer.”Laurie Palagyi
Mindfulness and Roleplay
Get the kids to become the animals that live in the woods! Why not use roleplay to introduce kids to mindfulness through engaging them with nature? Check out our handy video on how to use animals as a starting point for practising mindfulness in nature. It’s proven to work with kids and adults.
“Animal Form Games invite participants to empathize with animals, to imitate their attitudes, and, to the best of their human-bodied ability in the throes of a game, practice animals ways of moving.”Coyote’s Guide to Connecting with Nature
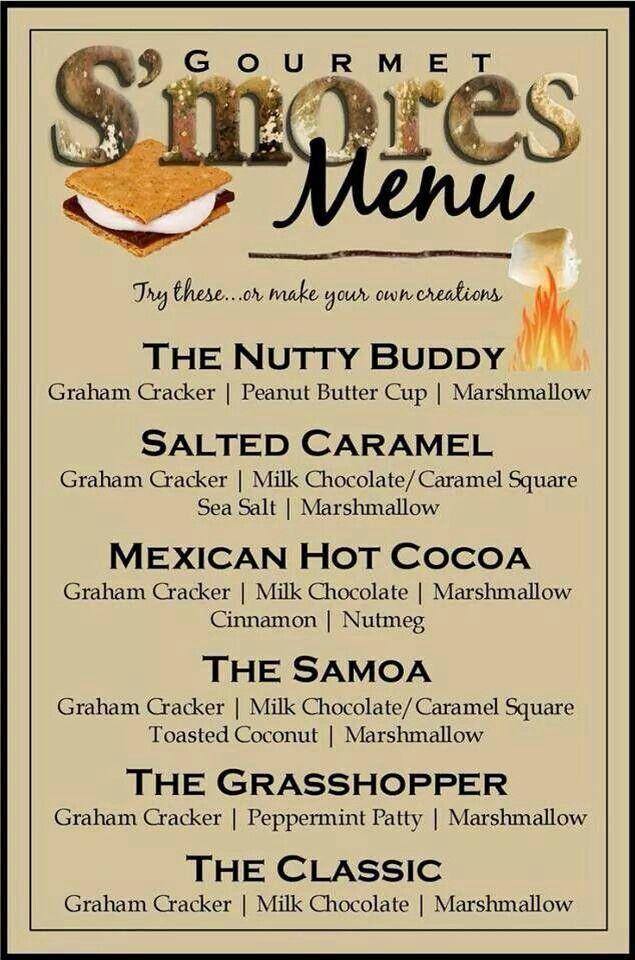
5. Get Creative with Campfire Cooking
New flavours and foods can be a real treat for kids. Explore world foods, host a mini street food festival and at the same time enhance outdoor cooking skills with new and original recipes. No need to go gourmet with this one, simple yet tasty will be a winner every time.
Here’s a few delicious ideas to add you to your Summer Camp program for 2019:
Hopefully, these activities will give you food for thought when putting that all-important program together. If you’re still stuck for ideas though, head to Pinterest which offers a goldmine of tips, tricks and activities, perfect for camp.
If you’re interested in the Wildcraft Adventure™ but aren’t 100% sure about how to implement it, contact us here and we’ll be more than happy to give you all the details you need.
James & Lea Kendall are the creators of Woodland Classroom. “Through our passion, enthusiasm and experience we help people connect with nature, feel healthier and have meaningful experiences through positive activity and creative play.”
“We are experienced outdoor educators with a background in bushcraft, forest school and nature therapy, who love what we do.”
Are you looking for a simple but tasty treat that could go head-to-head with marshmallows as the number one campfire snack with kids? Well look no further…
We cook A LOT of marshmallows over the campfire with kids when we host our Forest School sessions and Woodland Birthday Parties. We know children love them, but they are not exactly a nutritionists best friend. They also contain gelatine made from pork or beef and we’re getting a lot more requests from parents who want vegetarian or vegan friendly campfire snacks for their kids when they come out to the woods with us. Last but not least, they’re sticky residue is a nightmare to get out of your clothes. Luckily, we have the solution.
Toffee Apple Slices are our alternative to marshmallows and kids love them! Granted they’re still coated in sugar but kids are getting some fruit down them and this recipe is vegan too. Our favourite sugar to use is coconut blossom sugar, as it less refined and less processed than regular sugar but any soft brown sugar will do the trick. They make a great hot campfire snack anytime of the year, especially in the autumn when you can walk out to an apple tree and pick the fruit straight from the branch.
Ingredients
Apples
Light or Dark Brown Soft Sugar
Cinnamon and Nutmeg – add to taste
Cooking Method
To get a fire that really makes the most mouth-watering toffee apple slices it’s best to let your flames die down and roast your apples over the hot coals – just like you would with a bbq. This will save them from burning.
First gently roast your apple slice over the fire until it begins to go soft and the pulp starts to bubble up.
Next, dip your hot apple slice in a tray of soft brown sugar until it is well coated. Be careful it doesn’t fall off the stick.
Roast your coated apple slice over the fire again until the sugar starts to melt.
Now for the final touch… let your apple slice cool for a minute and the sugar will harden up and give your apple a crispy toffee coating – simply delicious.
Eat and repeat!
For a slightly spiced variant on this snack then try sprinkling some cinnamon and/or nutmeg into the sugar. Ginger would work well too.
Which Wood Should You Use?
For your roasting stick we would recommend using either a hazel, willow or sycamore stick. At Forest School this can be a whole activity in itself, identifying the tree in the woods, cutting a suitable branch responsibly and reducing the damage to the tree, then practising some basic whittling skills by slicing away the bark near the tip and making a sharp point.
We would recommend using green (fresh) sticks from a tree as they are more resistant to the fire than dead twigs, so will last longer.
Sycamore – the winter twig and full leaf.
FUN FACT:Sycamore (Acerpseudoplatanus) actually contains it’s own natural antibacterial and antiviral properties, which is one reason why it is very sought after for use in kitchenware. This makes it a really safe wood to use for roasting sticks when out in the woods with kids.
Full disclosure, I personally can’t stand marshmallows, even though I cook so many, so I was very glad to discover this tasty alternative. Thanks to the Forest School Leader who shared this cooking idea with us at a skill share training day in Derbyshire last year, I can’t remember your name but we’re forever grateful 🙂
Happy cooking everyone.
James
James & Lea Kendall are the creators of Woodland Classroom. “Through our passion, enthusiasm and experience we help people connect with nature, feel healthier and have meaningful experiences through positive activity and creative play.”
“We are experienced outdoor educators with a background in bushcraft, forest school and nature therapy, who love what we do.”
Baking bread out in the woods has always been one of those mystic arts to me. Something that, like tool sharpening, seems shrouded in mystery. With my ongoing Bushcraft Instructor training I thought it was high time that I made an effort to try it for myself. What’s the worst that could happen?
I also had a 4 litre dutch oven sitting in my shed, which was a Christmas present 2 years ago. I always felt a bit guilty when I came across it. So it was time to do it justice.
I’ve seen it done before but couldn’t for the life of me remember the exact method the teacher used at the time. So when it came to our next bushcraft training sessions I told everyone that I would bake them a loaf for the evening. The challenge was on.
The trick to using a dutch oven, as far as I understood it, was to get an even heat around the whole pot so that your bread would bake all round. So what was needed was a campfire that had been burning for a while to produce a good amount of hot coals, more like what you’d get in a barbecue. It’s this bed of coals and ember that makes an effective cooking fire, rather than roaring flames. I actually brought along some Welsh charcoal for the bake as I wasn’t sure what state the communal fire would be in by the time I came to experiment. This worked really well but I imagine if you use hardwood firewood and burn it down to coals it would be just as good.
Above: This is not the same loaf as I cooked as it was dark by the time I was baking. You can see though how the coals have been placed on top of the oven lid it help it bake with an even heat.
The good news is that the loaf was a success! In fact it was one of the best loaves I’ve ever tasted, and even better that it was fresh out of the oven. Everyone complimented my on it and the mystery of using a dutch oven is firmly behind me, though I imagine there’s a lot to learn yet. For anyone who wants to give it a go for themselves I’m going to share that tasty recipe with you now….
STOUT & FRUIT SODA BREAD
This recipe fed 6 adults with a very generous slice of bread. They all loved it. Any left over stout can be generously gifted to a camping buddy that likes that sort of thing. I prefer cider myself. Having enjoyed this loaf myself I can say that it was delicious straight out the oven and didn’t even need any butter to improve it though you can try that if you like. It tasted more like a cake than bread 🙂
WHAT YOU NEED
4 litre dutch oven • large mixing bowl • mixing spoon (whittled by yourself preferably) • a metal dish that will sit in the bottom of your oven • 4 small stones (trust me)
INGREDIENTS
2 big overflowing handfuls of strong wholemeal flour
2 big overflowing handfuls of strong plain flour
A half handful of sugar (caster sugar is best as it’s finer)
1 heaped tablespoon of baking powder
1 good pinch of salt
1 big overflowing handful of mixed dry fruit
1 egg
1 can of stout
Keep some extra spare flour left aside for dusting the metal dish
METHOD
Mix up all the dry ingredients together. I did this in advance before the trip and put them in a plastic tub so it would save doing it around the campfire at night.
In your mixing bowl make a well in the middle of the dry mix and add crack the egg in. Then mix with your wooden spoon.
Slowly add the stout until all the dry ingredients are mixed in and you have a ball of dough that holds it shape.
Coat your metal dish in a light layer of your spare flour. This will stop the bread from sticking to the dish.
Place your dough onto the floured dish and sprinkle a little sugar on top.
Now it’s time to use those 4 mysterious small stones. These are placed evenly spaced at the bottom of the dutch oven. The metal dish is then placed on top of these so it sits comfortably. What this does is elevate the dish from the bottom of the dutch oven to allow the air to circulate. This all helps prevent the lower crust from burning.
Place the lid onto the oven and pop it into your campfire.
We surrounded the oven with a ring of charcoal and placed some hot coals evenly on top. This is the part of the process that inly experience can teach you and I’m looking forward to trying this recipe again and seeing if the cooking time changes. I imagine it depends on how hot your fire is and how even the coals are around your oven.
I checked the loaf after 15 minutes and we all agreed it needed longer.
I cooked my loaf for 25-30 minutes but I think i could have got away with taking it out a bit sooner. You will see some burn on the left hand side of the close up picture. This is where there was a flaming log placed right up against the dutch oven so I think it caused that side of the oven to be hotter.
The last tip I was given was to use a clean knife to push into the middle of the loaf. If it comes out clean then the bread is ready.
Above: The complete loaf. Not bad at all for a first effort. In fact it was one of the best breads I’ve ever tasted.
By the way, did you know that the phrase “the upper crust” comes from a time when those who could afford it would get the more valuable upper section of the loaf rather than the often burnt bottom. So the rich were referred to at the “upper crust.”
I hope this has inspired you to try dutch oven baking for yourself. I’ve definitely got the hook and have made a promise to myself to try a different recipe each time I go camping now. Suddenly the world of outdoor baking has completely open up to me. It’s a real sense of achievement.
We use cookies on our website to give you the most relevant experience by remembering your preferences and repeat visits. By clicking “Accept All”, you consent to the use of ALL the cookies. However, you may visit "Cookie Settings" to provide a controlled consent.
This website uses cookies to improve your experience while you navigate through the website. Out of these, the cookies that are categorized as necessary are stored on your browser as they are essential for the working of basic functionalities of the website. We also use third-party cookies that help us analyze and understand how you use this website. These cookies will be stored in your browser only with your consent. You also have the option to opt-out of these cookies. But opting out of some of these cookies may affect your browsing experience.
Necessary cookies are absolutely essential for the website to function properly. These cookies ensure basic functionalities and security features of the website, anonymously.
Cookie
Duration
Description
cookielawinfo-checkbox-analytics
11 months
This cookie is set by GDPR Cookie Consent plugin. The cookie is used to store the user consent for the cookies in the category "Analytics".
cookielawinfo-checkbox-functional
11 months
The cookie is set by GDPR cookie consent to record the user consent for the cookies in the category "Functional".
cookielawinfo-checkbox-necessary
11 months
This cookie is set by GDPR Cookie Consent plugin. The cookies is used to store the user consent for the cookies in the category "Necessary".
cookielawinfo-checkbox-others
11 months
This cookie is set by GDPR Cookie Consent plugin. The cookie is used to store the user consent for the cookies in the category "Other.
cookielawinfo-checkbox-performance
11 months
This cookie is set by GDPR Cookie Consent plugin. The cookie is used to store the user consent for the cookies in the category "Performance".
viewed_cookie_policy
11 months
The cookie is set by the GDPR Cookie Consent plugin and is used to store whether or not user has consented to the use of cookies. It does not store any personal data.
Functional cookies help to perform certain functionalities like sharing the content of the website on social media platforms, collect feedbacks, and other third-party features.
Performance cookies are used to understand and analyze the key performance indexes of the website which helps in delivering a better user experience for the visitors.
Analytical cookies are used to understand how visitors interact with the website. These cookies help provide information on metrics the number of visitors, bounce rate, traffic source, etc.
Advertisement cookies are used to provide visitors with relevant ads and marketing campaigns. These cookies track visitors across websites and collect information to provide customized ads.


 We cook A LOT of marshmallows over the campfire with kids when we host our


 WHAT YOU NEED