Call us on: 07876 794098

bushcraft

Park in the Past - the new home of Woodland Classroom

An Exciting New Venue For Our Future

The BIG news we’ve been sitting on for the past few months can finally be announced! Woodland Classroom are moving, to a new venue. It’s a home which is somewhere quite unlike anywhere else.

Just north of Wrexham lies an ambitious project like no other, Park In The Past. It’s a place where not only can you explore woodlands or try your hand at water-sports, but you could also stumble across a full-size Roman fortress! As we said, this place is special.

Set in the ancient Welsh landscape, the park comprises 120 acres of outstanding natural beauty offering woodlands, wetlands, meadows, footpaths a magnificent 35-acre lake and the gorgeous River Alyn winding through it. To find out more about the venue, visit their website here.

The aim of Park In The Past is to create a totally unique visitor attraction. There is the country park itself which local people are encouraged to explore and enjoy the nature trails. Then there is the historic aspect where the project seeks to recreate an ancient landscape, winding the clock back to the Roman invasion of Britain. This is where the Roman Fort Build comes in. Visitors can walk amongst the construction site of a full-size timber and earthwork fort recreated using traditional techniques wherever possible. It’s pretty impressive!

park in the past collage history

Above: It’s not uncommon to see a Roman soldier wandering the pathways. Visitors can explore the fort build and seek out the ‘neolithic’ stone chamber.

Our blend of bushcraft, woodland skills and outdoor education marries well with what the team on site are trying to achieve here, complimenting what is already on offer.

Phil Hirst, one of the Park Directors told us; “All of the team at Park in the Past are really delighted to welcome James and Lea Kendall from Woodland Classroom to our heritage and conservation attraction in January 2023. Our new partnership will extend the range and quality of inspiring experiences for visitors. James and Lea’s unique approach to engaging with Mother Nature and forgotten country crafts will greatly enhance our ability to improve the mental health and wellbeing of our communities. We can’t wait to get started!”

James Kendall, Head Bushcraft Instructor at Woodland Classroom shared his enthusiasm; “We are extremely excited to be working with Park in the Past and can’t wait to be able to offer our courses and events at this fantastic venue. We will be bringing our established programme of bushcraft, wild food foraging, forest school and nature-based wellbeing to this site as well as a whole host of new courses for people who want to develop their outdoor skills or deepen their connection with nature.”

If you want to check out our upcoming courses and events, you can do that right here.

“Park in the Past brings so many new opportunities for us with a huge space offering woodland, meadows and scrubland, not to mention the lake which could enable us to offer bushcraft combined with canoeing in the future – two things that go so well together. Where else can you be exploring woodland one minute and then stumble over a Roman fort? The ongoing experimental archaeology projects here are great opportunities to link in our traditional woodland skills and greenwood crafts also. We are also looking forward to lending our experience of sustainable woodland management and working toward improving biodiversity on site as part of our ongoing activities.”

park in the past collage - watersports

Above: The site features a 35 acre which hosts a range of water sports. There is also opportunity for pond dipping and river studies with our groups.

Park in The Past is managed by a Community Interest Company which has been set up to restore and manage the former Fagl Lane Quarry. The project aims to establish a balance between the sustainable management of habitats reserved exclusively for wildlife, and the sensitive utilisation of the site for commercial, educational and interpretative purposes. Park In The Past aims to create a balanced mixture of safe wildlife havens as well as areas for people to safely enjoy the site.

Park In The Past is easily accessible from the A55 North Wales Expressway. Chester City Centre is only 20 minutes drive away. Central Wrexham is just 15 mins drive away. The site is also within walking distance of Hope railway station.

The venue has lots of exciting plans for the future including the construction of a Celtic village and farm, a state-of-the-art visitor centre and a growing educational programme for schools focusing on ancient British history. As time goes on this venue is going to get better and better.

park in the past collage - park & wildlife

Above: The park is haven for wildlife and the woodlands are being managed with a view to improving biodiversity for the future.


Some people have asked us what this all means for Woodland Classroom offering courses and hosting groups at both Erddig and Chirk Castle. We’ve had a strong relationship with the National Trust, having hosted our courses at these venues since 2016 and we will continue to offer Felin Puleston Outdoor Centre at Erddig as a venue for outdoor education. In addition, a number of our bushcraft and foraging courses will still be hosted at Chirk Castle as it is a site which offers a completely different set of flora and fungi to Park In The Past. This way we can demonstrate the diversity that different sites can offer to the bushcrafter or forager. However, Park In The Past will become our principle home going forward.

Look out for more announcements over the coming months for our new course programme, venue launch event and the development of our new Bushcraft Basecamp and Forest School activity areas at Park In The Past. Our sincerest thanks go out to Paul and the rest of the Park In the Past team for letting us come and play in their sandbox.

If you are interested in bringing your school class, group or family along to a session with us at Park In The Past for a session with us then do get in touch.

We’re excited for the future and can’t wait to share this new venue with you all.

James & Lea

The Perfect Wild Mushroom For Beginner Foragers: Parasols

There is something magical about the idea of going out to the countryside and finding wild mushrooms to cook with. It scratches an ancient itch in our hunter-gather brains. If you’re looking to get into this addictive hobby then the Parasol Mushroom (Macrolepiota procera) is a great beginners fungi for anyone wanting to start wild mushroom foraging.

My name is James, I teach Bushcraft and Foraging in North Wales. I am the co-creator of Your Wild Food Year, an online course for anyone wanting to gain confidence in identifying, harvesting and cooking with wild foods. In this article I will introduce you to this commonly found edible fungi. You will learn how to identify it, where and when to find it, how to cook with it and what poisonous lookalikes you will need to avoid. Let’s dive in.

how to identify parasol mushrooms - wild food & foraging

Where & When Can you Find Them

We have found good specimens as early as late July but it’s most often seen from late August and through September.

You’re most likely to find it in meadows and unimproved grassland. I’ve also found it at the edges of ancient woodland. The three locations I see it often are all National Trust estates, so that points to land that has been consistently managed over a long period.

At what growth stage should you harvest them? Well you can pick them when they’re not yet fully opened. But if doing this be sure you’re not confusing them for the Shaggy Parasol (more on that below). Basically if the specimen looks like it’s in good condition you’re good to go. Ensure you fungi is free of mold, sliminess on the gills and the cap is not starting to wilt. One word of caution, you do often get the odd maggot or two inside the cap, which you only find when you’ve taken them home and started to chop them up. These are more typically found in older specimens. If there’s just one or two, I pick them out and use the mushroom anyway. What you do is down to personal preference.

how to identify parasol mushrooms - wild food & foraging

how to identify parasol mushrooms - wild food & foraging

How To Identify Parasol Mushrooms

Well, true to its name it resembles a parasol umbrella. You’ll find a distinctive brown ‘nipple’ raised in the centre of the cap. The cream-white cap meanwhile is also patterned with light brown scales. Something that is important (you’ll see why later) is the typical size of the cap. When fully open they can grow to 15-35cm across diameter, so they get seriously big! You’re getting a lot of food from your forage here.

Looking underneath the cap you will find gills rather than pores. These are cream-white in colour. The flesh of the mushroom doesn’t discolour when bruised, it stays cream-white.

The stem (otherwise known as a stipe) is again cream-white in colour and looks like it’s covered in a snakeskin pattern. It can grow quite tall, reaching up to 25cm in height. You will also typically find a ring surrounding the stem. If handled carefully this can be separated from the stem and then it runs up and down freely. Another good way to identify this fungi.

You shouldn’t forget to use your nose when learning to identify wild mushrooms. Some fungi have really distinctive aromas, like Dryad’s Saddle which smells surprisingly like melon. Parasols have a pleasant mushroom-like smell which some say reminds them of warm milk.

how to identify parasol mushrooms - wild food & foraging

how to identify parasol mushrooms - wild food & foraging

How To Use Parasol Mushrooms In Cooking

Parasols have a nice, firm texture and a pleasant mushroom flavour. They do dry well, retaining their smell and flavour. So, we often slice up any excess mushrooms and pop them in our dehydrator. This means you can enjoy them right through the winter in your cooking.

Some people prefer just eating the caps but you can eat the stem, in fact some experts say there’s more goodness to be found in the stem of fungi than the cap. The flesh is not as soft as the cap though, so some folks use these for making a mushroom stock.

Like most mushrooms they go great in an omelette, in a quiche, stir fry or added to a stew. Try deep-frying them in breadcrumbs and serving with lemon and garlic mayo. The sheer size of the cap makes them an excellent replacement for the a large field mushroom in your cooked breakfast. Lovely stuff all round!

wild mushroom and nettle tart

We made this tasty wild mushroom and nettle tart, cooked in our dutch oven over the campfire.


Caution: Beware The Shaggy Parasol

As with any foraging of wild mushrooms, you need to widen your knowledge beyond just the species you’re looking for, or think you’re looking at. As the old saying goes; “There are old foragers and bold foragers, but there are no old, bold foragers.” Heed these wise words folks.

If you’re going out looking for Parasols then you need to be aware of the closely related and similar looking Shaggy Parasol (Macrolepiota rhacodes). This is not a poisonous species, however with around 20% of people it’s been known to give them a bit of an upset stomach.  It’s found in similar habitats and at the same time of year. Let’s learn more about the differences between the two fungi.

As the name suggests it is shaggier in appearance. Also the base of the stem is typically more bulbous than with the Parasol. It also doesn’t grow as large as the Parasol, the cap only getting to around 8-15cm in diameter and the stem reaching 12-18cm height. So a good way to avoid Shaggy Parasols would be to only pick fungi that are larger than this.

Remember that the flesh of the Parasol doesn’t bruise when handled? With the Shaggy Parasol this isn’t the case. The gills will bruise red and the flesh will turn an orange/red when you cut it.

This fungi also has a ring around the stem, but unlike the Parasol, this ring will not separate from the stem. So there’s another method of differentiating between the two.

shaggy parasol - wild mushroom foraging

Shaggy Parasol (Macrolepiota rhacodes). It can give some people an upset stomach. Image by Canva.

So, can you eat this mushroom? Well yes, but as I’ve said it can disagree with some people. So good practise is to try just a little bit and leave it 48 hrs to see if your stomach is happy. If so, tuck in. Be aware though if you are going to eat the Shaggy Parasol, it must be cooked first.

One last fungi to mention here are the Dapperlings (Lepiota spp.) They are poisonous so need to be avoided. How could they be confused with Parasols though? Well they have a distinctive brown spot in the centre of the cap too. However, the saving grace is that they do grow much smaller than the Parasols. As a general rule, avoid picking any Parasols whose cap is less than 12cm in diameter.

Hopefully this has not put you off heading out the door for your first Parasol mushroom. If anything I hope it will make the thrill of the hunt even more enjoyable and the reward of positively identifying your Parasol all the more satisfying.

dapperling - a poisonous wild mushroom

Stinking Dapperling (Lepiota cristata). A common member of this poisonous group. Note how much smaller it is than the Parasols when fully opened out. Get to know them. Image by Canva.


Discover More Wild Food

If all this talk of wild food and foraging has whetted your appetite then you can take your learning further with us either outdoors or online.

You can immerse yourself in the world of foraging through our outdoor courses hosted in beautiful National Trust estate woodlands in North-East Wales. Or if that’s too far afield for you we also host regular online workshops, live through Zoom where we focus on wild foods of the season and give you delicious recipe ideas, foraging tips and expertise from special guest speakers. If this all sounds interesting, check out what’s coming up on our Events page right here.

I think you’ll also be interested in our flagship online foraging course called Your Wild Food Year. When you enrol on this course you will go from clueless to confident on your journey to enjoying foraged plants, fungi, fruits and more with this detailed guide to identifying and cooking with the best wild edibles of Great Britain & Ireland.

Discover the joy of finding, harvesting and cooking with wild food with the very best each month has to offer. You will learn what to look for, where to look, and what to do with it in the kitchen. You will have videos, photo galleries, recipes and more at your fingertips, all taught by experienced foragers. Discover over 70 wild foods!

Crucially, you’ll also learn when to look. As each month we bring you the edible fungi, flowers, fruits and foliage which are in season from January to December.

There is even a FREE TASTER version of the course so you can try before you buy and see if the larger course is something that’s a good fit for you. So, start your journey to becoming a confident wild food forager today. Find out more right here.

“I’d always loved the idea of foraging for wild mushrooms but was too scared to try it. This course has shown me which species I can pick with confidence. The wild fungi hot spots I’ve discovered in my local area are now my closely guarded secret 😉 Thanks Lea and James.” Matt Corcoran

Your Wild Food Year - online foraging course

Until next time, stay safe and remember to always be 100% sure you have correctly identified a wild edible before consuming it. Good luck with your own foraging journey.

James

how to identify native conifers UK

Which Conifer Trees Are Native to Britain?

Are you confused by conifers and flummoxed by firs? In this article you’re going to get to know the native conifer trees of Britain & Ireland and learn the top five key features you need to look for so that you can easily recognise them in the countryside and tell them apart from the many non-native conifers you may find.

Conifers are not rare in this country, you can find them everywhere. As a general rule, they are also evergreen (though there is an exception, the Larch) so they hang on to their foliage right through our winter. With the majority of our native trees being broadleaves, losing their leaves in autumn, this makes a conifer easy to spot from a mile off.

But are you looking at one of our native conifer trees or is it one of the many non-native species which have been introduced to this country?

Before we get into this topic, you might be interested in my FREE Tree ID Course online, it’s called Kickstart Your Tree ID Skills and it includes videos, downloads, photo galleries and quizzes on trees in all four seasons of the year. If this sounds good to you then you can enrol for free right here.


What is a Conifer?

Conifers are a very old group of trees that includes firs, cedars, cypresses, junipers, kauri, larches, pines, hemlocks, redwoods, spruces and yews. As a rule, conifers bare cones, though some don’t look much like cones as we think of them. The other key feature they share is they have very small leaves in the form of needles or scales.

With the exception of some Scots Pine in Scotland and a few Yew woodlands, you will not comes across a natural forest of conifer trees in the UK and Ireland. They are most likely planted non-native species, usually for timber production or as a shelter-belt woodland.

When we picture a conifer, we usually have a Christmas tree in mind, which is typically a Spruce. But there’s more to conifers than simply this conical cone-baring form. Especially when it comes to our own natives.

how to identify conifers

Above: Conifers can come in a variety of weird and wonderful forms.


How Many Native Conifers Do We Have in the UK & Ireland?

Well the good news here is that we have only three native conifers. By native, we mean a species which have been naturally present on these isles since the last Ice Age and before we became disconnected from the continent. Our three native conifers are Scots Pine, Juniper and Yew.

Take a trip around the globe and you could be dealing with up to 800 conifer species. So, we’re quite lucky in the UK & Ireland that we only have three to tackle.

It’s not just the trees featured in this article that you could well see on your country walk though. There are several species and families of conifer trees that are very commonly planted here, either for forestry or in country estates and parks for their sheer beauty. You’d be forgiven for thinking that Larch, Spruce, Firs and Hemlock could be part of the natural make of our landscape but they are all guests from exotic lands.

So, let’s get to know our three natives and pick out the key identifying features you need to look for.


Scots Pine (Pinus sylvestris)

There are several pines which has been introduced to this country including the Corsican Pine (Pinus nigra var. maritima) and Lodgepole Pine (Pinus contora ssp. latifolia) to name a couple, but we have only one native and the clue is in the name, Scots Pine. However, don’t be fooled, this tree isn’t found only in Scotland, you could see it anywhere. In its natural range though it does favour uplands and poor soils. The oldest Scots Pine in the UK can be found in Scotland in the Caledonian Forest.

how to identify scots pine - pinus sylvestris

Left: Needles are in pairs, joined at their base. Middle: A ripe cone, still closed. Right: A mature cone having dropped its seeds.

Before we get into the specific details of Scots Pine, it’s worth mentioning a feature that is unique to pines. If you follow a single pine needle back to its base, where it joins the twig, you will discover it is joined to one or more other needles. Pine needles come in twos, threes or fives. This is important because conifers like spruce have needles which are attached singly to the twig.

I was told this handy little rhyme by Dave Watson of Woodland Survival Crafts to help me remember this rule; “If it’s a pair, it’s a pine, but not all pines are pairs.” By using this rhyme we can eliminate other families of conifers and know that we are looking at a pine. So, that leads to the question, how do we know it’s a Scots Pine?

To identify the Scots Pine there’s a few key features to look for:

  1. Needles come in pairs, joined at their base to the twig. Needles are approx 5 to 7.5cm in length. This is important as a commonly planted non-native, the Corsican Pine, also has needles in pairs, but they are significantly longer. Corsican Pine needles can grow to 15cm long.
  2. Needles often have a twist to them.
  3. Mature bark is a warm brown to orange colour with a craggy character. Also, look for a band of orange on the main trunk about a third to two-thirds up the tree. This is especially visible in clear sunlight.
  4. Pine cones. These are the typical cones used for Christmas decorations that you are probably familiar with. They take two years to mature. Cones are green and conical in their first year on the branch. In their second year they become more rounded and brown-grey in colour.
  5. Mature trees have a habit of spreading  and flattening out in their crown, so losing the “Christmas tree” conical shape we think of when picturing a conifer.


how to identify scots pine - pinus sylvestris

Left: Look for an orange band on the trunk some way up the tree. Middle: Bark is craggy and covered in plates. Right: The crown of mature trees flatten out.


Juniper (Juniperus communis)

You might know this tree best from its berries, or rather what’s its berries are used to flavour… gin.

This is by far the least common of our three native conifers. It is mostly a tree of upland areas, but you can find it formally planted in country estate gardens where it can be trimmed to shape. It’s worth noting though that Juniper is probably the most widespread tree species in the world, found from the Arctic to the Mediterranean.

how to identify juniper - juniperus communis

Left: Typically a low-growing and spreading tree. Middle: Ripe berries are blue to black in colour. Right: Needles grow in threes. They are very spiky.

In the UK, Juniper tends to favour chalk and limestone sites.

To identify Juniper you’re looking for the following things:

  1. Typically a low-growing, sprawling shrub of a tree. Though not always.
  2. Needles are small (up to 2cm long), very spiky to touch and they grow in threes.
  3. The mature bark is a reddish-brown colour which has a peeling habit.
  4. Berries. When mature they are dark blue/black. They are small and spherical. When young they are green in colour. You will only find them on the female trees. So, this feature can be a little unreliable.
  5. Crush a berry between you fingers, it will smell of gin. This also works with the twigs & foliage, but be careful, it’s spiky!

The ripe fruit of the female Juniper are generally called berries, but they are actually classed as cones.

There are several cultivated varieties of Juniper which you can pick up in your local garden centre.

how to identify juniper - juniperus communis

Left: Bark is reddish-brown and peeling. Middle: Young berries are blue/green. Right: Juniper can be an upright, single-trunked tree, but this is less common.


Yew (Taxus baccata)

We can lay claim to some of the most spectacular Yew trees in the world, as they are the oldest living organisms in the UK. It’s thought that some are as old as five thousand years! There is hot debate as to which is the oldest living Yew, but the most likely candidates, in my opinion, are in Wales.

how to identify yew - taxus baccata

Left: Yews are often found in churchayrds. Middle: Needles are soft to touch. Right: Bark is patchy with reds, browns & purples.

You are most likely to find a Yew in your local churchyard, looming over the gravestones. Many of these trees predate the church they are paired with.

To identify the Yew tree you’re looking for a few key things:

  1. Glossy needles are up to 4cm long. They are arranged flat, along green twigs.
  2. The needles are soft to the touch, unlike spikier spruce trees.
  3. The mature bark of Yew is quite beautiful. Look for red-brown bark with a peeling habit that can show patches of oranges, purples and blood red. When wet, patches of the bark can look like they’re bleeding.
  4. The bright pink/red oval berries of the Yew are very different from anything else you’ll find on a conifer. You will only find these on female trees, so don’t rely on this alone.
  5. Mature trees will typically have more than one stem, growing from the base.

Yew trees don’t have cones. This makes them easy to distinguish from pine, spruce and fir.

how to identify yew - taxus baccata

Left: Pink/red berries are unmistakable. Middle: Needles arranged flat, on green twigs. Right: Bark is peeling and full of character.


Discover More About Trees

It can be so interesting to really look in to the details of our native trees and notice the changes that they undergo throughout the four seasons. That’s just what I’ve created for my FREE introductory online course called Kickstart Your Tree ID Skills. Here you will find a whole host of resources to take you from clueless to confident on your way to really knowing your trees.

REGISTER FOR THE FREE COURSE HERE

kickstart your tree id skills, free online course

When you sign up to this free mini-course you’ll be identifying common trees with video tutorials and photo galleries at your fingertips. Start your journey to becoming a fully fledged Tree Expert today. The course includes Tree ID Cheat Sheets which you can download and take outdoors with you.

“I’ve been frustrated for so long trying to learn my trees myself and haven’t gotten far. This course answered everything and has seriously upped my game.” Dr. Patrick Alexander


Happy tree hunting folks.

James

free winter tree id guide to UK & Ireland

FREE Winter Tree ID Guide

Many of us might well be able to spot an oak in winter by looking for fallen acorns or the familiar leaves, but could you tell me the difference between blackthorn and hawthorn in winter just by looking at the buds? Or do you know which trees give themselves away in winter by their bark? We might be able to identify trees in summer when their leaves are on but winter is a whole different ball game.

For anyone looking to improve their tree identification skills winter provides us with many distinctive signs such as buds, bark, twigs and fallen leaf litter that we can use to recognise our native and common tree species. The clues are all there if you know how to look.

In this blog I’ll introduce you to some of clues to look out for in winter and break down the differences between common trees which often get confused. You can get outdoors and spot these clues for yourself with a free download I’ve created; Winter Trees Guide, which you can get your hands on just below.

free winter tree id guide to download

By the way, if you love trees, but struggle to tell one species from another, then you could enrol in my FREE Tree Identification Course online. More details can be found at the end of the article.


Bud Arrangement: The BIG Giveaway

One of the first things you can ask a tree when you are trying to identify it in winter is this; “Are the buds arranged alternately or in opposite pairs?”

This is absolutely key to nailing the species of tree as once you’ve answered that question it allows you to eliminate a whole bunch of species from your enquiry.

The majority of native tree species in Britain have their buds arranged alternately along the branch.

One last thing to remember; it’s important to select a young healthy twig to answer this question because as a branch matures it will often self-select the healthiest of the twigs to grow on and will drop it’s near partner. So, you can be looking at an older branch and thinking that they definitely don’t grow in opposite pairs, but then on closer inspection you might well notice the old scar left over from where it’s opposite equivalent was self-selected to be dropped by the tree in favour of it’s partner.

When you become practised at this you will begin to start noticing the bud arrangement from a distance, as you look at the form of tree. This is when tree identification can become very satisfying and you can really start showing off.

In the Free Winter Tree ID Guide I’ve grouped alternate budding trees separate from opposite budding trees for easy reference.


Blackthorn vs. Hawthorn

Let’s take two very common trees which often get confused. Not only are their names similar, but they also are thorny, shrubby trees which populate our hedgerows, often growing side by side.

To help confuse matters both these species have alternate buds and the buds are very small and grow in cluster at the end of the twig. So, we need to look at other clues to help us out.

hawthorn and blackthorn winter tree identification

Above: Blackthorn (Prunus spinosa) on the left, Hawthorn (Crataegus monogyna) on the right. The difference is clear.

The first thing to look for is leaf litter below the tree. As you can see from the picture, the leaves shapes are very different. However, this method is unreliable when you’re looking at a dense hedgerow and the two species are intertwined. How can you tell which tree the leaf has fallen from? Luckily, there are other signs we can go to also.

identifying blackthorn and hawthorn in winter

Above: Blackthorn on the left, Hawthorn on the right. Bark is a feature you can use year round to identify a tree.

Looking at the bark is going to be useful here as, like the leaf litter, they are very different. The bark of blackthorn, as its name suggests, is very dark and seems to soak up the light. It is also generally quite smooth. The bark of hawthorn is much more grey to brown and fissures readily, being much more craggy.

As well as the bark you can look at the thorns, which typically you will see a lot more of on blackthorn than you will compared to hawthorn. The last sign to help us here is the autumn fruits, which can often be found still hanging on in winter.

comparing blackthorn and hawthorn in winter

Above: On the left, Blackthorn can hang on to a few withered & dried sloes in winter. On the right, hawthorns often has smaller, deep red berries on show in winter.

The autumn fruit of blackthorn is the sloe. A good size fruit, around 1.5cm diameter and purple to black in colour. In winter though they are shrivelled and looking much worse for wear, with most of them having fallen already. Hawthorn in comparison holds onto it’s berries better in winter. Look for smaller, dark red berries, with an ovoid shape, growing in sparse clusters. As they dry out they darken in colour.


Looking Under The Tree

Have a good kick about in the leaf litter under a tree and you might find another big hint to what species you’re looking at. The old saying goes “the apple never falls far from the tree” and that’s good news for us in this case. I’m talking about fallen fruits and nut cases, many of which can still be found in the depths of winter, if not in the best condition.

winter tree identification: fallen fruits and nuts

Top Left: Crab Apples. Mid Top: Sweet Chestnut. Top Right: Hazelnuts, nibbled by wildlife. Bottom Left: Conkers from Horse Chestnut. Mid Bottom: Beech mast and leaf litter. Bottom Right: A bract from a Lime tree.

Some trees, like the Crab Apple, have a dead giveaway with the fallen, rotting fruits. Look under an established hazelnut and you’ll most likely find empty nut shells, nibbled away by rodents and birds. Then there’s tree like out three native Limes which have special leaves called bracts, which look like nothing else you’ll find on the woodland floor and can only belong to a Lime tree. Beech mast is very reliable under mature trees and you’ll find yourself crunching in underfoot as it carpets the woodland floor. There’s much to be gained by looking down.

Now this only works if there’s something to find and also you should be wary of relying on this too heavily where the tree is crowded with others as  what you’re looking at may have fallen from it’s neighbour.

By the far the most reliable method of winter tree identification is to begin with a branch and study a healthy twig and it’s buds. That way we can be sure we’re investigating the right tree and the knowledge of bud and twig is transferable no matter whether the ground below is humous or concrete.


Get Your FREE Winter Tree Guide

I’ve created a handy guide you can use when you’re out and about looking at trees during winter. The guide features 18 native and common British trees which have buds, twigs and leaf litter that you might already be familiar with but also there’s other signs here that you’ve probably never noticed before. I’ve laid out similar looking species side by side so that you can easily distinguish between them.

The guide puts the focus firmly on the winter buds but you’ll also see smaller images featuring other clues you can look for in each species such as old fruits, leaf litter, nut cases, bark and catkins. Where I’ve included these they act as dead giveaways to which tree species you’re looking at.

I hope you find it useful on your journey to understanding the trees around us.

DOWNLOAD YOUR GUIDE HERE


Discover more About Trees

It can be so interesting to really look in to the details of our native trees and notice the changes that they undergo throughout the four seasons. That’s just what I’ve created for my FREE introductory online course called Kickstart Your Tree ID Skills. Here you will find a whole host of resources to take you from clueless to confident on your way to really knowing your trees.

REGISTER FOR THE FREE COURSE HERE

kickstart your tree id skills, free online course

When you sign up to this free mini-course you’ll be identifying common trees with video tutorials and photo galleries at your fingertips. Start your journey to becoming a fully fledged Tree Expert today. The course includes Tree ID Cheat Sheets which you can download and take outdoors with you.

“I’ve been frustrated for so long trying to learn my trees myself and haven’t gotten far. This course answered everything and has seriously upped my game.” Dr. Patrick Alexander


Happy tree hunting folks.

James

bushcraft skills course in north wales

My Weekend in the Woods

Have you ever wanted to learn skills that would help you thrive in the wild, from how to read the landscape to lighting a fire with natural materials? My name is Emily Fox and I was asked to write about my experience attending a Bushcraft Skills Weekend with Woodland Classroom.

Woodland Classroom host outdoor courses that cover everything from tree identification, foraging and outdoor survival skills, but in reality those lines often blur as there is so much cross-over in these subjects, so I was looking forward to a little of everything. In this blog I’ll be taking you along with me as I tell you what I got up to in my weekend in the woods. To check out what other outdoor courses we have coming up click here. 

I’m already a pretty outdoorsy person, I’m really into my climbing and love hiking, especially around Snowdonia and the Lake District.

I spend a lot of time hiking and running around in the woods wherever possible and have even managed a little wild camping, so I’m used to being outdoors. I saw the bushcraft weekend as an opportunity to really step up my skill level and become better at understanding the land around me and how to survive if I found myself short on anything on a wild camp or out in the woods. It was something I’d not really done before so I was excited to see what skills I could learn. Having arrived late on the Friday evening though I didn’t know it would be straight into the deep end!

I was offered the option to sleep out in what looked like the ultimate den of sticks… my answer was, of course, yes. My tent, stayed in the backpack.

natural lean-to survival shelter

Above: My home from home for the weekend. Notice the bed of fresh brush which kept me off the cold floor.

Waking Up In A House Made of Sticks

Waking up on Saturday morning after a full, busy week of fast-paced work and modern living to the sun filtering through the pine trees as I lay on a bed of bracken under the canopy of the lean-to shelter was the most relaxing start to the weekend I’ve ever had. It put me right in the zone. I’d jumped at the chance to come and help at a bushcraft weekend in Wales as it sounded like the perfect getaway, and I was even more excited when I was offered an outdoor shelter to sleep in for the night. My lean-to was made of just sticks, leaves and branches, not a plastic tarp in sight, but despite it having rained the whole day before this natural shelter was bone dry and I slept like a baby the whole night!

After introducing ourselves to the group James, our Head Instructor, took us into the woods and asked us to look at our surroundings and share what we could tell about the landscape around us. I was asked to read the landscape; what did I notice about the age of the trees, did I recognise any plant species, how might the land-use have changed over time and where could water possibly be found? This was all about waking up our inner-ancestor and looking at the land through ancient eyes, those people that relied on the land for their survival. We were then tasked with going and having a look to see what natural materials we could gather that could be useful to us. Spruce resin for fire building, blackberries for eating, flexible willow branches for weaving and spruce needles for natural medicine were all things students brought back.

making survival shelters

Above: Constructing a kennel shelter. The whole thing is held up by just 3 poles. No rope is used.

Sharp Tools & Shelters

The first activity was to whittle a tent peg from greenwood, something that would come in handy later. James showed us safe ways to use a knife, cutting techniques and knife grips to use in making the peg. I was pleased with my finished peg and tucked it into my backpack for tomorrow. Having shown we were safe with the knives we were allowed to keep them on us for the weekend. Next we were onto natural shelter building, similar to the one I’d slept in last night.

The group was split into two and each team was guided through making a different style of lean-to we split into two groups and got to work building different types of lean-to shelters. James showed us how to use bundles of bracken, like thatching, to make a layered waterproof covering to keep the shelters dry. Working in smaller groups let us be super involved in each activity and allowed us to get to know the people we were working with a lot better. Using these materials was time-consuming, compared to putting up a tent, but they were also surprisingly effective and I got a real sense of achievement from creating this structure. It’s an empowering experience and I can see why bushcraft skills can be addictive – the idea of being able to fend for yourself, accessing “secret” knowledge.

whittling skills on a bushcraft course

Above: Other folks on the course very happy with their brand new tent pegs.

Playing with Fire

After lunch at basecamp we went back into the woods to start on fire making. We began by looking at all the components we needed to actually light and sustain a fire. The three essential aspects of a fire are heat, fuel and oxygen. I would need all of these things in abundance to keep my fire healthy. I experimented with lighting fires using modern fire-steel and traditional flint & steel. I was given cotton wall and char-cloth (made my baking natural fabrics) and I soon saw that without any substantial fuel the flame only lasted for a few seconds before dying off.

I learned that by adding an accelerant, either something I could bring with me like vaseline or something gathered from the woods, such as spruce resin. My little fire lasted a lot longer, around thirty seconds instead. We then used this principle to find natural tinder, kindling and accelerants before building our own fires, gradually building our firewood thickness until we got from a small flame to our own roaring campfire that could sustain us through the night if needed.

It really is true that once you have a simple roof over your head and a fire going, you can feel at home anywhere. The cup of tea helped.


Identifying Trees in the Dark?!

Just as the sun was setting James ran a night-time tree identification walk. Now this sounds intriguing; how can we possible identify trees in the dark? We took a stroll in the darkening woods to see if we could hone our skills, with James teaching us how to recognise trees based on just the leaf shapes, texture of the bark and shape of the tree against the sky. There were some really interesting conversations about how we each recognised certain trees. For example, someone commented on the fact that the oak tree was easy to identify by its outline because it was often used on pub signs. James encouraged us to closely examine the trees we came across; see what the leaves felt like, how the branches were structured, all whilst encouraging us to draw on what knowledge we already had. I was also encouraged to engage my other senses. I discovered that I could recognise a mature beech with my eyes shut as I could hear the crunch of the thick layer of beech mast beneath my feet – result! James was giving out ‘bushcraft points’ to anyone with correct answers. I earned 5 bushcraft points for remembering that holly leaves further up the tree aren’t spiky because animals don’t graze on them, then lost another two for excessive gloating, oops!


Easy Like Sunday Morning

Another comfortable night in my stick home, with the tawny owls hoots for company. James had explained that by crafting a raised bed from, logs brash and bracken layered up that it raised my body off the cold ground and so added a lot of insulation. It’s said that layers below you are much more valuable than a layer on top when sleeping on the earth.

I started Sunday with a nature-awareness exercise, called the Sit Spot. James talked to us about connecting with nature by taking a moment to sit outside and quietly observe what was happening around us, without expectation or agenda. With that we each slunk off into the woods to find a quiet comfortable spot. I sat for 20 minutes to take in everything going on around me before coming back and reporting what we had seen, heard or felt. It was lovely to start the day by connecting deeply with our environment. Tis is a real contrast to the attitude I adopt when hiking where the purpose of being outdoors is to get from one place to another, rather than simply allowing myself and nature to be.

water filtering and billy can cooking

Above: Hanging out billy can above the fire using campcraft skills. Filtering dirty water using natural materials.

Making My Ultimate Woodland Getaway

The majority of today was all about putting together the skills we had learnt so far. The goal was to be able to set up our own shelters, start a fire and make a cup of tea in our camps. I would need to use my knife for cutting, shelter building skills, I’d need a way to hang my billy can over the fire and I’d need plenty of firewood. Lots to be getting on with.

The first activity was to filter water using natural materials we could find in the woods as well as artificial ones to. We would not be drinking the water we filtered aa this should only be done in a real situation, but it was good to see the principles at work. We then worked on making natural cordage using nettles and bramble. This cordage could be used for our shelters or for hanging our billy can. James showed us how to identify the most suitable bits of plant to use and how to dry and braid the strands to make a strong cord which could be used for years.

Since yesterday we all made a natural shelter, today we were given a one-person tarp (called a basha) to rig over our makeshift camps. James introduced me to a couple of knots for getting it all taught. Our group decided to combine the tarp alongside the lean-to I slept out in so we had a covered area for our outdoor fire – very cosy indeed. Our whittled tent pegs and natural cordage came in handy here and we saw how strong this natural fibre really was when put to the test of holding up our shelter.

Next we worked we turned to campcraft skills with the challenge of creating something that could be used to hang our billy can for boiling our brew over the fire. I worked with a couple of others, each of us made a different part of the frame from hazel wood before moving the various components over to our camp. Each group came up with a totally different way of solving the problem which was good to see. My trusty tent peg came in handy to anchor the pot pole. I used my wild cord to make the billy can adjustable so we could lower it down or back up depending on how intense we wanted the boil.

natural cordage and survival shelter

Above: We combined paracord with our bramble cord to tie off our shelter. Matt looking very content in his woodland home.

Making Fire… in Heavy Rain!

It was time for the big finish, practising ancient fire by friction skills. Something I had read about and seen on YouTube but not done myself yet. Now it’s very important that certain components of this traditional fire-starting kit be kept bone dry. We were all set, feeling somewhat confident… and then the heavens opened! We were to make our fires using bow drills and due to the rain coming down we decided to work in teams to increase our chances of success rather than everyone struggling individually in unideal conditions. I get the feeling this is how our ancestors would have pulled together in a real situation… so it’s not cheating.

Once James showed us the technique I was surprised how quickly we achieved smoke and the beginnings of an ember. James tressed how success comes not from powering through to eventual success but using good technique and communication with each other to ensure the best chance of making fire. Unfortunately, for a beginner like me, these were not ideal conditions. The rain was getting heavier and this made it hard for us to create any sparks or for a flame to catch in our tinder nest, but with a little help, we eventually managed to get a roaring fire going and enjoyed a well-earned hot cup of tea from our billy can. Job done! 

fire by friction skills course

Above: Me working with my group on fire-by-friction to get a good ember for our fire.

Home & Dry

At the end of the day, we had practiced the skills to go out into the woods and thrive on what we could find around us in a sustainable and nature-focused way.

There was something very rewarding about managing to make the bow drilling a success despite the elements being against us. We were shouting when we finally got it going it was an amazing feeling and even though we were all pretty tired at the end of the weekend I definitely felt like I had learnt so much. It was more than just learning skills to use outdoors, it was changing the way I thought about nature and being creative with how I solved any problems I might face if I was in the woods without certain tools. I’ve definitely caught the bushcraft bug.


Ready For Your Own Adventure?

I can highly recommend this course and I’m looking forward to attending more in the future, especially the Wild Food and Foraging Day. If you’re looking for a quality and fun experience like this then do check out our upcoming courses.

Woodland Classroom host outdoor courses on bushcraft skills, wild food & foraging, nature connection and tree identification all surrounded by the beautiful National Trust estate woodland of Erddig and Chirk Castle in North-East Wales. Courses are available for adult learners, families and private bookings. Get in touch if you’d like to know more.

SEE OUR UPCOMING COURSES HERE

Hope to see you in the woods,

Emily

Emily Fox is our Outdoor Activities Assistant, on placement to Woodland Classroom for 12 months. She hopes one day to run her own outdoor activity business where she can share her passion with others.

how to forage sea buckthorn - wild food

How To Forage Sea Buckthorn – Nature’s Superfood

Sea buckthorn (Hippophae rhamnoides) is one of our littlest known but most beautiful trees. Not only do they give a stunning display of colour, the berries sure do pack a tropical punch. The juice has to be one of the most memorable and refreshing flavours in the wold of UK wild food. When they fruit, the combination of the bright orange berries against the silvery green leaves make them look almost Mediterranean. So, if you want to feel like you’re kicking back on a sunny beach with a tropical drink in the depths of winter, we’ll give you the closest thing with some delicious sea buckthorn recipes. It’s a a wild food that’s well worth getting to know.

Getting these berries off the tree can be a little troublesome. You might have guessed from the name of this tree that there’s thorns to deal with. I’m here to help though and I’ve included a video which shows the easiest ways I’ve found to harvest the berries. You’ll get tips and tricks to filtering out leaf debris, so give it a watch. These are tried and tested methods so you can see how well each works for yourself.

If you’ve watched the video you might be thinking; “that seems like a lot of work for some fruit juice.” But the nutritional benefit of these little gems is unbelievable! They truly are a superfood. They contain high levels of vitamin C, around 5 times more than oranges, high levels of antioxidants as well as omega 3 and 6. Importantly they contain A, B, C and E vitamins including B12. Scientific trials have found that sea buckthorn is effective in treating tumours, lung diseases and gastric distress. They also help reduce inflammation and can treat heart diseases and improve blood vessel function, so get drinking it!

how to identify sea buckthorn

Above: This female sea buckthorn was found in an old sand & gravel quarry, far from the coast.

Where & When Can I Find Sea Buckthorn

Finding one of these amazing trees is not always the easiest thing. They are not nationally common, but could be locally common in your area. Generally, sea buckthorn is restricted to coastal areas or particularly gravelly soil so if you’re near a beach make sure to have a scout around as they have been purposely planted in many areas to help stabilise sand dunes. With that in mind they can also sometimes be found planted up in retail parks and roadside verges where they provide that stabilisation for the ground but also quick ground cover. Keep your eyes peeled.

Sea buckthorn is a deciduous shrub that has silvery-green leaves similar in appearance to rosemary. The leaves also remind us of a smaller version of willow leaves. The shrub also grows thick spines along the branches which is a good indicator of the species into the winter when the leaves fall. 

The dense clusters of bright orange berries are a dead giveaway to positive identification. Look for a silvery sheen close up on the berry skins too. The berries begin to fruit around August and September but it’s best to leave them till they’ve all turned from green to orange. As you’ll see from my video, early to mid autumn is the best time of year to harvest the berries as they are more firm and will get damaged less when picking. The later in the season you go, the more delicate the berries become. You can still harvest them into late autumn/early winter but it will be a messier job as the juice gets everywhere.

This tree is dioecious, which means it has separate male and female trees. Only the females produce the berries. So, don’t be surprised if you come across a specimen in the right season but with no berries. Look around the surrounding area for a female in fruit.

sea buckthorn wild food & foraging recipes

Above: Notice the leaves grow in a whorl around the whole twig. They have a silvery sheen to them.

How do I Process Sea Buckthorn

As the name suggests the sea buckthorn is a spiny shrub so a thick pair of gloves is helpful for one of the methods of collecting the berries. When the berries are ripe they tend to burst very easily, which does make collecting them a little tricky, but we’ve got some proven methods to remove the berries that we’ve tried so you don’t have to.

The first method, which I prefer, involves cutting off the tips of branches which are heavy with berries. Although this can seem quite destructive, this is a tree which grows back fast, so you can cut with confidence. It’s good practise to always take only what you need and leave what you can for wildlife.

  • Pop the cut branches in a bag.
  • When you’re home, put the branches on a tea towel outdoors, in a place where creepy crawlies can escape.
  • Later, place the berry-heavy bunches in a double layered bin bag and leaving in the freezer for a couple of days.
  • Once the berries have fully frozen remove the bin bag and beat it with a stick, this will separate them from the branch without bursting them.
  • Lastly you’ll need to separate the whole berries from any other debris that has been loosened in the bag. Watch the video for tips on how to do this effectively.

The second method is a little messier but is a quick way of collecting the juice of the berries. This method is best done later in the season when the berries are at their ripest. 

  • Put a clean food bucket under the branch you want to collect the juice from.
  • Wearing a thick pair of rubber gloves, squeeze along the branch in a downward motion, toward the tip. This squishes the berries as you go and avoids you getting spiked. The juice runs into the bucket below.
  • When you get home, the juice will need straining as lots of leaf and branch debris will probably fall into the bucket during the collection process. 

With either of these methods, make sure you’re not wearing anything you would mind getting berry juice on or even wear an apron.

foraging for sea buckthorn

Above: Using the “bag & freezer” method to separate the berries.

how to process sea buckthorn berries

Above: Processing the juice from the berries. I used a potato ricer.

What Can I Make with Sea Buckthorn

Sea buckthorn has a notoriously tart taste so I would recommend sweetening it before eating, unless you like an intense sharp and sour hit – I dare you to give it a try raw. If you want to get an idea of the kind of sharp citrusy flavour the processed juice of the berry gives then pick one straight from the tree, it’s very refreshing… if a little tart. The recipe I made was a sweet sea buckthorn juice and it was a very refreshing and very healthy addition to my breakfast. 

For this recipe you can get away with using the squeeze method as mentioned above, as all you really need is the juice. Make sure you strain the juice through a sieve or muslin cloth if you want to be super thorough. You will need:

  • Sea buckthorn juice
  • Runny honey to taste
  • A sterilised container with a lid for storage

In a saucepan, heat the juice and honey together on a low heat. Stir well to make sure the honey melts into the juice. When the juice is as sweet as you want, take the pan off the heat and leave to cool before bottling in a sterilised jar. 

As well as complimenting your morning eggs you could try adding the juice to some sparkling white wine to make sea bucks fizz, or with lemonade to make a refreshing cordial. You could also consider using sea buckthorn for jam, or you could reduce the juice by cooking it for longer and adding sugar to make a sea buckthorn syrup. In Northern Europe, it’s popular as an accompaniment to fish as it is similar in sharpness to lemon.

Making a fruit leather would be a good way of preserving the goodness of the berries right through the year. To do this; gently simmer the juice down to a thick syrup, combine it with hawthorn berry pulp which has been similarly boiled down, spread the mixture thinly onto greaseproof paper and then dry it over several hours gently in a dehydrator, on an oven on a low heat with the door slightly ajar to allow airflow. The purpose of the hawthorn berries (called haws) is to provide a binding quality to the leather, as on its own the buckthorn juice may struggle to hold together. The haws also have their own major health benefits. A fruit leather not only preserves the vitamins but hold the taste too.

sea buckthorn wild food & foraging recipes

Above: The juice or berries can be used to make a range of tangy foods like jam, sauce, cordial or fruit leather.

Discover More Wild Food

If all this talk of wild food and foraging has whetted your appetite then you can take your learning further with us through the range of courses we offer.

You can immerse yourself in the world of foraging through our outdoor courses hosted in beautiful National Trust estate woodlands in North-East Wales. Or if that’s too far afield for you we also host regular online workshops, live through Zoom where we focus on wild foods of the season and give you delicious recipe ideas, foraging tips and expertise from special guest speakers. If this all sounds interesting, check out what’s coming up on our Events page right here.

Another way to get instant access to a whole backlog of wild food & foraging videos, recipes and recorded workshops is to join our Tribe over on Patreon. In return for supporting our mission, our patrons get access loads of exclusive resources. You can join the Tribe from as little as £3.60 per month. Find out about all the benefits right here.

Until next time, good luck with your own foraging journey.

James

how to pick wild rosehips - foraging and wildcraft

The Best Way To Eat Rosehips

If you’re not eating rosehips already, you need to start. Not only are they really good for you, but they taste amazing… like a burst of tropical fruit. They are also very common and easy to identify. So, what’s stopping you?

I really look forward to the season for rosehips, they are one of my favourite wild foods. The bright red scattering of rosehips in our hedgerows is one of the biggest indicators that winter is settling in. These vibrant fruits stand out to our eyes and that bright colour could mislead you into thinking that you should stay away from them, but the rosehip can make some delicious winter recipes to keep you going through the colder months.

I made this short video to show you the best way to eat rosehips raw, right off the branch. They make a great ‘pick-me-up’ on a country walk. There’s a couple of essential tips you need to know, so check it out…

Where & When To Find Rosehips

Rosehips grow on wild rose bushes. In the UK there are two species which you can forage from; the dog rose (Rosa canina) and the field rose (Rosa arvensis). Dog rose is found in most parts of the UK, unlike the field rose which is only found in England and Wales. Both species can be eaten so it’s not particularly important to know the difference between the two. These plants are climbers, trailing their way through hedgerows with their stems covered in thorns.

The rosehips themselves are easy to identify as oval fruits which develop behind the summer flower, turning from green to red as they ripen. In the summer the petals for both wild roses are large, being pink to white in colour with a yellow stamen. They have a beautiful fragrance, as you’d expect from a rose.

The best spots for finding rosehips is hedgerows and woodland edges, where the hips can ripen with plenty of sunshine. Scrubland and brownfield sites are also good places to look.

It’s from September that the hips begin to ripen enough to be harvested. They should only be eaten once they are fully red, don’t eat them if they’re still a bit green. There isn’t a particular firmness they are best at; they can be harvested when squishy or hard so don’t worry if you don’t get them right at the beginning of the season. What is important though is that you’re only eating the red flesh. The hairy, yellow seeds in the centre of the hip need to be removed before they can be eaten. These hairs are very fine and can lodge in your throat, being very uncomfortable to digest.

If you haven’t watched our video above already, do check it out so you can learn how to easily remove the flesh from the hairy seeds. Another method can be used back in the kitchen, whilst processing the hips back at home using a muslin cloth (see our method for rosehip syrup below) but if you’re out in the field after a quick hot of that tropical taste then here’s what you need to do:

  • Look for the softer squishy ones with a wrinkled skin. These are found more so at the back end of autumn.
  • To remove the hip cleanly, and avoid being spiked, twist is away from you and toward the stalk. This will usually give a clean break.
  • Hold the rosehip between both thumbs and index fingers equally, with the stalk side facing you.
  • Squeeze the hip with even pressure. A ‘red worm’ of pulp should rise from the hole.
  • Eat the tasty red flesh, discard the squeezed hip.
how to forage rosehips

Above Left: Rosehips looking perfectly ripe on the branch. Above Right: These hips are softer and more wrinkled. Perfect for the squeezing method as explained in the video.

How To Make Rosehip Syrup

A more traditional use for them would be rosehip syrup, which was a common sight in the household during the second world war. Due to the UK’s inability to import fruit from other countries, the public were recommended to collect and make their own rosehip syrup to prevent scurvy; two tablespoons of rosehip syrup would more than provide you with your daily dose of vitamin C.  As well as being very good for you, the syrup is deliciously sweet and goes really well drizzled on top of hot sponges, pancakes, and other desserts or you could try adding a little to some lemonade to make a cordial. Below is a recipe for rosehip syrup so you can make your own.

To make a litre of syrup you need: 

  • 1 kilogram of rosehips
  • 3 litres of water
  • 450g of sugar (or honey)

Method:

  1. Remove any leaves and the green ends of the rosehips, then chop them by hand or in a food processor and add to a saucepan with the water. 
  2. Bring to the boil and simmer for 20-30 minutes before straining with a muslin into a clean bowl. Once the juice has been strained, re-strain in a clean muslin cloth. This ensures that all the hairs inside that cause irritation have been removed. 
  3. In a new saucepan add the sugar and simmer together until it has dissolved and the liquid has thickened. 
  4. Transfer to a sterilised jar and keep in a cool place. 

As well as being delicious on pancakes and packed with vitamin C, rosehips also have a fantastic range of health benefits. Amazingly, rosehips contain 2000mg per 100g, compared with the equivalent weight of orange with just 50mg! This little fruit can boost heart health by lowering cholesterol and blood pressure. Rosehips also have anti-inflammatory properties and there is some evidence it can reduce pain and stiffness in joints with osteoarthritis, possibly due to the high level of antioxidants they contain. Cold pressed rosehip oil can also help protect against ultraviolet light, pollution, and cigarette smoke as well as increasing skin elasticity. They also contain high levels of fibre, vitamin A, calcium, and potassium.

I’ve also used them to make a cup of rosehip tea. To try this yourself; halve ten hips and scrape out the seeds and hairs. Cover the hips in boiling water and leave to infuse for a few minutes. You could add a little honey or sugar to sweeten your tea, but rosehips contain their own natural sweetness, so adding sugar is not essential, just see how you like it.

You could always try slicing and drying the hips to make a longer-lasting tea ingredient. If you don’t have a dehydrator, put the halved hips on a parchment covered baking tray and cook on a very low heat with the door slightly open for a few hours to remove the moisture. Rosehips can also be used to make a sweet jam to go on toast or on plain yoghurt. We added halved rosehips to a hedgerow crumble for a burst of colour and flavour amongst the apples and blackberries.

how to make rosehip syrup

Above Left: Rosehip syrup. Above Right: Fruit leather with rosehips, crab apple and hawthorn.

Can I Eat My Garden Roses?

This is a fair question, so let’s look into it. As far as I have researched, all roses are edible. You might well be familiar with the Japanese Rose (Rosa rugosa) which is a common sight in suburban areas and retail centre car parks. The rosehips on this plant are much larger, being more rounded. They also ripen earlier than our native roses. The summer petals on this plant are a beautiful cerise pink colour. Both the petals and hips are edible, as with our wild roses. However I have found that these hips, being larger, are more susceptible to harbouring maggots, especially when they start to soften. So, I would recommend halving them to have a good look inside before using them for any cooking.

Something else you need to be aware of with foraging garden roses, including the Japanese Rose, is that they may have been sprayed with pesticide or plant food, not something you want to add to your diet. So, unless you know the garden or gardener well, it’s best to avoid Mr Jones’ prize roses from across the road. With any foraging it’s important to take a wider view and think about where you’re picking from and what forces those plants are subjected to. As always; if in doubt, leave it out.

foraging for japanese rosehips

Above: Japanese Rose (Rosa rugosa) with striking pink flowers in summer and hips as large as cherry tomatoes.

Discover More Wild Foods

Along with my partner, James, I host foraging and wild food walks and courses in North-East Wales at two beautiful National Trust estate grounds. Coming on a course is a great way to learn a variety of commonly growing plants and fungi we can use in our own cooking and also for hedgerow medicine. If you’d like to see what courses we have coming up, then head to our Events page.


I hope this blog has inspired you to try foraging rosehips yourself.

Lea

ten trees you can eat - wild food & foraging

Ten Trees You Can Eat

When you’re walking in the woods have you ever wondered which trees you could eat? Of course, I mean the tree’s berries, nuts, leaves and fruit. Chewing on wood is strictly for beavers only. Trees are a great source of wild food and in this article we’re going to take a look at ten of the best native and common British trees which you can forage from as well as giving you some inspiring recipe ideas using these natural ingredients.

Before we get going with the list, if you’re someone who loves trees but struggles to know what you’re looking at on your country walk, you could start building your tree identification skills today by signing up to our free online course, titled Kickstart Your Tree ID Skills. You’d be joining thousands of other students who want to know more about the trees around them. You can enroll for free right here.

Now, on with the top ten list, starting in no particular order with…


1. Sweet Chestnut (Castanea sativa)

Sweet chestnuts are something you typically associate with Christmas (cue Bing Crosby singing here) but in the UK you can forage for your own chestnuts around the middle of October. These really are a top nut and I don’t think we utilise them enough outside of the festive season, there are so many tasty recipes you can use them in. Our home-grown wild nuts tend to be on the smaller side compared to other parts of Europe, as in this country they are at the edge of their natural range. Shop-bought chestnuts tend to be grown in warmer climes such as Italy, Spain, and Croatia.

sweet chestnut tree foraging

Above: Sweet Chestnuts are not just for Christmas. Try roasting them in their shells in the embers of a campfire. Yum!

The casing of the sweet chestnut is easily recognisable by the long, densely packed spikes, and if you’ve ever been curious enough to pick one up you know how delicately they need to be handled to avoid being speared. You can tell when the chestnuts are ripe because the casing will be large and green, heading towards a lighter brown colour. They will also begin to split open as they ripen, and you can often see the shell of the chestnut through the cracks in the casing. The nuts grow in threes inside the spiked case. The shells are, as you would expect, a chestnut brown colour, topped with a white tuft of hairs. When foraging for these nuts make sure you use thick gloves to pry them open.

Taking a step back to look at the whole tree; another indicator you’re looking at sweet chestnut is the trunk itself. On mature trees deep fissures develop that tend to twist and spiral up the trunk. This is a more obvious distinction going into autumn when the tree begins to lose its leaves.

When it comes to cooking with sweet chestnuts the most traditional use is roasting. Firstly, pierce the shell with a knife to prevent them popping and roast them in an oven at 200°c for 30 minutes. My favourite way to cook them is more simple, and connects us with our ancestors; roasting the nut (in their shells) directly in the embers of a campfire. Once cooked, leave to cool for a few minutes then peel the shells off and eat. Other tasty uses for chestnuts are in stuffing, added into brownies or cheesecakes. They add a fantastic sweet nutty taste to anything you add them to, so alternatively you could try pairing them with something salty like a soy sauce glaze, as well as to supplement your sweet dishes.


2. Beech (Fagus sylvatica)

Often called the “queen of British trees” Beech are one of our most magnificent trees. They can grow up to, and sometimes exceed 40 meters height. There’s a beech tree in my village that’s so large you can see it from about a mile away, it’s loved by everyone and has such a magnificent canopy, it’s not hard to see why. You often find these trees on very chalky areas, and they can be identified by their grey-brown bark and iconic nuts that grow in October, with spiky basing that splits open to reveal the smooth pyramid shaped nuts. 

beech nuts - tree foraging

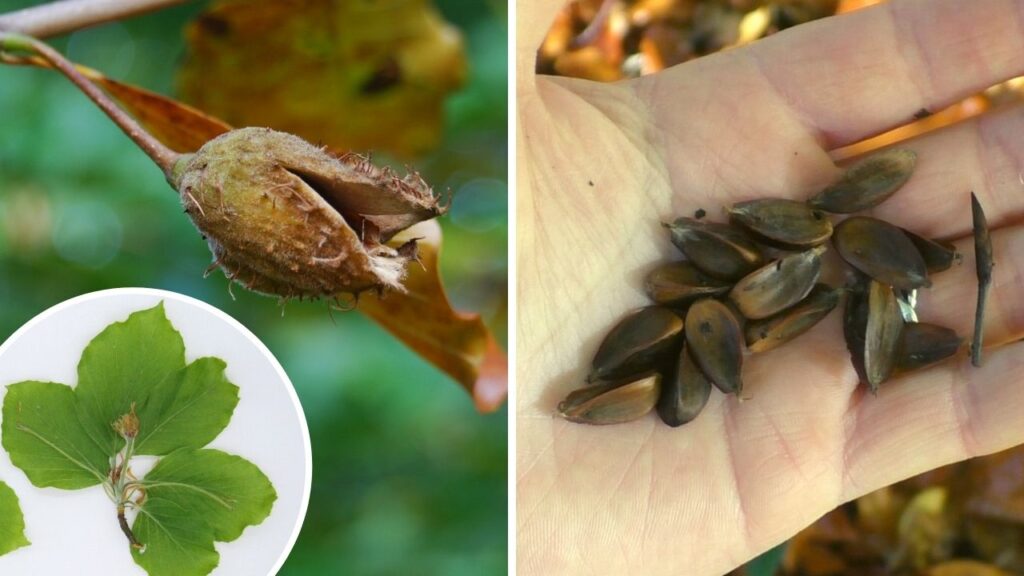
Above: Beech nuts are small but worth the effort. A great snack whilst out on a stroll. Inset: Young leaves make a tangy addition to salads in spring.

As well as being beautiful beech trees have two seasons in the year when parts can be harvested for food. Firstly, around May when new leaves emerge they can be eaten straight off the twig or put into salads or sandwiches. They have a tangy, almost acidic flavour. You’re looking for the lighter green slightly hairy leaves, before they darken in colour and develop an unpalatable, waxy surface. 

In October, it’s the beech nuts which drop to the ground and can be collected for our table. The casing (called mast) splits open and will often drop off the tree with the nuts inside meaning it’s relatively easy to collect them, although you may have to rummage around on the ground a little to find the nuts under the leaf litter. Inside the mast can be up to 3 nuts each in their own triangular brown shell.

Beech nuts are a good source of protein, contain lots of healthy oils and taste a little like hazelnuts making them amazing for both sweet and savoury dishes. It’s advised that you don’t eat too many raw as they contains tannins which can cause an upset stomach, although not everyone has a negative reaction to raw beech nuts but it’s best to be cautious. They’re small though, so collecting that many would be quite a feat. Cooking or soaking removes this toxin and makes them safe to eat en masse, so try toasting them to add to salads or using as a cake topping as an alternative to hazelnuts. I like them best as a snack on the go whilst walking.


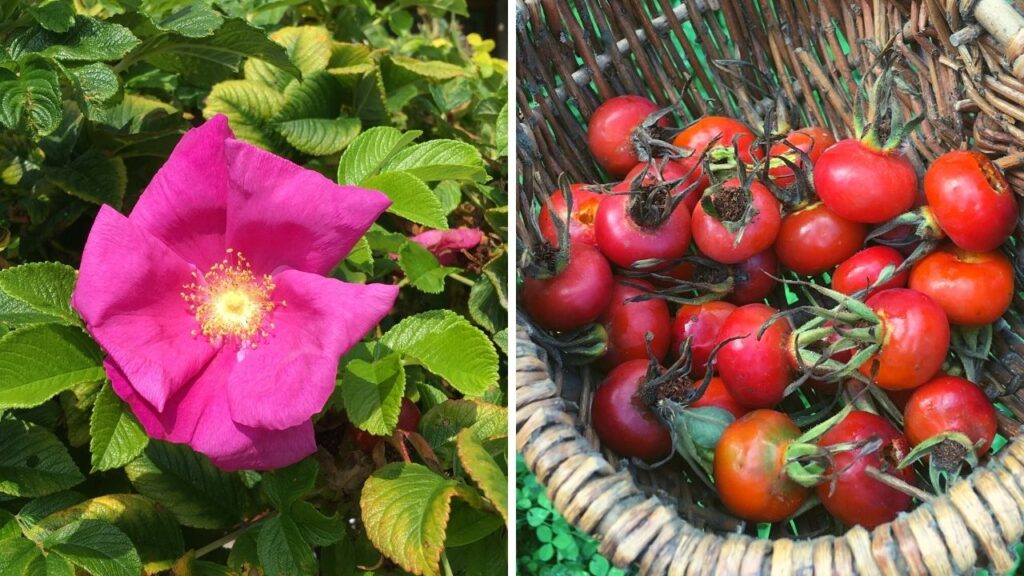
3. Blackthorn (Prunus spinosa)

Blackthorns are a favourite of many as they give us the fruit used to make sloe gin. Around autumn there’s excitement in the foraging community as everyone rushes to make their annual batch of sloe gin ready to replace the previous years which will inevitably be either drunk or given as a Christmas present. A friend proudly declared that this Christmas he’ll be opening a bottle he made five years ago! 

sloes and blackthorn - tree foraging

Above: Everyone has heard of sloe gin, but did you know you can use the gin soaked sloes to make boozy chocolates. We dare you to try it.

The blackthorn tree can be identified by their almost black branches (hence the name) and large thorns which can cause a nasty infection if spiked so be very careful when harvesting your sloes, some thick gloves are recommended! In March the blackthorn is the first tree to make its presence known as it erupts en masse in our hedgerows with a show of white blossom. The flowers make for an incredibly beautiful contrast to the black spines. Blackthorn is a tough old tree with a habit of spreading quickly into open space, making it an unwelcome guest with landowners who like things tidy. It follows that with this tough, thorny tree, that seems to be telling us to “look but don’t touch” it would bear such sour fruits that when eaten raw don’t exactly endear themselves to us. They are worth collecting though as alcohol transforms their flavour.

The blackthorn is part of the plum family so this gives us a clue that there’s some good stuff to be had from the fruits. From September onward the sloes take on a dark blue colour as they ripen. The classic recipe, sloe gin, is made using fresh sloes, pricked with a fork, packed into a jar with gin and sugar. Shake this every day to help the sugar dissolve and then after at least a month (longer is better) strain off the berries and bottle the liquid, ready for a Christmas gift or to go on the sdhelf and left for a year before drinking. Also, did you know that the leaves can also be infused with alcohol and are at their best around June and July.

Interestingly sloe stones have been found at many archaeological sites which suggests our ancestors valued this fruit highly as well; it’s lovely to think that the blackthorn has connected us to our ancestors for thousands of years. Try boiling your sloes down to turn them into a jam or syrup, they’re naturally a little tart so it’s best to have a sweet aspect to each recipe such as reducing with sugar or treacle to make a delicious tart filling. If making sloe gin or other alcohol infusion is something you want to give a go, remember this top tip; try saving your soaked sloes to coat in chocolate. This makes for a perfect present for friends and family at Christmas time.


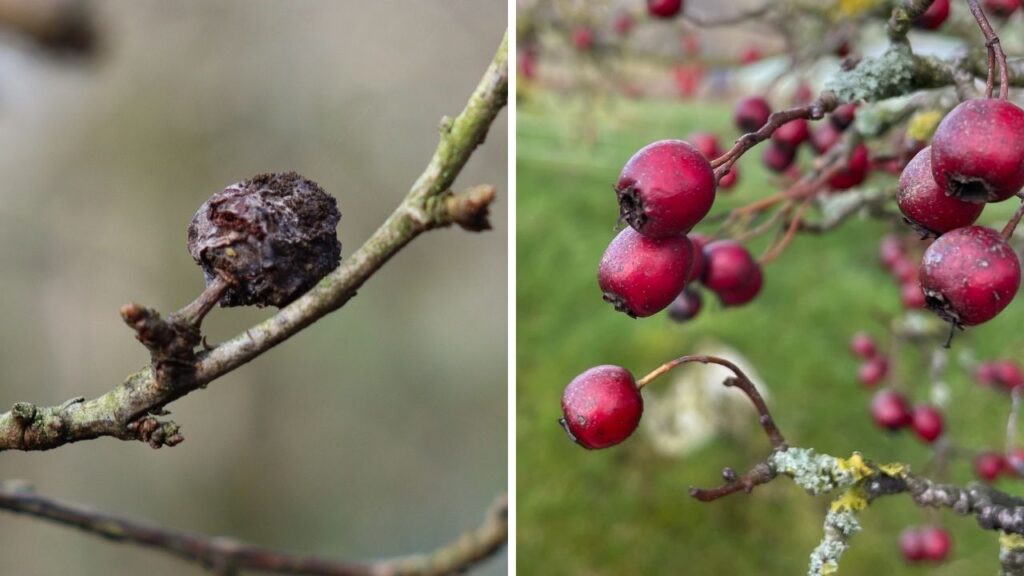
4. Hawthorn (Crataegus monogyna)

I don’t know about you, but I always see the arrival of Hawthorns as the official start of autumn. The iconic red berry a sight you’re likely familiar with as they grow in abundance along roadsides and in hedgerows. Hawthorn trees are one of our most common trees as they can thrive almost anywhere and are popular in hedges as they make a thorny stock-proof barrier which has vigorous regrowth when cut back. Head out to your local green space, you might be surprised by how many hawthorn trees you can find.

hawthorn - tree foraging

Above: They might not taste like much on their own but as a cooking ingredient they work very well. We made spicy hawthorn relish.

Hawthorns in Autumn are easy to identify, with large bunches of deep red oval berries, known as haws. They can be seen from September onward and can persist on the tree right through winter after the leaves have fallen. One of the earliest identifiers for this tree in our calendar year can be seen in early spring when the bright green leaves with between 3-5 jagged lobes, looking somewhat similar to parsley, explode in our hedgerows after the white blossom of blackthorn. In April and May look for a show of beautiful flowers blooming from this tree. They resemble cherry blossom, with a strong scent of almonds, 5 small white petals and pink stamens. 

Back in autumn with the berries; you could eat a single haw and be forgiven for wondering what all the fuss is about as there’s not much taste to them. But that couldn’t be more wrong, this is such a versatile food source that not enough people know about. Where the haws shine is as an ingredient rather than a food on its own. Haws contain a single stone which needs to be removed before they can be eaten. This can be a time consuming process, but the reward is worth it. These berries can be used to make everything from jam, ketchup, relish and even wine; boiling and straining can be a quicker way of removing the stones than individually de-stoning each fruit. Although they’re fairly plain in flavour they have a similar texture to avocados, making them an eco-friendly substitute to use in guacamole.

As well as making some delicious foods, the haws are incredibly good for you. They can increase the blood flow to the heart, helping prevent heart attacks as well as reducing irregular heartbeats. This isn’t a new discovery either, haws have been used to treat heart conditions as early as the 17th century. If you are on heart medication, seek advice form a professional herbalist before eating them.


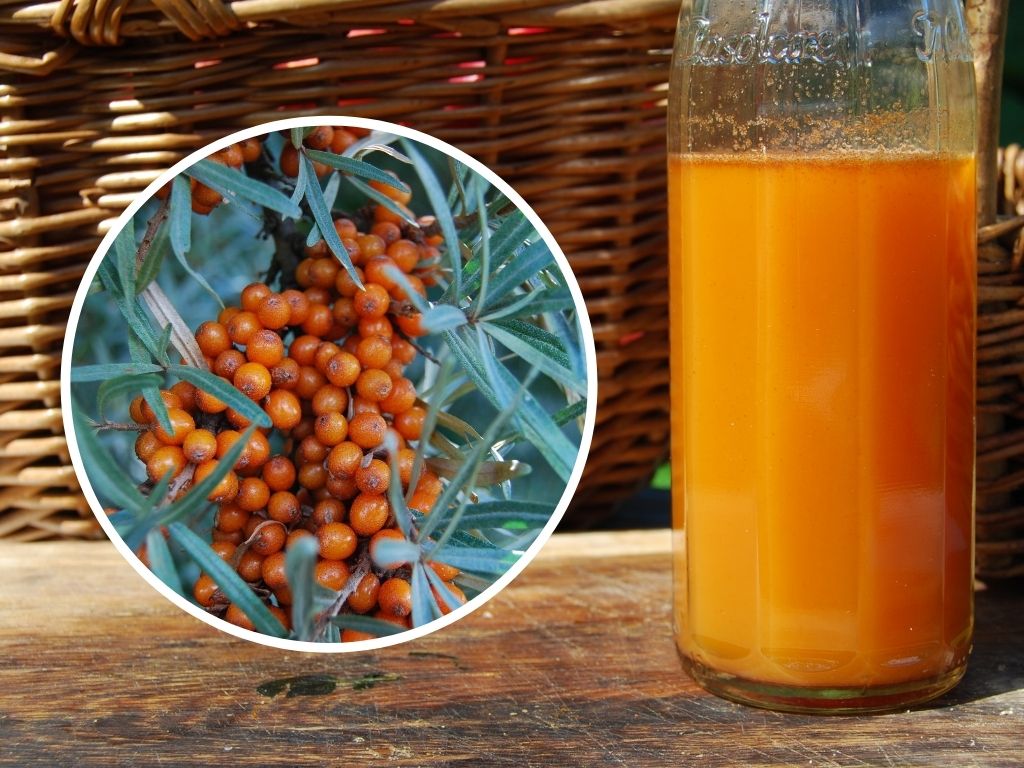
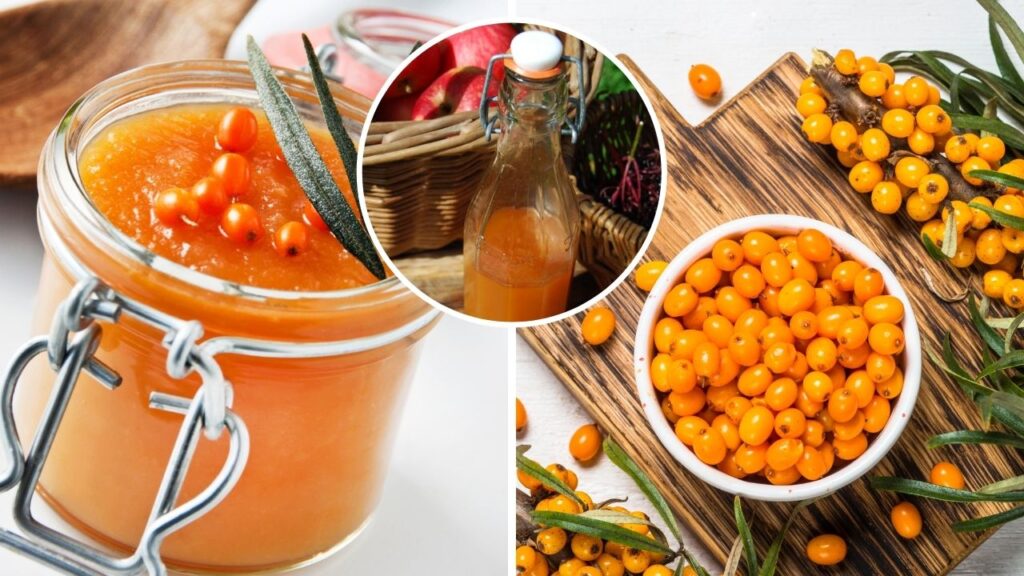
5. Sea Buckthorn (Hippophae rhamnoides)

Sea buckthorn is incredibly beautiful when the tree is fruiting; with gorgeous bunches of bright orange berries surrounded by silvery green leaves that heavily resemble rosemary. The fruit of this tree is citrusy but does require some sweetening as it has a naturally sharp almost bitter flavour, similar to the acidity of a grapefruit. In terms of flavour, this is about as tropical as it gets for native tree foraging. If you don’t mind a bit of work and being spiked by thorns, then you’re in for a treat that packs a mighty punch.

sea buckthorn - tree foraging

Above: If you want a juice that packs a serious punch for both taste and health, try Sea Buckthorn.

Unfortunately, the sea buckthorn isn’t very common and is normally only found near the coastline or in very gravely areas. However, you might find it along roadsides and in retail parks or industrial estates, where it can be planted as cover. If you discover one of these trees locally make a note of it and be sure to give it a visit when it’s fruiting! These beautiful berries come into fruit around September to early October and are best picked after all the berries on the tree turn from green to orange as it’s when they’re at their most ripe. The tricky part of collecting the berries of the sea buckthorn is how prone they are to bursting when picking, meaning you could get juice on your clothes so make sure you’re not wearing your favourite white shirt when collecting these.

There are two main ways you can collect the berries; if you’re not too bothered about the whole berry and are happy with just the juice, which is the best part in my opinion, you can use some very thick rubber gloves to squeeze down a branch to collect the juice into a bucket. This will need straining once you get home to remove any bits of leaf or debris that you’ll also find in your bucket. This is the fastest way to collect the juice, but works best when the berries are a little softer later in the season. Another method is to snip off twigs that have berry clusters. Take them home and leave them outside on a towel or some tissue to allow any creepy crawlies to escape before putting them in a bin liner and bunging them in the freezer overnight. Once the berries are frozen beat the bag to dislodge them from the branch and then pick out the branches and leaves. This is my preferred method.

You can strain the berries to make a nutritious fruit juice, although some sweetening is recommended, try adding honey as a healthier alternative to sugar. To make a cordial, reduce the juice by simmering and add sugar. Dilute with water and serve with ice, or use neat added to sparkling wine to make a sea bucks fizz! As well as being delicious, sea buckthorn hailed as a superfood, being packed with vitamins and minerals such as Vitamin A, B and C and is proven to preventing tumours, ulcers and detoxify the liver.


6. Elder (Sambucus nigra)

Whenever I think of summer elderflower cordial always springs to mind. Its subtle sweetness reminds me of hot breezy days. The elder tree has got to be in the top ten wild foods of the UK as it provides two delicacies for us to enjoy. The flowers which bloom in June and the berries which ripen around August to September. If you have a shrub in your garden I would recommend not taking all the flowers as you’ll then be stuck without any berries later on. Leave some to mature and you get to enjoy both harvests.

elderberry - tree foraging

Above: Elderberries are packed full of good things. Our favourite recipe is Elderberry Elixir, made with honey, brandy and warming spices.

Whilst elderberries are easily recognisable, the spray of creamy-white summer flowers are easy to mistake for other similar looking trees. Make sure you’re not accidentally picking flowers from a Rowan or Wayfaring tree as they look similar when in bloom. Get to know the whole tree. The leaves of the elder are jagged around the edge and typically have five large leaflets on each leaf. The flowers themselves are very small and grow in dense bunches that tend to grow upwards in fairly uniform, flat formation. The stems will droop down when the flowers turn into the berries. 

Elderflower cordial is an obvious classic recipe for the elder but there are so many more ways you can use the flowers. Try infusing them into Turkish delight or sorbets for a sweet treat or using them to flavour panna cotta or yoghurt. Don’t feel limited by traditional uses for elderflower cordial either, use the cordial to flavour cakes and tray bakes or add to sparkling wine. 

Come the autumn, the berries are well worth your attention. Not only does their juice taste great but they’re good for our health too, making an excellent immune system booster. Be sure to use any freshly picked berries quickly as they don’t tend to last for very long once they’ve been picked. Try cooking them to make jam, using them to make a coulis for a pudding topping, or mixing with honey and spices to make a warming elderberry elixir – this is our personal favourite. The deep purple syrup is very striking when drizzled on cheesecake. Some more unusual uses for elderberries are to make vinegar and fruit leather.

Do be aware that the seeds in the berries contain a small amount of cyanide, so you don’t want to eat the berries raw, they must be cooked. We remove the seeds and flesh by straining the cooked berries through a muslin cloth.


7. Hazel (Corylus avellana)

Hazel, as you can probably guess, gives us the hazelnut; something so commonly used in modern processed foods you may forget that you can forage for them yourself. How does the idea of making your own hazelnut chocolate spread sound? When identifying a hazel, you’re more likely to find one in shrub form rather than a full tree, with several stems sprouting from the base rather than one single trunk. In summer the leaves are large and round with a serrated edge. At the tips of the yellow-brown branches you’ll also see large green buds. When searching for a hazelnuts the best place to look is hedgerows and woodland edges. The nuts tend not to grow as well in deeper woodland as they get shaded out by taller trees.

hazelnuts - tree foraging

Above: Make your own nutty chocolate spread from hazelnuts, if you can beat the squirrels to them.

The best time of year for hazelnuts is the back end of August and into September. When you find them they might appear fairly green. These are unripe but can still be eaten. They are best when the shells have turned nut brown. They tend to grow in clusters and the nuts will have a frilly green bract around them, almost making them look like they’re wearing hats. Ripe nuts will fall from the tree but make sure you crack open the casing of a few nuts before you collect loads as often  the tree will discard any nuts that haven’t been successful to focus on growing others. Nobody wants to go home to find they’ve actually been carrying empty shells.

The other issue to content with is the Grey Squirrel who will harvest all the nuts from your favourite hazel tree before they ripen. Aside from the obvious solution to this problem (squirrel pie anyone?) you could try netting a small tree (easier said than done) or look for a tree in an urban space where squirrels aren’t present. This is where I’ve had the most success myself.

Hazelnuts give us so many possibilities. They make a nutritious addition to cakes and bakes. They compliment chocolate really nicely so you could try incorporating them into a batch of cookies which are sure to go down a treat. For something more low-key you could always sprinkle chopped hazelnuts onto a bowl of muesli or porridge for a healthy breakfast to kickstart your day with plenty of energy. Possibly a more unusual way of using the nuts would be to blend them into some homemade green pesto for extra crunch and depth of flavour, you could even try toasting them first. 

The good news is that these delicious nuts are really good for you as well, supporting a healthy heart and helping to reduce cholesterol. They’re also full of vitamin E which helps maintain a healthy immune system, so there’s no need to feel bad about snacking on this treat. 


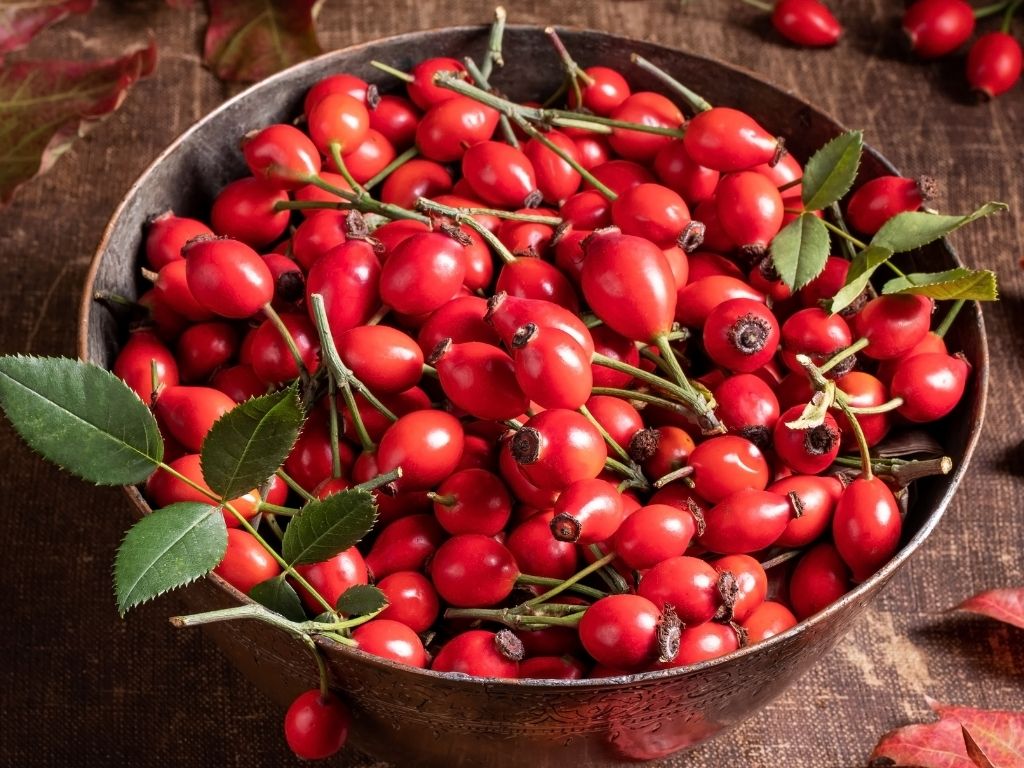
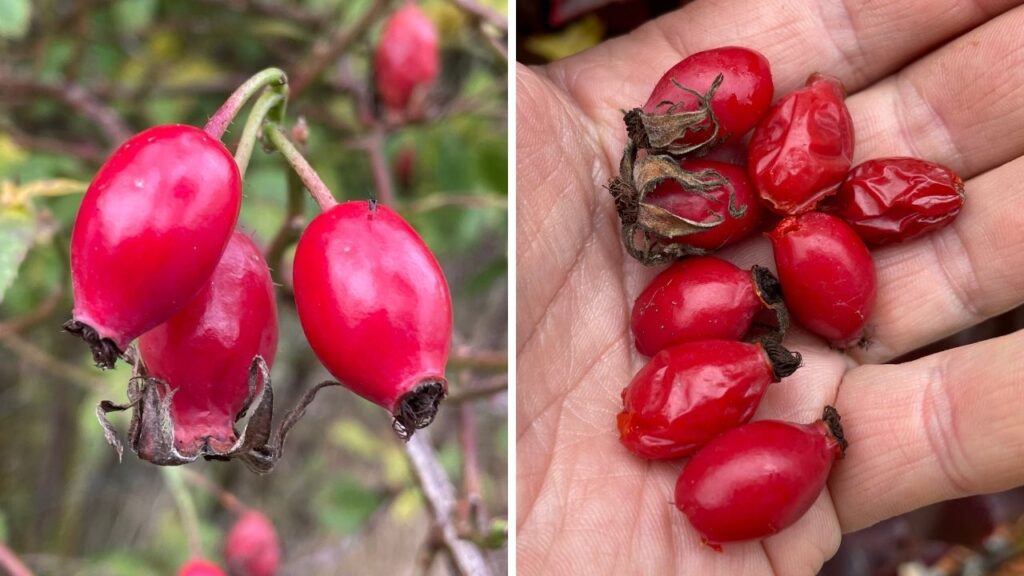
8. Rowan (Sorbus aucuparia) 

Otherwise known as Mountain Ash, this tree grows not only in high places, as it’s name suggests, but can also be found in hedgerows, scrubland and urban spaces. When flowering, rowan is easily mistaken for the elderflower as they have similar sized white flowers sitting on a flat bed, called an umbel. Once these flowers mature to fruit though the difference becomes very obvious. Rowan produces striking red berries instead of the purple-black of elder. The berries are also larger and persist on the tree long after the elderberries have dried up. Another similar feature are the leaves. Rowan has more leaflets per leaf than elder. Anywhere between 11 – 17 leaflets, opposed to elder typical 5-7.

rowan berries - tree foraging

Above: The most famous recipe for these berries is Rowan Jelly, which includes Crab Apple. It goes great with game.

It’s these juicy red berries that we’re looking to forage. You can find them on the tree as early as late July. September onwards is the main season though. Don’t be tempted to eat these berries right off the tree as they need to be cooked before they’re edible, otherwise they can cause severe indigestion due to the ascorbic acid they contain. The most traditional recipe for this unusual berry is rowan berry jelly, often paired here with crab apples as the pectin tends to thicken the jelly and make sure it sets properly.The crabs are also sweetening the jelly.

To make a jelly add equal quantities of chopped apple and rowan to a pan and simmer in water for 20 minutes. Strain in a muslin cloth over a bowl for at least 4 hours, allowing the juice to drip into the bowl, if you squeeze the mix then the jam will be cloudy. Harvest the liquid and for every 600ml of fluid, add 450g sugar and the juice of one lemon and boil again for 10 minutes. You can test when it’s ready by putting a spoonful on a chilled plate; if the jelly wrinkles when you squidge it with your finger its ready to be put into a sterilised jar. This jelly is perfect to accompany meats or even something like cheesecake to add a tart splash of colour to your pate. 

Interestingly, rowan berry flour is used in Russian baking, which gives bread a slight tang and adds a lot of nutrition. Rowan berries can also be added into chutneys, soups, and ketchups to add a depth of flavour, although it is worth adding a source of sweetness to counteract the tartness they naturally have. This is one berry that I’ve not actually gotten round to cooking with myself at the time of writing, but the jelly recipe is one that has persisted through time so it must be worthwhile. Let me know how you get on.


9. Crab Apple (Malus sylvestris)


Crab apples are a bit tricky, as the sourness of these wild fruits tends to catch people off guard. I still remember the shock of biting into one and finding out just how sour they were for the first time! Fortunately, there are still numerous ways you can use the crab apple and sweeten it to make it more digestible.

crab apple - tree foraging

Above: From these humble beginnings, all our cultivated apples came. The crab apple deserves some respect.

Unlike cooking apples, the crab apple is small, often only reaching around 3cm in diameter. This may be why they are so tart, as the flavour is concentrated in a smaller fruit. Crab apple trees are often found in hedgerows, woodland clearings and around farmland. The leaves are ovular with a finely toothed margin. The apples can be stored for several months before they become unusable, keep them somewhere cool and dry and you can always come back to them when your other foraging projects are done.

Like the rowan, crab apple is often used in jellies to offset the sharpness of flavour and I would follow a similar recipe to the rowan berry jelly above. There are many more ways to use them though. They can be sliced and dehydrated in an oven to make dried apple slices, which tend to be a lot sweeter and make a delicious snack on walks or part of a healthy breakfast when mixed with yoghurt and nuts. They can also be used as an ingredient in fruit leather which is always very popular with kids. For grown ups, how about this liqueur? Add layers of sliced crab apples to a jar, sprinkling sugar in between each layer and then covering with vodka. Leave for a year before draining; a long time I know but you should have a bottle ready for the following Christmas.

Other ideas for the crab apple include juicing them, crab apple butter, adding them to pickles or chutneys, or in a mixed fruit pie or crumble. Their tartness adds an unexpected bite to sweet puddings, so give it a go.


10. Guelder-Rose (Viburnum opulus)

The guelder-rose  was previously known as swamp elder, which to me is a more appropriate name as it describes this shrubby tree much better. Native to the UK the guelder-rose can be identified in the summer by its serrated three lobed leaves, which are similar looking to maple leaves, and are slightly hairy on the underside. Similar again to the elder and rowan the guelder-rose has umbels of white flowers that bloom around May to July. Look closer and you’ll see that a cluster of larger petalled flowers are surrounded by a ring of smaller flowers. Very striking indeed. In autumn these flowers mature to small shiny red berries, similar in appearance to cranberries which sometimes gives it the nickname European cranberry bush.

guelder rose - tree foraging

Above: A less well known wild food, these berries make a tasty, tangy jam which goes great on toast.

When searching for this berry look in damp places along riversides, scrubland, and hedgerows; it tends to have a habit of spreading if left unattended. When preparing the berries make sure they’re cooked before eating them as they can be slightly toxic if eaten raw, so don’t eat them straight off the tree. The berries need to be prepared in a similar way to rowan, as they are also fairly bitter. They do work well in jellies and jams. Try adding them with rowan berries and crab apples for a tangy addition to toast and porridge or add a dollop to your Sunday roast. Often it’s best to wait for the first frost of the year before collecting the berries as it tends to sweeten them, but you could always pop them in the freezer for the same effect if you can’t wait. I made jam and although when cooking the aroma wasn’t all that appetising, the resulting jam was very good.

As well as being used as a source of food the bark of the tree has been used for hundreds of years to soothe menstrual cramps as the bark has sedative and antispasmodic properties. This is probably due to the chemical viopudial, a compound that lowers blood pressure relaxes smooth muscle, which also means it’s useful in alleviating hiccups and stomach aches. However, it is worth saying that there have been no medical trials to confirm these properties or in what quantities it should be consumed, so I wouldn’t advise just peeling off bits of bark to use, especially if you’re not confident on your identification. Seek the advice of a professional herbalist if you want to take this further.


Where Can You Find These Trees?

Now this all sounds good on paper but how you do go about recognising these tree species and finding the right habitats where they grow?

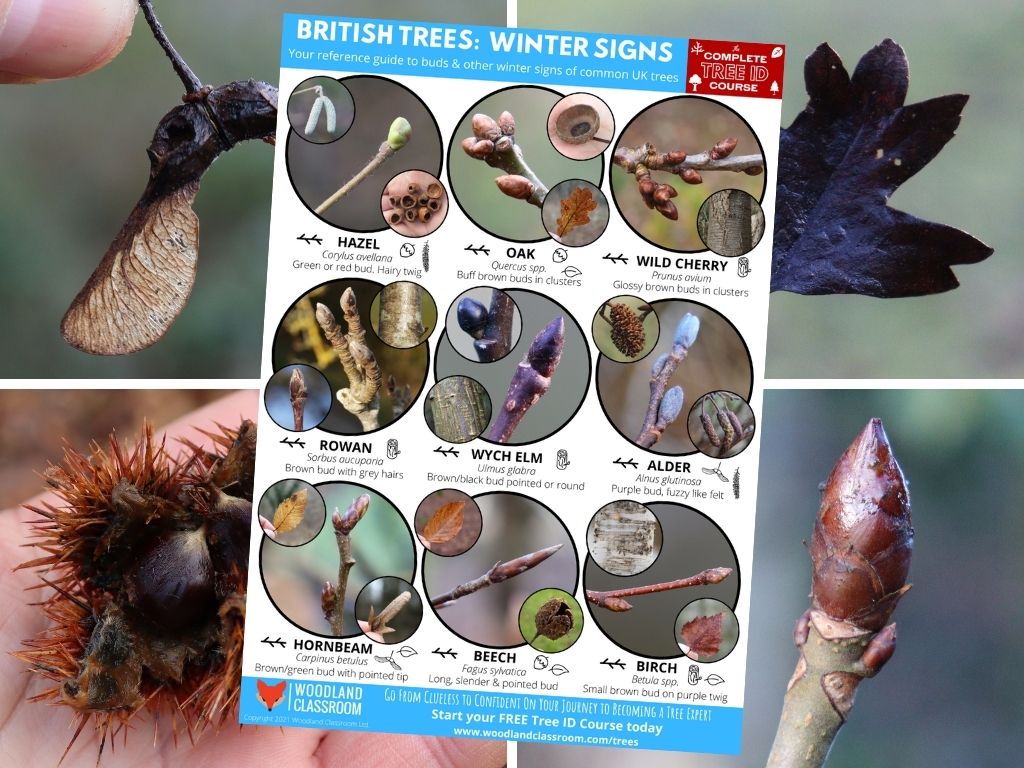
I have created a FREE online Tree Identification course called Kickstart Your Tree ID Skills, which you can enroll on today and start improving your skills so you can find these wild foods for yourself. The course will also show you how to identify trees at other times of the year; winter, spring and summer. Here you will learn about buds, flowers, leaves, bark and other useful identifying signs so you can really get to know our native trees all year round. Sound good to you? Register for free right here.

free tree identification course

Sign up to our free course today and watch videos, download cheat sheets and access photo galleries.

You can also download a copy of my FREE Autumn Tree Guide which you can view on your phone whilst out and about. It features many of the species in this blog with quality pictures of the fruits, berries and nuts. You can grab your copy of that guide right here.

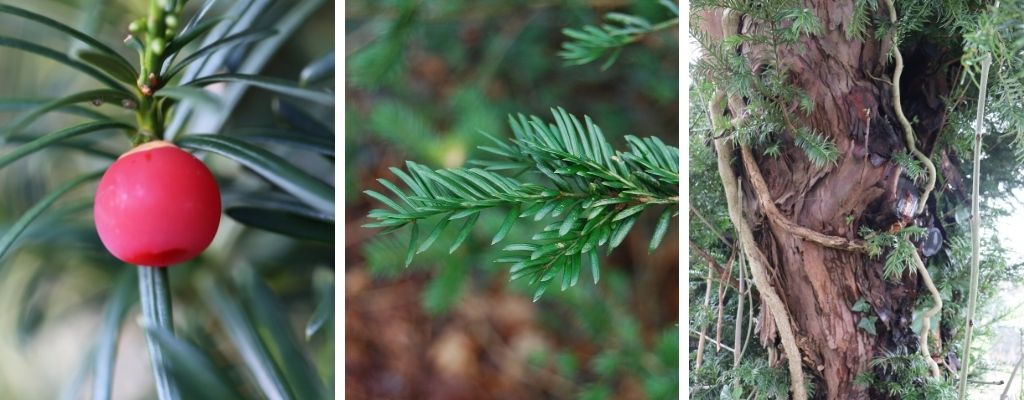
So, there’s my list, not so much a definitive top ten, as there are a couple of omissions here of native trees which produce some fantastic wild foods at times of the year other than autumn. Perhaps I’ll make that absolute top ten list later down the line. Certainly birch sap syrup, wych elm seeds wild cherries are all worth a mention.

I hope you found this article inspiring and I’d love to hear if you make anything with the wild foods featured. If you want more good stuff from us you could subscribe to our YouTube Channel where we post videos about trees, wild food and nature connection.

Happy foraging,

James

forage your own sweet chestnuts

Forage Your Own Sweet Chestnuts

Often the first thing that comes to mind when thinking of chestnuts is Christmas. Have you got the words “chestnuts roasting on an open fire” singing in your head? But, did you know you don’t have to buy them in the supermarket? You can forage your own sweet chestnuts, if you know when and where to look. We’ve made a video all about how to do just that, and you can watch it just below.

Autumn is a perfect time to go foraging for a variety of wild nuts, berries, and fungi. In this blog we’re going to focus on how to find and cook sweet chestnuts, one of our favourite wild foods of the season. You will also learn how to identify the tree they grow on and learn the nutritional benefits of this wild food.

In the UK, sweet chestnuts come into season in October, so if you want them for Christmas you have to be looking well in advance and be ready to freeze them. Finding a ripe chestnut on the forest floor ready for roasting is such a treat and this article will give you the best chance of finding some for yourself. Read on to learn about the history of the sweet chestnut, become an identification expert and learn some delicious recipes to cook at home or over the campfire.

The sweet chestnut hails all the way from Western Asia and was thought to have been introduced into Europe by the Greeks or Romans and used by the military to sustain their troops. The Latin name Castanea is actually derived from the name of a Greek town called Castonis where the tree was heavily cultivated for their nuts. The sweet chestnuts that grow in the UK tend to be smaller and less successful than the ones that grow in mainland Europe due to the cooler climate and in fact most of the chestnuts we buy at Christmas are grown in either Portugal or France. The tree is at the edge of its natural range here, though climate change could make them more favourable to the UK.

sweet chestnut and wild mushroom risotto

Above: Sweet Chestnut & Wild Mushroom Risotto. An autumn favourite in our home.

How To Identify Ripe Sweet Chestnuts

The spiny casing goes from a lime green to a light brown as the chestnuts ripen, but the best ones will be more green than brown. Unfortunately, many of the largest ripe nuts will be eaten by squirrels before they can hit the ground so it’s important to go foraging early to give yourself the best chance of finding a good batch. Remember to take a thick pair of gardening gloves with you for cracking the casing open, as the spines can make the casing impenetrable and painful to handle. Don’t be disheartened if the chestnuts aren’t as big as the casing would suggest, it’s a little luck of the draw when foraging.

Sweet chestnuts are easy to identify as they’re covered in a soft white fuzz that tufts into a point at the top of the nut. Be careful not to mix them up with horse chestnuts (conkers to you and me) which looks very similar but have far less spines, a glossy shell and are more rounded. Another difference is that there are up to three sweet chestnuts in each case, whereas there is typically only one horse chestnut in each case. If you find a nut out of its casing and you’re not confident in identifying it, you can always look at other clues from the tree itself. So, let’s take a look at the video where I go foraging for nuts… 

Now we’ve had a good look at the this tasty wild food, let’s go into a bit more detail about the identifying features of the tree, so that you can be really confident you know what you’re looking at.


How To Identify a Sweet Chestnut Tree

The sweet chestnut (Castanea sativa) is a member of the beech family and can sometimes be confused with the horse chestnut (Aesculus hippocastanum) due to their similarity to the much-loved conker. However, there are some distinct features that set the sweet chestnut apart and will reliably help you identify the tree correctly.

Leaves

When looking for sweet chestnuts the leaves are the first identifier. They have an elongated ovular shape with a strongly serrated edge. The leaves themselves are one of the largest you will find commonly in the countryside and longer than they are wide, growing up to a huge 28cm long and up to 9cm wide. Another clue that you’re looking at a sweet chestnut are the 20 or so pairs of veins packed closely together running down the central vein.  In the spring and summer, the leaves are a thick and glossy green, fading into a mottled amber in autumn before falling off.

You can, of course, look for these distinctive leaves in the forest floor below the tree throughout winter too.

Nut Casings

Unlike the stumpy spikes of conker casings, sweet chestnuts are significantly more prickly with sharp barbs protecting the nuts from pilfering wildlife, though they don’t seem to put squirrels off. So, a thick pair of gardening gloves is essential when trying to break them open. The technical term for the spiny casing is cupules and this shell goes from a bright vibrant green to a lighter brown as they begin to mature and decay on the ground. You will start spotting the small, young cupules as early as July.

You can tell when the chestnuts are ripe because the casing will be large and green, heading towards a lighter brown colour. They will begin to split open as they ripen, and you can often see parts of the chestnut through the cracks in the casing as they grow. The cupules typically fall over a two week period around the middle of October and you will often see bits of brown casing around the tree showing the squirrels and mice have been hard at work.

Bark

On younger trees the bark is a smooth brown or deep forest green. However older sweet chestnuts develop deep fissures running lengthways up the tree which have a tendency to twist as they grow creating a spiral of fissures around the trunk which is incredibly beautiful and distinctive. Along with the fallen nut cases, this is the most reliable indicator of a mature sweet chestnut, especially going into winter when the trees lose their leaves.

Flowers

Sweet chestnuts have long light yellow catkins that flower around June, with both the male and female parts growing together on the same tree. A catkin will contain small female flowers at the base, which become the young nut cases once they are pollinated.

how to identify sweet chestnut

Top Left: Early summer flowers. Top Right: Large leaves with a serrated edge. Bottom Left: Mature trees have a twist ini the trunk. Bottom Right: The prickly nut cases of autumn.

If you’d like to know more about how to identify common trees in the British countryside, then you could join the thousands of students already on my FREE online tree identification course, where you can learn through videos, downloadable ID sheets and photo galleries. You can enroll for your free place on the course right here.


How To Cook Sweet Chestnuts

One of the uses utilised by the Romans is using ground roasted chestnuts to make polenta, a traditional Italian food. Today polenta is generally made from boiled cornmeal but there is no reason you couldn’t make your own polenta with chestnuts. To make a sweet chestnut flour you need a large quantity of chestnuts, probably more than you would be able to forage but there is no reason you couldn’t try to make it with shop-bought chestnuts. If you’ve never tried polenta before, it has a porridge-like consistency when hot but can be cooled down into a solid block that can be cubed and fried and goes really well with stews. You can also try using the flour to thicken bread and cakes to give it a naturally sweet edge.

Another favourite is the roasted chestnut at Christmas, if this is something you haven’t tried I would strongly recommend incorporating roasted chestnuts into your Christmas traditions. Sweet, toasted chestnuts are such a seasonal delight, but they don’t have to be eaten just at Christmas. In October you can pick them fresh from the tree and cook them there and then in a pan on the campfire or at home in your oven. Another tradition is to substitute the pan for roasting the nuts on a garden spade. They can also be cooked right in their shells in the embers and ash of an open fire. There’s a lot of fun to be had with this ancient method of simple cooking.

campfire cooking sweet chestnuts

Above: The simplest way to cook chestnuts is to roast them right in the embers of your campfire. The nut shells protect the food inside. No need to tin foil.

To roast them in an oven, score a cross on the shells and put them in a conventional oven at 200°c for 30 minutes. Once they are cooked leave them to cool for a minute or two before peeling the shells and eating.

There are so many other ways to incorporate sweet chestnuts into your food. Add roasted chestnut chunks into chocolate brownies for added crunch or into stuffing for Sunday lunch. Try tossing roasted chestnuts in a sweet soy sauce glaze for an afternoon snack. The fantastic thing about them is that chestnuts go so well with both sweet and savoury dishes so really the only limit is your imagination.


Marron Glacés; a French Delicacy

Below are instructions on how to make marron glacés, a traditional French recipe for crystallised chestnuts which was popular in the 18th century. They’re a delicious treat that would make for a unique addition to the Christmas table. The chestnuts require soaking over several days so leave plenty of time to prepare them.

You will need:

  • 500g fresh peeled sweet chestnuts
  • 300ml water
  • 500g caster sugar
  • 1tsp vanilla extract

Method:

  1. Boil the peeled sweet chestnuts in a pan for 10 minutes then drain the water and with your fingers, or a small clean cloth, peel the thin skin away.
  2. In another pan bring the vanilla extract, caster sugar and water to a boil to make a syrup. Make sure you stir continually to avoid any burning at the bottom of the pan. Simmer on a medium heat for 5 minutes.
  3. Stir in the chestnuts and simmer for another 10 minutes. Keep stirring!
  4. Take off the heat and transfer to a clean bowl and leave covered in a cool place overnight. Don’t put it in the fridge or the syrup will set and take longer to boil the next day. Leave them to soak for a minimum of 12 hours.
  5. The next day in a fresh pan, bring to the boil and cook for only 2 minutes before taking off the heat and leaving them to soak again for at least another 18 hours.
  6. Repeat this process three more times (I said you need plenty of time for this one!) until the sugar syrup has been absorbed by the sweet chestnuts.
  7. Transfer the chestnuts to a tray lined with baking paper and cook at 70°c for 1-2 hours with the oven door opened slightly. Check on them regularly; you want the syrup to harden before removing them.
  8. Once cooled they are ready to serve. Enjoy!


Good News; Chestnuts Are Good For You Too

Unsurprisingly sweet chestnuts offer a wealth of nutritional benefits, being a rich source of vitamins and minerals. Chestnuts are a source of carbohydrates and proteins; only 100 grams contains a third of your daily required carbohydrate intake and 44% of your daily required vitamin C intake which promotes the production of white blood cells to boost the immune system.

As well as this chestnuts also contain magnesium which helps strengthen enamel on your teeth and calcium and phosphorus which strengthens bones. You can also find your B vitamins in chestnuts which contribute towards keeping your nervous system and skin healthy as well as helping the body break down food, in fact B vitamins 1 through 6 can be found in chestnuts.

You can read a more about the detailed breakdown of the nutritional value of sweet chestnuts in this article by Health Benefits Times.

 Get further information about the benefits of B vitamins on the NHS website, right here.


Get More Wild Food Recipes & Foraging Videos

If all this talk of wild food has wetted your appetite for more then I have some good news for you. Here at Woodland Classroom we have created a special community, we call our Tribe, who in return for their support get access to exclusive wild food and foraging videos, recipe ideas, blogs, live hang outs and more. Sound good to you?

From as little as the price of a cup of dandelion coffee per month you could join our Tribe and not only be part of a growing and supportive nature connection community but also get a whole heap of perks available only to our Patrons. You can find out more about this community over on Patreon. When you join you’ll get immediate access to the entire back catalog of wild food, bushcraft and nature connection videos and resources we’ve created for our members. Find out more right here.

get access to exclusive foraging videos

Above: A selection of just some of the wild food videos you could access when you join our Tribe on Patreon.

free autumn tree guide

FREE Autumn Tree Guide

We all know that tree leaves change colour in autumn, that acorns grow on oak and conkers grow on horse chestnut, but can you tell me what the autumn fruit of the hornbeam looks like? For anyone looking to improve their tree identification skills autumn provides us with many distinctive signs such as fruits, nuts, berries and leaf colour that we can use to recognise our native and common tree species. In this blog I’ll introduce you to some of clues to look out for in autumn and break down the differences between common trees which often get confused. You can get outdoors and spot these clues for yourself with a free download I’ve created; Autumn Tree Guide, which you can get your hands on just below.

autumn tree guide - free download

By the way, if you love trees, but struggle to tell one species from another, then you could enroll in my FREE Tree Identification Course online. More details can be found at the end of the article.


3 Common Maple Trees

Maple leaves are quite a distinctive shape, just think of the Canadian flag. But we have several maple species commonly growing in our countryside and when it comes to including formal planting and gardens that numbers goes sky high. We shall steer clear of those for now. Let’s just look at the differences between our 3 most common maple trees which you’re most likely to see on a country walk. We will look at the difference in their leaves in autumn and also their fruits.

comparing autumn maple leaves

Left: Field Maple (Acer campestre), Middle: Sycamore (Acer pseudoplatanus), Right: Norway Maple (Acer platanoides)

So, we have 3 different maples each with their characteristic 5-lobed leaf shape. But they are also clearly quite different, especially as autumn reveals it’s colours. Let’s break that down…

Field Maple (Acer campestre) – our only native maple in the UK. Firstly, the leaves are much smaller than the other two species here and the tree itself is smaller when mature also. The lobes are more rounded than the others. But a key difference to look out for is the leaf colour in autumn, which across the whole tree will be a bright yellow. The best example is the leaf seen in the extreme left. Once they fall, they will turn brown.

Sycamore (Acer pseudoplatanus) – a commonly planted non-native maple. We’ve got a much larger leaf here than the field maple, but also the presence of Tar Spot Fungus – have you noticed those black spots? You don’t get these spots on our other two maples here, so it’s a dead giveaway. There’s something interesting about the autumn leaf colour too, in that there isn’t much to shout about. Typically you won’t see a great display of colour from our sycamores, they generally just turn a dirty/patchy brown. This is in contrast to our other two species here. Take caution though; sometimes we do get yellow leaves across the tree, but this is less common. Natures loves not conforming to simple rules 🙂

Norway Maple (Acer platanoides) – next to sycamore this is probably the most commonly planted non-native maple in the UK, particularly in urban areas and roadsides. We have a larger leaf, like sycamore, but the lobes are much more jagged and dramatic in their form. We also can’t ignore the amazing display of colours we get from norway maple, which is a world away from sycamore at this time of year. Just look at those reds, oranges and yellows.

In summer, all these leaves are green, of course. But come the autumn you can clearly see the differences. Let’s not forget the fruits of the maples either, what many people call “helicopters.” These winged seed cases are a favourite of children who love throwing them in the air and watching them spin to the earth. Let’s take a look at the differences between our 3 maples when it comes to these “helicopters.”

comparing maple seeds

Left: Field Maple (Acer campestre), Middle: Sycamore (Acer pseudoplatanus), Right: Norway Maple (Acer platanoides), Inset: Sycamore seeds in autumn

You can see the clear difference in not only the typical size of the winged seeds but also their shape. Field maple seeds typically have their wings at 180 degrees to each other, whereas sycamore wings are generally at a more down-swept 45 degrees. The norway maple wings are larger again. By the way, this picture is of the seeds in summer, when they are not fully mature so be aware that in autumn the mature wings will all be brown in colour, as seen in the inset picture.

I hope that’s cleared up any confusion between these 3 common maples. Now, let’s look at some autumn berries which can be the cause of confusion.


Red Berries Everywhere

To someone starting out in tree identification, it can be easy to get confused between tree species which have similar berries, especially when they’re the same colour. Just take a look at these below…

uk native trees in autumn: red berries

Top Left: Hawthorn (Crataegus monogyna), Top Right: Guelder-rose (Viburnum opulus), Bottom Left: Rowan (Sorbus aucuparia), Bottom Right: Whitebeam (Sorbus aria)

Here we have four different native trees, each with red berries. So, how can we easily tell between them? Well although this may seem confusing at first glance there are differences to see once we slow down and look closer. Here’s my handy hints for telling these trees apart in autumn:

Hawthorn (Crataegus monogyna) – this is the 3rd display of colour we’ve had from this tree over the year. The first being the flush of spring green leaves which fill our hedgerows and roadsides. The second comes in May with the white blossom, smelling of sweet almonds. This third display are the berries themselves, known as haws. They are round to oval in shape, with a matt finish. Inside you’ll find the flesh is a yellow/green colour which surrounds a large stone. You will see less fruits per bunch than you will with the other species here. Also, look out for the thorns on the branch, which these other species don’t have.

Guelder-rose (Viburnum opulus) – a common shrub of hedgerows. Firstly these striking red berries grow in umbels (a cluster of stalks), unlike the hawthorn. Also, these berries are really glossy. They have a real shine to them. The flesh inside is red, with the whole berry being much less firm than the others here. Lastly, their shape is important, which is more difficult to see from the above picture, but they are partially flattened, as if their round shape has been squashed.

Rowan (Sorbus aucuparia) – you may know this tree as the mountain ash. These berries grow from an umbel, with many berries per cluster. The seed inside is much smaller than that of hawthorn. The month you’re seeing these berries is also important too because they can appear on the tree as early as July and can persist after the leaves have fallen in autumn. So, they have a long season on the branch. Beware that there are many cultivars of rowan which are planted in urban spaces. You can even get orange or yellow berry varieties. But in the countryside, you’re unlikely to see these.

Whitebeam (Sorbus aria) – These are the largest berry of the four seen here. A feature which is difficult t pick up from this image is that the berries are peppered with white/grey spots called lenticels. Notice the latin family name ‘Sorbus’, this species is related to our rowan. So, it’s no surprise there are some similarities in how the berries look. Like the rowan, there are several cultivars of whitebeam which you might well see in urban areas and gardens, so we’re just talking about the wild native here.


We’re missing a key piece of the puzzle here though, the leaves. We need to widen our view of these trees because if we just look at the berries we’re not using all of the information available to us. Take a look at the images below and you’ll see that we have four very different leaf shapes with their respective autumn colours.

autumn leaf collage

Top Left: Hawthorn (Crataegus monogyna), Top Right: Guelder-rose (Viburnum opulus), Bottom Left: Rowan (Sorbus aucuparia), Bottom Right: Whitebeam (Sorbus aria)

So, as we can now see, with the full picture things become a little easier. This is one of the big things I ask my students to practise when they’re out identifying trees. I ask them to “Tune In” so they look at the bigger picture before concentrating on the details. Clues like leaf shape, bark, or even the place where the tree is growing can tell us a lot about what we’re looking at.


Get Your FREE Autumn Tree Guide

I’ve created a handy guide you can use when you’re out and about looking at trees during autumn. The guide features 18 native and common British trees which have fruits, berries or nuts that you might already be familiar with but also there’s other signs here that you’ve probably never noticed before. I’ve laid out similar looking berries side by side so that you can easily distinguish between them.

You’ll also see smaller images featuring typical autumn leaf colour for each species. Notice which ones turn a distinct colour and also which ones, like alder and sycamore, don’t tend to have a display of colour at all. This too can be a useful identifying feature, once you get your eye in.

I hope you find it useful on your journey to understanding the trees around us.


Discover more About Trees

It can be so interesting to really look in to the details of our native trees and notice the changes that they undergo throughout the four seasons. That’s just what I’ve created for my FREE introductory online course called Kickstart Your Tree ID Skills. Here you will find a whole host of resources to take you from clueless to confident on your way to really knowing your trees.

REGISTER FOR THE FREE COURSE HERE

kickstart your tree id skills, free online course

When you sign up to this free mini-course you’ll be identifying common trees with video tutorials and photo galleries at your fingertips. Start your journey to becoming a fully fledged Tree Expert today. The course includes Tree ID Cheat Sheets which you can download and take outdoors with you.

“I’ve been frustrated for so long trying to learn my trees myself and haven’t gotten far. This course answered everything and has seriously upped my game.” Dr. Patrick Alexander


Happy tree hunting folks.

James

Social Share Buttons and Icons powered by Ultimatelysocial