Call us on: 07876 794098

great winter activities

identifying trees in winter UK & Ireland

Identifying Trees in Winter: A Beginner’s Guide to Spotting Trees Without Leaves

Yes, You Can Identify Trees in Winter!

I’ll be honest, when I first started learning to identify trees, winter felt like the hardest season to do it. Without leaves on the branches, trees can look like lifeless skeletons, and it’s easy to think that identifying them by species is impossible. But over time, as an outdoor educator, I’ve discovered that winter is actually one of the most rewarding times to develop tree ID skills. It really gets you looking closer at the details, and once you nail winter, identifying trees in summer becomes a breeze.

In this post, I’m going to share with you how I identify trees in winter, focusing on key seasonal features like bark, buds, leaf litter and tree form. I’ll also give you three practical examples to show how these techniques work in the field. And if you’re feeling inspired to learn more, I’ll invite you to join my free online course, Kickstart Your Tree ID Skills.


My Process for Identifying Trees in Winter

When I head outdoors in winter, I focus on four key features that trees display even when their leaves are long gone. Let me walk you through my approach:
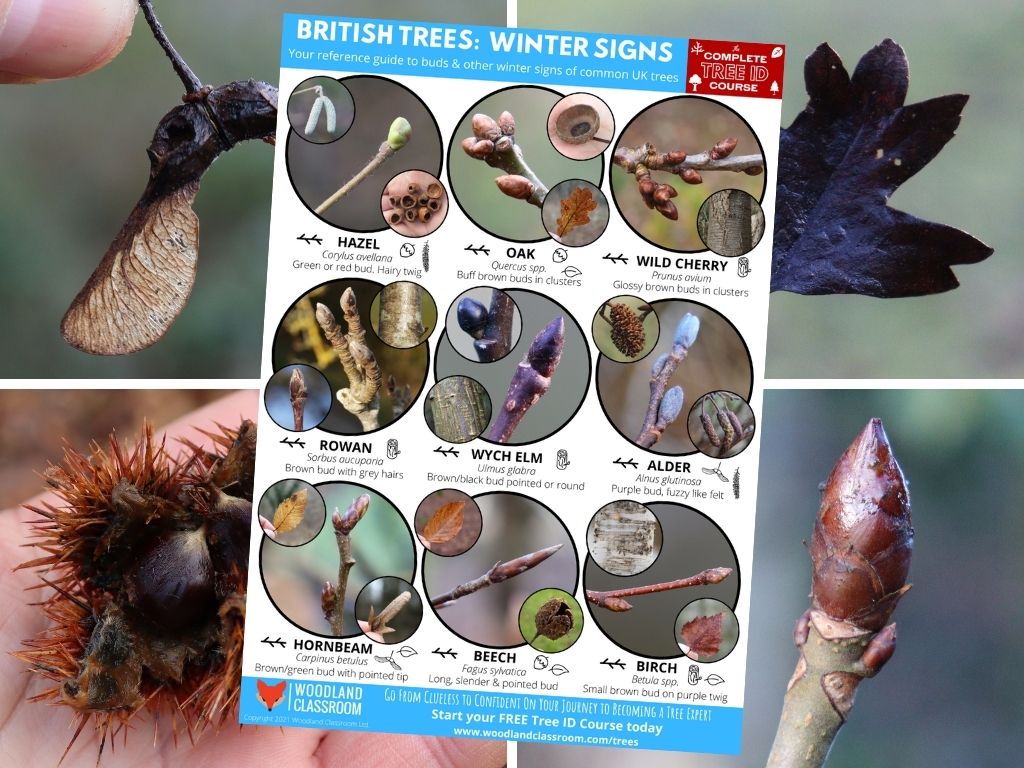
1. Buds

Once I learned to recognise buds, a whole new world opened up. They’re like the fingerprints of trees—each species has a unique  combination of shape, colour, and size. It’s important to not look at the bud in isolation though but to consider the twig and most importantly, the arrangement of the buds on that twig. More on that later. Here’s some examples of buds that stand out:

  • Ash (Fraxinus excelsior) trees are easy to identify in winter with their striking large black buds, arranged in opposite pairs. The young twigs of ash are a grey/green colour. The terminal bud resembles a Phillips screwdriver head. Once you see it, you can’t un-see it.


  • Beech (Fagus sylvatica) buds are long, slender (more so than any other common tree bud), and pointed—almost like little cigars waiting to unfurl. The twig of beech is typically slender, with a grey bark.


  • Horse Chestnut (Aesculus hippocastanum) buds are huge! Noticeably larger than other common tree buds. They are arranged in opposite pairs and are sticky to the touch. Look below the buds on the twig and you’ll see what looks like a horseshoe. This is the leaf scar, left over when the leaf fell in autumn. It’s one way this tree got its name.

identifying trees in winter using buds2. Bark

Bark can be one of the easiest and most reliable clues in winter. I love the variety you can find—some bark is smooth, some deeply furrowed, and some even peels away. Not all trees have bark that stands out from the crowd though, there’s a lot of grey/brown furrowed bark out there. But here’s some examples of a few which really ping out to the eye:

  • Birch (Betula spp.) is one of my favourites to spot because of its bright, white, papery bark. There’s nothing else like it.


  • Wild Cherry (Prunus avium), when it’s mature, has a rich brown bark with a high glossy shine to it. Across the trunk you’ll see distinctive horizontal lines called lenticels. The bark also has a peeling quality to it a bit like birch.


  • Beech (Fagus sylvatica) trees live to a grand old age and what is distinctive about their bark is that it typically remains smooth and unifssured even in it’s veteran years when every other tree species around it has long since cracked up. This feature makes the beech an easy spot in winter.

3. Leaf Litter

Even if there are no leaves on the branches, the ground can tell you a lot. I always look for fallen leaves and other debris at the base of a tree. But heed this warning, leaf litter is most reliable when the tree is isolated. If the tree is surrounded by many others, say in a woodland setting, then how can you be sure that the leaves you’re looking at belong to the tree above? So, if I’m not looking at an isolated tree, I tend to use leaf litter to re-enforce the conclusion I’m coming to from already having looked at the buds, twigs and bark. Saying that. here’s some distinctive leaf shapes to look out for on the ground:

  • Oak (Quercus spp.) leaves, with their lobed edges, are usually unmistakable. It’s a shape that appears in so much iconography that most of us know it inside out. The good news is that oak leaves have a high tannin content in them so they are well preserved through the winter for you to find.


  • Scots Pine (Pinus sylvestris) needles can be found anytime of the year below the tree. They will have browned off form their deep green colour, but what you’re looking for are needles which are joined at their base in pairs. Remember “Is it’s a pair, it’s a pine.” Needle length around 5-7cm is typical. This is a great way to spot our only native pine species without having to climb those tricky limbs.


  • Wild Service Tree (Sorbus torminalis) is a native species that most people haven’t heard of. It’s fairly rare, preferring ancient woodland sites. But it’s leaf litter is highly distinctive as it doesn’t look like anything else out there. Imagine a maple leaf (think of the Canadian flag) with 5 pointed lobes, but then it’s been put on a rack and stretched out, elongated. In Autumn time they can be a bright firey red colour.


identifying trees in winter using leaf litter4. Tree Form

I always take a step back and look at the overall shape of the tree, its “posture,” if you will. In winter, there are some trees which have a very distinctive outline and it’s worth knowing these:

  • Look at the outer branches of an ash (Fraxinus excelsior) tree and you’ll see they are smooth, upswept and with distinctive buds and twigs in opposite pairs. To me, the tips of the branches resemble a devil’s pitchfork. Look out for this.


  • Silver Birch (Betula pendula) trees have a habit of being pendulous toward their branch tips. You’ll notice that the end of the branches droop down, sometimes dramatically so, toward the ground and ending in very fine twigs, looking almost like hair swaying in the breeze. This is also a good feature to know as it helps you distinguish this species from other birch trees.


  • Hazel (Corylus avellana) is never a big tall tree. It’s a short shrubby tree that typically grows many stems from it’s base, shooting straight, long and upward to the sky. These multiple stems are often densely packed and made up of thicker and thinner shoots from several years of growth.

identifying trees in winter using form and shape


The Three Steps I Use to Identify Any Tree

Over the years, I’ve developed a simple three-step process that helps me identify trees, no matter the season:

STEP 1: Look at the Tree in Context
Take a moment to tune into your surroundings. I always consider where the tree is growing. Is it in a hedgerow, woodland, or near water? For example, alder and willow trees love wet habitats, while rowan is more common in upland areas. The more you practise your tree identification, the more this habit becomes useful as you ask “what do I expect to see in this environment?”

STEP 2: Begin With A Branch

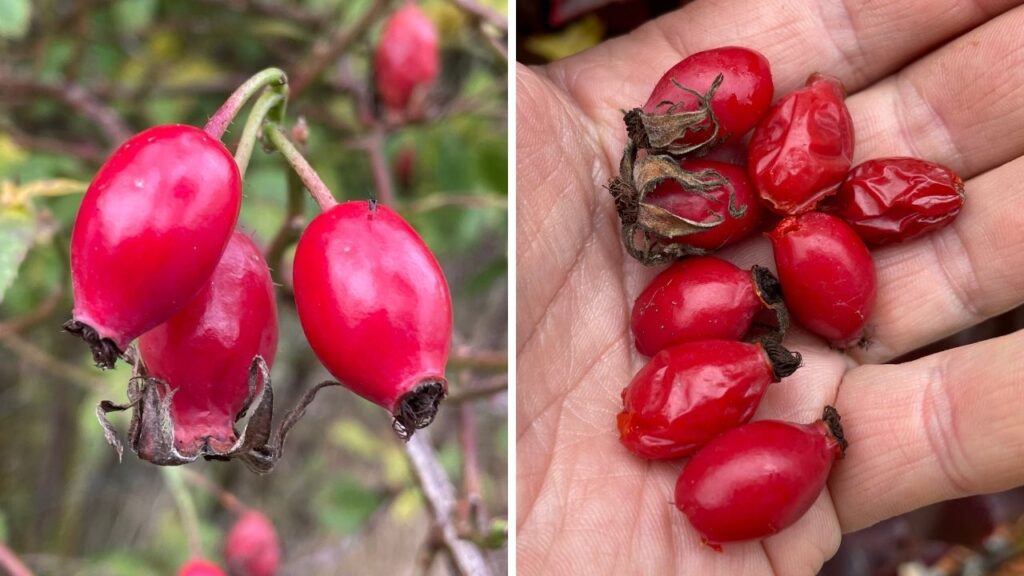
Rather than getting overwhelmed, break the tree down into parts. I focus on one feature at a time starting with the a young healthy branch. Everything you need to know to identify the species is here in the buds, the twig and any withered fruits that be still hanging on. Once you’ve had a good look here, look closer at the other features such as bark, leaf litter or the overall form. Winter is perfect for this, as these features are more prominent without the distraction of leaves.

STEP 3: Ask A Question, Are The Buds Opposite or Alternate?
You might have noticed I’ve mentioned a few times whether the buds are arranged in opposite pairs or alternately along the twig. This is so important, because trees (for the most part) show one or the other. For instance, if a tree (in our British countryside) has opposite buds, it’s likely to be one of a select few; ash, elder, horse chestnut, sycamore, field maple, spindle, wayfaring tree or guelder-rose. I appreciate at this stage you might be thinking, “I can’t remember all those.” Well you don’t have to, that will come with practise,. Right now, it’s important to just look closer and start to recognise these patterns.


Example of Winter Tree ID in Action

Let’s put it into practise and I’ll share a real-life example where these techniques come into play.

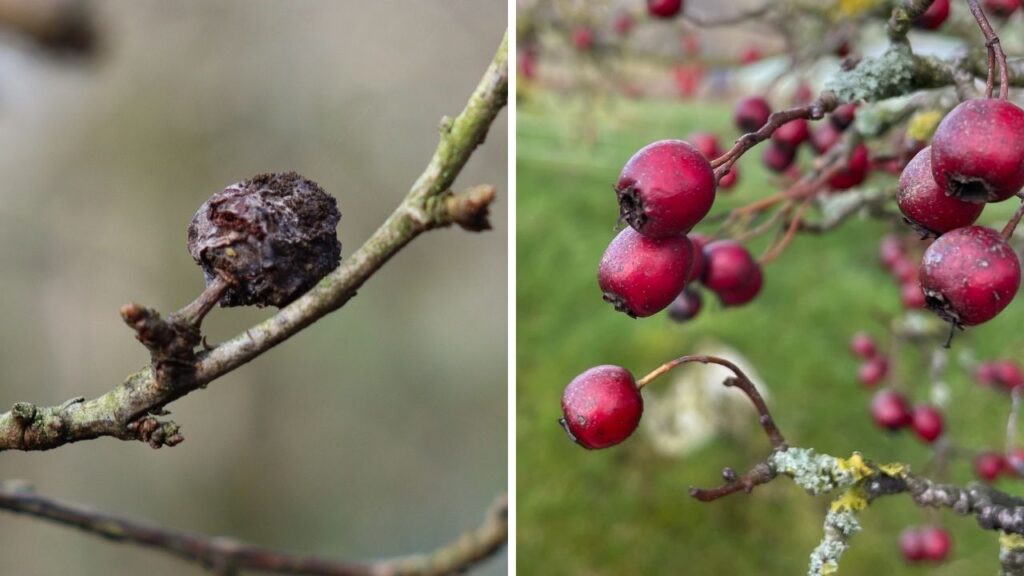
Elder is a very common native tree found in all sorts of woodland and hedgerow. Here’s what i would look out for when identifying this tree in winter…

Bud & Twig – purple buds in opposite pairs on a thin grey twig.

Bark – mature bark is grey, knobbly and corky to the touch, try digging your thumbnail into it.

Leaf Litter – not usually found in late winter as it rots away, so not to be relied upon. If found, it is a composite leaf, made up of typically 5-7 smaller leaflets.

Tree Form – a small, shrubby tree, typically not taller than 6m. Often with multiple stems growing from the base or someway up.

Want to see these identifying features out in the field? You can watch my short video where I investigate the Elder in winter. It’s a snippet from my online tree ID course.


Take Your Tree ID Skills to the Next Level

If you’re excited to learn more about identifying trees, why not join me for my FREE online course, Kickstart Your Tree ID Skills? In this course, I walk you through everything you need to know to identify native UK and Ireland trees, with videos, quizzes, cheat sheets, photos and practical tips to help you grow your confidence.

👉 Sign up here for free and take the first step on your tree ID journey!


Conclusion: Why Winter Tree ID is Worth It

Remember, winter tree identification isn’t as hard as it looks—it just takes practice and a little know-how. By focusing on bark, buds, leaf litter, and tree form, you’ll soon find yourself confidently identifying species even on the coldest days.

I hope these tips and examples have inspired you to get outside and give it a go. And if you want to learn more, I’d love to see you in my free online course.

Happy tree hunting,

James
Head Instructor at Woodland Classroom

Creator of The Complete Tree ID Course

free winter tree id guide to UK & Ireland

FREE Winter Tree ID Guide

Many of us might well be able to spot an oak in winter by looking for fallen acorns or the familiar leaves, but could you tell me the difference between blackthorn and hawthorn in winter just by looking at the buds? Or do you know which trees give themselves away in winter by their bark? We might be able to identify trees in summer when their leaves are on but winter is a whole different ball game.

For anyone looking to improve their tree identification skills winter provides us with many distinctive signs such as buds, bark, twigs and fallen leaf litter that we can use to recognise our native and common tree species. The clues are all there if you know how to look.

In this blog I’ll introduce you to some of clues to look out for in winter and break down the differences between common trees which often get confused. You can get outdoors and spot these clues for yourself with a free download I’ve created; Winter Trees Guide, which you can get your hands on just below.

free winter tree id guide to download

By the way, if you love trees, but struggle to tell one species from another, then you could enrol in my FREE Tree Identification Course online. More details can be found at the end of the article.


Bud Arrangement: The BIG Giveaway

One of the first things you can ask a tree when you are trying to identify it in winter is this; “Are the buds arranged alternately or in opposite pairs?”

This is absolutely key to nailing the species of tree as once you’ve answered that question it allows you to eliminate a whole bunch of species from your enquiry.

The majority of native tree species in Britain have their buds arranged alternately along the branch.

One last thing to remember; it’s important to select a young healthy twig to answer this question because as a branch matures it will often self-select the healthiest of the twigs to grow on and will drop it’s near partner. So, you can be looking at an older branch and thinking that they definitely don’t grow in opposite pairs, but then on closer inspection you might well notice the old scar left over from where it’s opposite equivalent was self-selected to be dropped by the tree in favour of it’s partner.

When you become practised at this you will begin to start noticing the bud arrangement from a distance, as you look at the form of tree. This is when tree identification can become very satisfying and you can really start showing off.

In the Free Winter Tree ID Guide I’ve grouped alternate budding trees separate from opposite budding trees for easy reference.


Blackthorn vs. Hawthorn

Let’s take two very common trees which often get confused. Not only are their names similar, but they also are thorny, shrubby trees which populate our hedgerows, often growing side by side.

To help confuse matters both these species have alternate buds and the buds are very small and grow in cluster at the end of the twig. So, we need to look at other clues to help us out.

hawthorn and blackthorn winter tree identification

Above: Blackthorn (Prunus spinosa) on the left, Hawthorn (Crataegus monogyna) on the right. The difference is clear.

The first thing to look for is leaf litter below the tree. As you can see from the picture, the leaves shapes are very different. However, this method is unreliable when you’re looking at a dense hedgerow and the two species are intertwined. How can you tell which tree the leaf has fallen from? Luckily, there are other signs we can go to also.

identifying blackthorn and hawthorn in winter

Above: Blackthorn on the left, Hawthorn on the right. Bark is a feature you can use year round to identify a tree.

Looking at the bark is going to be useful here as, like the leaf litter, they are very different. The bark of blackthorn, as its name suggests, is very dark and seems to soak up the light. It is also generally quite smooth. The bark of hawthorn is much more grey to brown and fissures readily, being much more craggy.

As well as the bark you can look at the thorns, which typically you will see a lot more of on blackthorn than you will compared to hawthorn. The last sign to help us here is the autumn fruits, which can often be found still hanging on in winter.

comparing blackthorn and hawthorn in winter

Above: On the left, Blackthorn can hang on to a few withered & dried sloes in winter. On the right, hawthorns often has smaller, deep red berries on show in winter.

The autumn fruit of blackthorn is the sloe. A good size fruit, around 1.5cm diameter and purple to black in colour. In winter though they are shrivelled and looking much worse for wear, with most of them having fallen already. Hawthorn in comparison holds onto it’s berries better in winter. Look for smaller, dark red berries, with an ovoid shape, growing in sparse clusters. As they dry out they darken in colour.


Looking Under The Tree

Have a good kick about in the leaf litter under a tree and you might find another big hint to what species you’re looking at. The old saying goes “the apple never falls far from the tree” and that’s good news for us in this case. I’m talking about fallen fruits and nut cases, many of which can still be found in the depths of winter, if not in the best condition.

winter tree identification: fallen fruits and nuts

Top Left: Crab Apples. Mid Top: Sweet Chestnut. Top Right: Hazelnuts, nibbled by wildlife. Bottom Left: Conkers from Horse Chestnut. Mid Bottom: Beech mast and leaf litter. Bottom Right: A bract from a Lime tree.

Some trees, like the Crab Apple, have a dead giveaway with the fallen, rotting fruits. Look under an established hazelnut and you’ll most likely find empty nut shells, nibbled away by rodents and birds. Then there’s tree like out three native Limes which have special leaves called bracts, which look like nothing else you’ll find on the woodland floor and can only belong to a Lime tree. Beech mast is very reliable under mature trees and you’ll find yourself crunching in underfoot as it carpets the woodland floor. There’s much to be gained by looking down.

Now this only works if there’s something to find and also you should be wary of relying on this too heavily where the tree is crowded with others as  what you’re looking at may have fallen from it’s neighbour.

By the far the most reliable method of winter tree identification is to begin with a branch and study a healthy twig and it’s buds. That way we can be sure we’re investigating the right tree and the knowledge of bud and twig is transferable no matter whether the ground below is humous or concrete.


Get Your FREE Winter Tree Guide

I’ve created a handy guide you can use when you’re out and about looking at trees during winter. The guide features 18 native and common British trees which have buds, twigs and leaf litter that you might already be familiar with but also there’s other signs here that you’ve probably never noticed before. I’ve laid out similar looking species side by side so that you can easily distinguish between them.

The guide puts the focus firmly on the winter buds but you’ll also see smaller images featuring other clues you can look for in each species such as old fruits, leaf litter, nut cases, bark and catkins. Where I’ve included these they act as dead giveaways to which tree species you’re looking at.

I hope you find it useful on your journey to understanding the trees around us.

DOWNLOAD YOUR GUIDE HERE


Discover more About Trees

It can be so interesting to really look in to the details of our native trees and notice the changes that they undergo throughout the four seasons. That’s just what I’ve created for my FREE introductory online course called Kickstart Your Tree ID Skills. Here you will find a whole host of resources to take you from clueless to confident on your way to really knowing your trees.

REGISTER FOR THE FREE COURSE HERE

kickstart your tree id skills, free online course

When you sign up to this free mini-course you’ll be identifying common trees with video tutorials and photo galleries at your fingertips. Start your journey to becoming a fully fledged Tree Expert today. The course includes Tree ID Cheat Sheets which you can download and take outdoors with you.

“I’ve been frustrated for so long trying to learn my trees myself and haven’t gotten far. This course answered everything and has seriously upped my game.” Dr. Patrick Alexander


Happy tree hunting folks.

James

make boozy berry chocolates for christmas

Wild Boozy Berry Chocolates

So, you’ve made your sloe gin and your blackberry brandy back in the autumn and you’re now ready to bottle up the drinks to give as gifts for Christmas. But wait! Don’t throw away those berries. You could make divine festive chocolates that will leave you wanting more.

In this article we will show you two easy-to-make and indulgent recipes for our Wild Boozy Berry Chocolates which make great use of your spirit-soaked hedgerow fruits. This is one of our favourite recipes of the whole year.

These chocolates will be the talk of any Christmas gathering with friends or will make a perfect surprise flourish to round off Christmas dinner. You could even wash them down with a tot of blackberry brandy or elderberry vodka. Just remember, they’re not for kids 😉

make your own christmas chocolates wild food & foraging

Above: The brandy-soaked berries in these chocolates are complimented by the orange zest and cinnamon. We added some edible gold spray for a final flourish.

Making Hedgerow Spirits

As outdoor educators, 2020 saw us locked down, unable to run many of our woodland courses and forced to stay close to home for the majority of the year, consequently we have been exploring our local green spaces and (like so many people) really getting further into the fascinating world of wild food and foraging. We have been preserving wild greens, cooking up foraged meals and discovering so many edible plants all around us like never before.

In the spring we were enjoying wild garlic pesto and nettle soup, in the summer it was dandelion honey and elderflower cordial. Autumn has bought us an abundance of berries and one wild food recipe that most people have heard of is sloe gin. It’s a foragers classic and if you’ve never made it for yourself, do give it a go. It’s so simple. If you want a recommend method for making this yourself, head over to the River Cottage website for a simple how-to.

The possibilities of hedgerow spirits go way beyond simply sloe gin though. We have made all sorts of recipes, using vodka, brandy, gin and whiskey. Any of the autumn berries can be used, and any mix, depending on what you have available or an experiment of different flavours together. All of these autumn foraged fruits work well; sloe, bullace, damson, haws, blackberries, rosehips and elderberries. 

making hedgerow spirits - wild food & foraging

Above: The sloe gin and blackberry brandy is all bottled up, but we have some boozy berries left over. Don’t get rid of them just yet.

Waste Not, Want Not

Many people would chuck the alcohol-soaked fruits away once it’s time to strain out their hedgerow spirits, but this would be a BIG mistake. We used a whole host of hedgerow berries in our chocolates which has been gathered since summer; wild cherries, blackberries, wild raspberries, wild strawberry, sloe, bilberries, redcurrant and bullace. But you can use whatever fruits you have soaked in alcohol already.

Don’t use elderberries in your chocolates as the seeds can give you an upset stomach if eaten without cooking first. Be sure also to remove any large stones from fruits such as sloe, bullace and cherry too.

Any of the spirits will work for this recipe, but we love brandy-soaked fruit the best with chocolate. Rum would also be a good option.

wild food & foraging: autumn fruits

Above: Use any of these autumn fruits in your hedgerow spirits and chocolates. Sloe, elderberry, rosehip, blackberry, hawthorn and bilberry.

Recipe 1: Boozy Berry, Fruit & Nut Chocolates

Boozy fruit – stones removed from the flesh, as needed

Hazelnuts – Roughly chopped

70% Dark Chocolate – use good quality chocolate, you won’t regret it

Icing sugar – for decoration


Recipe 2: Boozy Berry, Orange & Cinnamon Chocolates

Boozy fruit – again, remove the stones where you need to

Grated orange zest

Cinnamon powder (to taste)

70% Dark Chocolate – use the good stuff

Edible Gold Glitter Spray – for decoration


Method

  1. Cut the flesh from your boozy fruit and discard any stones or inedible pips. Set the fruit aside in a bowl for now.
  2. Bring a small pan of water to the boil and rest another bowl over the pan to create a double-boiler. Break up the chocolate and slowly melt it in the dry pan.
  3. Take a clean ice-cube tray and fill each section halfway with the other ingredients; either fruit, orange zest and cinnamon or fruit and hazelnuts.
  4. Next, gently pour the melted chocolate into each section of the ice tray until the ingredients are well covered.
  5. Place the tray in the fridge for 1-2 hours to allow them to set.
  6. Push chocolates out of the tray and for a little sparkle you can either dust some icing sugar over them or give them a splash of edible gold spray.
  7. Lastly, eat them and be merry!
boozy berry chocolates

Above: These boozy chocolates contain not only brandy-soaked hedgerow berries but also hazelnuts, for an indulgent Christmas treat.

Discover More Wild Food

If all this talk of wild food and foraging has whetted your appetite then you can take your learning further with us through the range of courses we offer.

You can immerse yourself in the world of foraging through our outdoor courses hosted in beautiful National Trust estate woodlands in North-East Wales. Or if that’s too far afield for you we also host regular online workshops, live through Zoom where we focus on wild foods of the season and give you delicious recipe ideas, foraging tips and expertise from special guest speakers. If this all sounds interesting, check out what’s coming up on our Events page right here.

Another way to get instant access to a whole backlog of wild food & foraging videos, recipes and recorded workshops is to join our Tribe over on Patreon. In return for supporting our mission, our patrons get access loads of exclusive resources. You can join the Tribe from as little as £3.60 per month. Find out about all the benefits right here.

Until next time, good luck with your own foraging journey.

Lea

how to pick wild rosehips - foraging and wildcraft

The Best Way To Eat Rosehips

If you’re not eating rosehips already, you need to start. Not only are they really good for you, but they taste amazing… like a burst of tropical fruit. They are also very common and easy to identify. So, what’s stopping you?

I really look forward to the season for rosehips, they are one of my favourite wild foods. The bright red scattering of rosehips in our hedgerows is one of the biggest indicators that winter is settling in. These vibrant fruits stand out to our eyes and that bright colour could mislead you into thinking that you should stay away from them, but the rosehip can make some delicious winter recipes to keep you going through the colder months.

I made this short video to show you the best way to eat rosehips raw, right off the branch. They make a great ‘pick-me-up’ on a country walk. There’s a couple of essential tips you need to know, so check it out…

Where & When To Find Rosehips

Rosehips grow on wild rose bushes. In the UK there are two species which you can forage from; the dog rose (Rosa canina) and the field rose (Rosa arvensis). Dog rose is found in most parts of the UK, unlike the field rose which is only found in England and Wales. Both species can be eaten so it’s not particularly important to know the difference between the two. These plants are climbers, trailing their way through hedgerows with their stems covered in thorns.

The rosehips themselves are easy to identify as oval fruits which develop behind the summer flower, turning from green to red as they ripen. In the summer the petals for both wild roses are large, being pink to white in colour with a yellow stamen. They have a beautiful fragrance, as you’d expect from a rose.

The best spots for finding rosehips is hedgerows and woodland edges, where the hips can ripen with plenty of sunshine. Scrubland and brownfield sites are also good places to look.

It’s from September that the hips begin to ripen enough to be harvested. They should only be eaten once they are fully red, don’t eat them if they’re still a bit green. There isn’t a particular firmness they are best at; they can be harvested when squishy or hard so don’t worry if you don’t get them right at the beginning of the season. What is important though is that you’re only eating the red flesh. The hairy, yellow seeds in the centre of the hip need to be removed before they can be eaten. These hairs are very fine and can lodge in your throat, being very uncomfortable to digest.

If you haven’t watched our video above already, do check it out so you can learn how to easily remove the flesh from the hairy seeds. Another method can be used back in the kitchen, whilst processing the hips back at home using a muslin cloth (see our method for rosehip syrup below) but if you’re out in the field after a quick hot of that tropical taste then here’s what you need to do:

  • Look for the softer squishy ones with a wrinkled skin. These are found more so at the back end of autumn.
  • To remove the hip cleanly, and avoid being spiked, twist is away from you and toward the stalk. This will usually give a clean break.
  • Hold the rosehip between both thumbs and index fingers equally, with the stalk side facing you.
  • Squeeze the hip with even pressure. A ‘red worm’ of pulp should rise from the hole.
  • Eat the tasty red flesh, discard the squeezed hip.
how to forage rosehips

Above Left: Rosehips looking perfectly ripe on the branch. Above Right: These hips are softer and more wrinkled. Perfect for the squeezing method as explained in the video.

How To Make Rosehip Syrup

A more traditional use for them would be rosehip syrup, which was a common sight in the household during the second world war. Due to the UK’s inability to import fruit from other countries, the public were recommended to collect and make their own rosehip syrup to prevent scurvy; two tablespoons of rosehip syrup would more than provide you with your daily dose of vitamin C.  As well as being very good for you, the syrup is deliciously sweet and goes really well drizzled on top of hot sponges, pancakes, and other desserts or you could try adding a little to some lemonade to make a cordial. Below is a recipe for rosehip syrup so you can make your own.

To make a litre of syrup you need: 

  • 1 kilogram of rosehips
  • 3 litres of water
  • 450g of sugar (or honey)

Method:

  1. Remove any leaves and the green ends of the rosehips, then chop them by hand or in a food processor and add to a saucepan with the water. 
  2. Bring to the boil and simmer for 20-30 minutes before straining with a muslin into a clean bowl. Once the juice has been strained, re-strain in a clean muslin cloth. This ensures that all the hairs inside that cause irritation have been removed. 
  3. In a new saucepan add the sugar and simmer together until it has dissolved and the liquid has thickened. 
  4. Transfer to a sterilised jar and keep in a cool place. 

As well as being delicious on pancakes and packed with vitamin C, rosehips also have a fantastic range of health benefits. Amazingly, rosehips contain 2000mg per 100g, compared with the equivalent weight of orange with just 50mg! This little fruit can boost heart health by lowering cholesterol and blood pressure. Rosehips also have anti-inflammatory properties and there is some evidence it can reduce pain and stiffness in joints with osteoarthritis, possibly due to the high level of antioxidants they contain. Cold pressed rosehip oil can also help protect against ultraviolet light, pollution, and cigarette smoke as well as increasing skin elasticity. They also contain high levels of fibre, vitamin A, calcium, and potassium.

I’ve also used them to make a cup of rosehip tea. To try this yourself; halve ten hips and scrape out the seeds and hairs. Cover the hips in boiling water and leave to infuse for a few minutes. You could add a little honey or sugar to sweeten your tea, but rosehips contain their own natural sweetness, so adding sugar is not essential, just see how you like it.

You could always try slicing and drying the hips to make a longer-lasting tea ingredient. If you don’t have a dehydrator, put the halved hips on a parchment covered baking tray and cook on a very low heat with the door slightly open for a few hours to remove the moisture. Rosehips can also be used to make a sweet jam to go on toast or on plain yoghurt. We added halved rosehips to a hedgerow crumble for a burst of colour and flavour amongst the apples and blackberries.

how to make rosehip syrup

Above Left: Rosehip syrup. Above Right: Fruit leather with rosehips, crab apple and hawthorn.

Can I Eat My Garden Roses?

This is a fair question, so let’s look into it. As far as I have researched, all roses are edible. You might well be familiar with the Japanese Rose (Rosa rugosa) which is a common sight in suburban areas and retail centre car parks. The rosehips on this plant are much larger, being more rounded. They also ripen earlier than our native roses. The summer petals on this plant are a beautiful cerise pink colour. Both the petals and hips are edible, as with our wild roses. However I have found that these hips, being larger, are more susceptible to harbouring maggots, especially when they start to soften. So, I would recommend halving them to have a good look inside before using them for any cooking.

Something else you need to be aware of with foraging garden roses, including the Japanese Rose, is that they may have been sprayed with pesticide or plant food, not something you want to add to your diet. So, unless you know the garden or gardener well, it’s best to avoid Mr Jones’ prize roses from across the road. With any foraging it’s important to take a wider view and think about where you’re picking from and what forces those plants are subjected to. As always; if in doubt, leave it out.

foraging for japanese rosehips

Above: Japanese Rose (Rosa rugosa) with striking pink flowers in summer and hips as large as cherry tomatoes.

Discover More Wild Foods

If this has got your appetite for wild foods whetted then you should check out our online foraging course. It’s called Your Wild Food Year, and it covers over 80 wild food species over 12 months. You can find out more about the course here or sign up to a free taster.

Along with my partner, James, I host foraging and wild food walks and courses in North-East Wales at two beautiful National Trust estate grounds. Coming on a course is a great way to learn a variety of commonly growing plants and fungi we can use in our own cooking and also for hedgerow medicine. If you’d like to see what courses we have coming up, then head to our Events page.

I hope this blog has inspired you to try foraging rosehips yourself.

Lea

make wild woodland stuffing foraging

Wild Woodland Christmas Stuffing

Do you want to bring a little WILD to your Christmas table this year? Learn how to make our delicious Wild Woodland Stuffing which includes foraged ingredients; mixed woodland mushrooms, sweet chestnut, wild garlic bulbs and nettle.

Making this stuffing not only gives you a great excuse to get out in the woods in the run up to Christmas to gather some wild ingredients, but it tastes great and it will be the talk of the table.

This stuffing recipe was created by James and Lea Kendall. We are foragers and outdoor activity leaders based in North Wales. We found that using some of the wild foods that we’d been gathering all year in this stuffing was a satisfying way to celebrate our foraging journey over the past year.

The stuffing gives a strong, earthy flavour. This recipe serves 8 – 10 people, or if you’re a smaller group then there’s enough for turkey and stuffing sandwiches on Boxing Day 🙂

wild woodland christmas stuffing recipe - foraging

INGREDIENTS

270g breadcrumbs (wholemeal works best)

30g dried wild mushrooms – we used penny buns (ceps), parasols and brown birch boletes

4 bulbs wild garlic, finely chopped, use fewer if you want a less strong garlic flavour

300g cooked and peeled sweet chestnuts, roughly chopped

2 leeks, finely chopped

25g butter, plus extra for greasing the tray

1 tbsp olive oil

15g of fresh nettle tops or dried nettle leaves, finely chopped

2 eggs, beaten

Salt and pepper to taste

make wild food christmas stuffing

METHOD

  1. Preheat oven to 180°C, gas mark 4.
  2. Soak dried mushrooms in 350ml boiling water for 10 minutes so they soften. Drain, keeping the liquid for later, and chop them into small pieces.
  3. Add a few tablespoons of the mushroom liquid to the breadcrumbs, gently mix and leave to soak for 5 minutes until flavoured.
  4. If using fresh nettle tops, pour boiling water over the leaves to kill the stings and leave for 5 mins before draining then chopping finely.
  5. Heat the butter and oil in a pan, add the leeks and garlic and cook until softened. Tip into a bowl and leave to cool slightly.
  6. Stir in the remaining ingredients to the bowl until well mixed up. Season with salt and pepper then form into balls and place onto a buttered tray or dish.
  7. Cook in the oven for 20 minutes until golden and crispy on the outside.

For the ultimate wild Christmas dinner, you could serve this stuffing with roast wild pheasant or partridge.


DISCOVER MORE FORAGING

If you want to get outdoors and learn foraging for yourself then you could come on one of our popular wild food courses.

We host our courses both in the woods in North East Wales and also regularly online through zoom sessions.

Check out our upcoming events to see what wild food courses we’re hosting soon:

VIEW EVENTS & COURSES HERE

wild food & foraging courses north wales

James & Lea host wild food and foraging course in North-East Wales. Get in touch to find out more.

A DEEPER LOOK AT THE FORAGED INGREDIENTS

In our recipe we used the following species of wild mushroom; parasol mushroom (Macrolepiota procera), penny bun (Boletus edulis) & brown birch bolete (Leccinum scabrum). These were selected because it’s what we had available dried already. There’s no doubt that the parasols and penny buns have great flavour, however the birch bolete is more bland and not an essential ingredient for your own recipe.

If you don’t have a supply of dried wild mushrooms that you’d foraged back in autumn then you could always buy a pack from the local deli.

When gathering nettles (Urtica dioca) at this time of year, it’s all about beating the frosts so you don’t get withered leaves. Only pick the top four leaves of the nettle and go for the plants which are in good condition and still young. They can be found in December, especially if you look where land has been grazed or cut, so you get nettle regrowth.

Unless you have had the mystic foresight to roast and then freeze some foraged sweet chestnuts back in the autumn, you’re probably going to have to head to the shops again.

wild garlic bulbs foraging

Notice the shape of the bulb; tapering at either end and bulbous in the middle. Length is around 5-6cm.

DIGGING UP WILD GARLIC BULBS – GOOD PRACTISE

If you’re thinking of digging up wild garlic (Allium ursinum) bulbs then bear in mind that you’re are actually removing the wild plant from it’s habitats, not just harvesting the leaves which renew each year. So there’s a coupe of things we need to think about here so we’re exercising good practise as foragers:

  1. It is the law in the UK that you need the landowner’s permission to uproot any wild plant.
  2. You should only dig up bulbs from a spot where you know there to be an abundance of wild garlic in the spring, that way we’re only taking a very small amount of what’s in the ground.
  3. If you dig up any other bulbs that are not wild garlic then they must go back where and as you found them.
wild bluebell bulbs

You can see here that bluebell bulbs are a different shape to wild garlic bulbs too.

Lastly, it’s worth mentioning english bluebell (Hyacinthoides non-scripta) which also grow from bulbs and can often by found in amongst wild garlic at ancient woodland sites. We don’t want to be digging these up and eating them, they are poisonous.

If the bulbs you’re digging up don’t smell strongly of garlic then they’re not what you’re looking for. So, give the bulb a sniff before putting it in your basket. Bear in mind that when handling a lot of garlic your fingers will start smelling of it too so make sure you’re smelling the bulbs and not your fingers 😉

toffee apple slices - campfire cooking

Tired of Marshmallows Over the Campfire? Try This!

Are you looking for a simple but tasty treat that could go head-to-head with marshmallows as the number one campfire snack with kids? Well look no further…

We cook A LOT of marshmallows over the campfire with kids when we host our Forest School sessions and Woodland Birthday Parties. We know children love them, but they are not exactly a nutritionists best friend. They also contain gelatine made from pork or beef and we’re getting a lot more requests from parents who want vegetarian or vegan friendly campfire snacks for their kids when they come out to the woods with us. Last but not least, they’re sticky residue is a nightmare to get out of your clothes. Luckily, we have the solution.

Toffee Apple Slices are our alternative to marshmallows and kids love them! Granted they’re still coated in sugar but kids are getting some fruit down them and this recipe is vegan too. Our favourite sugar to use is coconut blossom sugar, as it less refined and less processed than regular sugar but any soft brown sugar will do the trick. They make a great hot campfire snack anytime of the year, especially in the autumn when you can walk out to an apple tree and pick the fruit straight from the branch.

Ingredients

  • Apples
  • Light or Dark Brown Soft Sugar
  • Cinnamon and Nutmeg – add to taste

Cooking Method

  1. To get a fire that really makes the most mouth-watering toffee apple slices it’s best to let your flames die down and roast your apples over the hot coals – just like you would with a bbq. This will save them from burning.
  2. First gently roast your apple slice over the fire until it begins to go soft and the pulp starts to bubble up.
  3. Next, dip your hot apple slice in a tray of soft brown sugar until it is well coated. Be careful it doesn’t fall off the stick.
  4. Roast your coated apple slice over the fire again until the sugar starts to melt.
  5. Now for the final touch… let your apple slice cool for a minute and the sugar will harden up and give your apple a crispy toffee coating – simply delicious.
  6.  Eat and repeat!
  7. For a slightly spiced variant on this snack then try sprinkling some cinnamon and/or nutmeg into the sugar. Ginger would work well too.

cooking toffee apple slices outdoors

Which Wood Should You Use?

For your roasting stick we would recommend using either a hazel, willow or sycamore stick. At Forest School this can be a whole activity in itself, identifying the tree in the woods, cutting a suitable branch responsibly and reducing the damage to the tree, then practising some basic whittling skills by slicing away the bark near the tip and making a sharp point.

We would recommend using green (fresh) sticks from a tree as they are more resistant to the fire than dead twigs, so will last longer.

sycamore tree - leaf and bud

Sycamore – the winter twig and full leaf.

FUN FACT: Sycamore (Acer pseudoplatanus) actually contains it’s own natural antibacterial and antiviral properties, which is one reason why it is very sought after for use in kitchenware. This makes it a really safe wood to use for roasting sticks when out in the woods with kids.

Full disclosure, I personally can’t stand marshmallows, even though I cook so many, so I was very glad to discover this tasty alternative. Thanks to the Forest School Leader who shared this cooking idea with us at a skill share training day in Derbyshire last year, I can’t remember your name but we’re forever grateful 🙂

Happy cooking everyone.

James


James and Lea Kendall from Woodland Classroom

James & Lea Kendall are the creators of Woodland Classroom. “Through our passion, enthusiasm and experience we help people connect with nature, feel healthier and have meaningful experiences through positive activity and creative play.”

“We are experienced outdoor educators with a background in bushcraft, forest school and nature therapy, who love what we do.”

tasty bread from a dutch oven

My Bushcraft Journal: Part #2 Baking in a Dutch Oven

Baking bread out in the woods has always been one of those mystic arts to me. Something that, like tool sharpening, seems shrouded in mystery. With my ongoing Bushcraft Instructor training I thought it was high time that I made an effort to try it for myself. What’s the worst that could happen?

I also had a 4 litre dutch oven sitting in my shed, which was a Christmas present 2 years ago. I always felt a bit guilty when I came across it. So it was time to do it justice.

I’ve seen it done before but couldn’t for the life of me remember the exact method the teacher used at the time. So when it came to our next bushcraft training sessions I told everyone that I would bake them a loaf for the evening. The challenge was on.

The trick to using a dutch oven, as far as I understood it, was to get an even heat around the whole pot so that your bread would bake all round. So what was needed was a campfire that had been burning for a while to produce a good amount of hot coals, more like what you’d get in a barbecue. It’s this bed of coals and ember that makes an effective cooking fire, rather than roaring flames. I actually brought along some Welsh charcoal for the bake as I wasn’t sure what state the communal fire would be in by the time I came to experiment. This worked really well but I imagine if you use hardwood firewood and burn it down to coals it would be just as good.

cooking bread in a dutch oven for bushcraft

Above: This is not the same loaf as I cooked as it was dark by the time I was baking. You can see though how the coals have been placed on top of the oven lid it help it bake with an even heat.

The good news is that the loaf was a success! In fact it was one of the best loaves I’ve ever tasted, and even better that it was fresh out of the oven. Everyone complimented my on it and the mystery of using a dutch oven is firmly behind me, though I imagine there’s a lot to learn yet. For anyone who wants to give it a go for themselves I’m going to share that tasty recipe with you now….

STOUT & FRUIT SODA BREAD

This recipe fed 6 adults with a very generous slice of bread. They all loved it. Any left over stout can be generously gifted to a camping buddy that likes that sort of thing. I prefer cider myself. Having enjoyed this loaf myself I can say that it was delicious straight out the oven and didn’t even need any butter to improve it though you can try that if you like. It tasted more like a cake than bread 🙂

WHAT YOU NEED

4 litre dutch oven • large mixing bowl • mixing spoon (whittled by yourself preferably) • a metal dish that will sit in the bottom of your oven • 4 small stones (trust me)

INGREDIENTS

2 big overflowing handfuls of strong wholemeal flour

2 big overflowing handfuls of strong plain flour

A half handful of sugar (caster sugar is best as it’s finer)

1 heaped tablespoon of baking powder

1 good pinch of salt

1 big overflowing handful of mixed dry fruit

1 egg

1 can of stout

Keep some extra spare flour left aside for dusting the metal dish

METHOD

Mix up all the dry ingredients together. I did this in advance before the trip and put them in a plastic tub so it would save doing it around the campfire at night.

In your mixing bowl make a well in the middle of the dry mix and add crack the egg in. Then mix with your wooden spoon.

Slowly add the stout until all the dry ingredients are mixed in and you have a ball of dough that holds it shape.

Coat your metal dish in a light layer of your spare flour. This will stop the bread from sticking to the dish.

Place your dough onto the floured dish and sprinkle a little sugar on top.

Now it’s time to use those 4 mysterious small stones. These are placed evenly spaced at the bottom of the dutch oven. The metal dish is then placed on top of these so it sits comfortably. What this does is elevate the dish from the bottom of the dutch oven to allow the air to circulate. This all helps prevent the lower crust from burning.

Place the lid onto the oven and pop it into your campfire.

We surrounded the oven with a ring of charcoal and placed some hot coals evenly on top. This is the part of the process that inly experience can teach you and I’m looking forward to trying this recipe again and seeing if the cooking time changes. I imagine it depends on how hot your fire is and how even the coals are around your oven.

I checked the loaf after 15 minutes and we all agreed it needed longer.

I cooked my loaf for 25-30 minutes but I think i could have got away with taking it out a bit sooner. You will see some burn on the left hand side of the close up picture. This is where there was a flaming log placed right up against the dutch oven so I think it caused that side of the oven to be hotter.

The last tip I was given was to use a clean knife to push into the middle of the loaf. If it comes out clean then the bread is ready.

tasty bread from a dutch oven

Above: The complete loaf. Not bad at all for a first effort. In fact it was one of the best breads I’ve ever tasted.

By the way, did you know that the phrase “the upper crust” comes from a time when those who could afford it would get the more valuable upper section of the loaf rather than the often burnt bottom. So the rich were referred to at the “upper crust.”

I hope this has inspired you to try dutch oven baking for yourself. I’ve definitely got the hook and have made a promise to myself to try a different recipe each time I go camping now. Suddenly the world of outdoor baking has completely open up to me. It’s a real sense of achievement.

Thanks for reading.

James K

bushcraft leader with shelter

My Bushcraft Journal: Part #1 Building Better Shelters

Hello folks. My name is James and I am an outdoor activity leader at Woodland Classroom, where we pass woodland skills and nature knowledge onto others with our sessions. Bushcraft is an element of what we do, fire-lighting, den building and campfire cooking etc but mostly it’s at a basic level. For a while now I’ve been wanting to improve my bushcraft skills and really go much further in depth not only because I love being out in the woods but also so that I can pass these skills onto others someday and continue to inspire children to fall in love with nature and being outdoors.

So, I’ve taken the plunge and enrolled on a 2 year Bushcraft Instructor training course which is going to really push me to up my game which is not only going to be a lot of fun but will also help me to offer so much more to our customers in the future.

Fire by friction, wild food, whittling, advanced shelter building, natural cordage and plant identification are just some of the skills I’ll be covering over the next two years. I’m quite excited.

Who knows, perhaps I’ll be able to call myself a proper bushcraft instructor when it’s all done. Saying that though, you never stop learning and with any good subject worth getting your teeth into, bushcraft is one of those fields of learning that the more questions you answer, the more questions there are. I imagine I will never stop learning.

Part of my training includes keeping a journal of my time learning bushcraft skills, so I though why not make it a blog and you can share my journey, my successes and my inevitable failures too.

As an old teacher once said to me though, “There are no mistakes. Just learning opportunities.”

So without further ado, here is my account of a day spent shelter building.

bushcraft leader with shelter

Building Better Shelters

Aim of the Day: To construct a one-person shelter using only natural materials, preferably with no cordage, which would be rain-proof.

I had a dry and sunny winter day to do this with no distractions which was good because proper shelter building is a lengthy task. From my training I knew that it took 6 of us a couple of hours to construct an effective shelter from scratch, so I would have my work cut out if I as to get it done all in one day.

There had been some recent tree felling work in the woods, cutting down young hazel stools under the power lines, so this as perfect material with which to construct the frame with as hazel is strong, flexible and being freshly cut it should have a longer life span than using older, more seasoned wood from the forest floor.

I wanted to build a classic kennel shelter, sometimes called the a-frame shelter, which uses just 3 sticks to support the whole structure. The shelter also has little room for movement once you’re inside so that there is less air space to be warmed up.

building a kennel shelter

Above: In Ray Mears’ Outdoor Survival Handbook, he describes the stages of building the kennel shelter.

The first task was to find a piece of ground that is flat, no mean feat in Wales. Another tip I had been given was to get down low to the ground so that you can see the small undulations that make up the lay of the land. This way I could pick out a spot that was not only flat, but would not be a pool for water if the weather turned wet and also was slightly raised from the surrounding land, again to shed ground surface water if needed.

My tutor had told me the importance of of ensuring that the triangular frame is locked together well and that each pole is well supported. The most effective way to do this (without using cordage) is using the method seen in the next picture.

shelter build - interlocking polesHere, the ridge pole is resting on both forked sticks and these are also interlocked. This should help prevent slippage and ensures that the weight of the shelter is evenly distributed. I don’t want it all coming down on me in the middle of the night. For some additional support, I saw that there was a convenient stump which I could rest the base of the right-hand pole against. This is certainly not essential, but a bit of added piece of mind.

Next up I started placing the uprights on either side of the shelter frame. These were no closer than a good hand span apart as if they were too close then I would have trouble weaving between them later when building up the walls of the shelter.

I had also been advised to not allow the uprights to stick up too much above the ridge pole as this would encourage rainwater to run down poles and then drip through into the shelter – which I imagine could be very annoying at 2am.

For weavers between the uprights I mostly used birch branches that were lying around the woodland, as when green they are still flexible. Any that were too far gone and dry, went in  a separate pile for firewood. It was time to start a fire for a well earned brew in my billy can. Think birch is quickly becoming my favourite tree because the more I learn about it, the more uses it seems to have – perhaps that’s the subject of a future journal entry.

Birch’s associations with fire are well known in the outdoor pursuits world and it makes great kindling for getting a blaze going. As soon as the fire was going I felt like I had arrived properly.

building a natural shelter in the woodsAbove: Burying the end of the ridge pole into the earth to help prevent it from slipping. Resting one of the forked poles against a convenient stump for added stability. And getting my tea on with my new billy can.

During my Bushcraft Instructor training we had plenty of bracken around us to use as a thatched covering for the weavers on the roof. You can see an example of that in the first picture on this blog page. But at my local woods bracken was not an option so I would have to go with the less effective (so I’m told) leaf litter – which was in abundance at this time of year. There was plenty of beech trees about and their leaves make a carpet on the woodland floor and I know these leaves to last pretty well rather than rot away quickly so this seems a good choice.  Using a blanket I could gather up lots of leaves quickly and then drag the full blanket over to the shelter.

This was still much more work than I had anticipated though and I had been advised to have a full arm’s length depth of leaf litter on the shelter to make it effective against the worst the weather could throw at it. This was a real eye opener as it soon became apparent just how much material I would need just for my little one-man shelter.

shelter building in the woods of wales

Above: The complete naked skeleton of my kennel shelter, complete with weavers from fallen birch with some hazel brash too for good measure.

Another thing I noticed when using the leaf litter was that leaves had a habit of tumbling down to the base of the shelter so that I was ending up with a lot of material close to the ground and hardly any on top. Stuffing handfuls of leaves between the weavers seems to help this to an extent as it gave the leaves something to grip to. But I wonder if this is also a common problem when using leaf litter like this and whether with enough depth of material you eventually over come it? I wasn’t going to find out today.

The day was drawing on and I still wasn’t complete. By the time the light was failing I had to accept that the shelter would not be completed today (the luxury of not actually being in a real survival situation) and I would have to return another day. I had got one side of the shelter completely covered with a fair depth of leaves, but by no means enough, and I was satisfied that I could return another day and complete the job, ready for a trial sleep out.

My last job was to put out my small brew fire and scatter the cold ashes to leave no trace – an important philosophy in bushcraft.

So, what were the main learning points for me:

  1. Shelter building takes longer than you think.
  2. It’s important to get the 3 main poles locked together correctly to maximise stability and strength.
  3. Don’t put the uprights too close together.
  4. Don’t let the uprights protrude too far above the ridge pole, so avoiding night time drips.
  5. If using leaf litter – allow for A LOT of material.
  6. Stuff the leaves into the weavers to encourage them to group to the shelter sides.
  7. Get up earlier in the morning and start sooner *laugh*

half built shelter

Above: The end of a day’s work.. well a leisurely days work anyway. I’m looking forward to coming back to complete the job and test it out.

That’s all for now. I hope to keep my Bushcraft Journal up to date with regular posts, so watch this space.

Thanks for reading.

James K

how the robin got its red breast

How the Robin Got its Red Breast

We love telling stories around the campfire with children at our outdoor activity sessions, especially those tales that are set in the woods and star the creatures that the kids could see for themselves. I think it helps bring the forest alive for their imaginations.

This short story, How The Robin Got Its Red Breast, is a great one to tell on a cold winters day with the campfire crackling away. For me, the story’s message is that no matter how small you are or seem to be, you can achieve great things.

“Long, long ago, when the world was new, as the winter Sun was setting, and the land was locked in ice and snow, all the creatures believed that the warmth they had enjoyed throughout the long summer was lost forever and might never return. They were cold and afraid.”

“As the winter winds blew through the forest, a small brown bird was sheltering in a holly tree and he thought to himself, ‘What could I do?’ Somehow he knew the warmth that had gone belonged to the Sun, so he decided to fly to the Sun and ask for it back. As he took flight the holly twig on which he was standing snapped off, so he took it with him, he thought it would make him feel braver to take a piece of home on his adventure.”

“He flew up, higher and higher he climbed, and as he flew, he felt the heat of the Sun increasing. He flew on, getting hotter and hotter, until he could hardly bear the heat any more and his feathers were scorching, he was so close to the Sun! But still, he was determined to get an audience with the Sun. Then suddenly the holly twig he was carrying burst into flames. He was so shocked that he fainted and fell, down, down, spiralling back to the Earth.”

“When he awoke he realised he still had the burning twig, clutched between his feet. He had done it. He had brought the Sun’s fire back to Earth, and everyone could warm themselves in the heat from the flames. He was a hero! And because he was so brave, and because his feathers had been scorched on his adventure, to this very day, he is still called Robin Redbreast.”

how the robin got its red breastArtwork by Karen Carter at Hedingham Fair

The Robin is probably the UK’s favourite bird. It’s known as the gardner’s friend because it’s often seen perched near to where earth and soil is being dug over, revealing lots of juicy worms. I’ve often had a Robin as my companion when I’m practising my bushcraft skills in the woods. he’s always hoping I’ll turn over some leaves or dead wood in the hope of a easy meal.

To find out more about the Robin, where it lives, what it eats and what it sounds like. You can visit the RSPBs website which should answer all your questions here.

Robin in the Snow

12 days of forest school

The 12 Days of Forest School

We’ve taken the classic Christmas song and given it our very own twist. So join us for a good old fashioned sing-along. We love singing this around our campfire with our kids groups throughout the festive season.

Forest School sessions are all about letting children be in charge of their own learning and giving them the chance to explore wild spaces on their own terms so they can grow emotionally and intellectually. We run plenty of outdoor sessions throughout the winter because we believe that children should have access to great outdoor activities all year round.

Enough of all that though, on with the song…..

We’ve made a series of pictures to celebrate each of our 12 Days, which also showcase many of the awesome activities that children get up to at forest school sessions. You can see these images by scrolling through…

first day of forest school christmas


second day of forest school christmas


third day of forest school christmas


fourth day of forest school christmas


fifth day of forest school christmas


sixth day of forest school christmas


seventh day of forest school christmas


eighth day of forest school christmas


nineth day of forest school christmas


tenth day of forest school christmas


eleventh day of forest school christmas


twelth day of forest school christmas

We love singing this round the campfire with the kids through December and you’re very welcome to use this song too. Here’s a run down of the lyrics:

“On the first day of forest school I had the chance to see…

A child climbing in an oak tree.

Two muddy boots

Three storytimes

Four crawling bugs

Five golden leaves!

Six kids a whittling

Seven mushrooms sprouting

Eight campfires blazing

Nine shelter builders

Ten monkeys swinging

Eleven axes chopping

Twelve hunters tracking”


Happy Holidays, Merry Christmas and a Happy New Year to all.

  • 1
  • 2
Social Share Buttons and Icons powered by Ultimatelysocial