Call us on: 07876 794098

Tag - wild food

forage your own sweet chestnuts

Forage Your Own Sweet Chestnuts

Often the first thing that comes to mind when thinking of chestnuts is Christmas. Have you got the words “chestnuts roasting on an open fire” singing in your head? But, did you know you don’t have to buy them in the supermarket? You can forage your own sweet chestnuts, if you know when and where to look. We’ve made a video all about how to do just that, and you can watch it just below.

Autumn is a perfect time to go foraging for a variety of wild nuts, berries, and fungi. In this blog we’re going to focus on how to find and cook sweet chestnuts, one of our favourite wild foods of the season. You will also learn how to identify the tree they grow on and learn the nutritional benefits of this wild food.

In the UK, sweet chestnuts come into season in October, so if you want them for Christmas you have to be looking well in advance and be ready to freeze them. Finding a ripe chestnut on the forest floor ready for roasting is such a treat and this article will give you the best chance of finding some for yourself. Read on to learn about the history of the sweet chestnut, become an identification expert and learn some delicious recipes to cook at home or over the campfire.

The sweet chestnut hails all the way from Western Asia and was thought to have been introduced into Europe by the Greeks or Romans and used by the military to sustain their troops. The Latin name Castanea is actually derived from the name of a Greek town called Castonis where the tree was heavily cultivated for their nuts. The sweet chestnuts that grow in the UK tend to be smaller and less successful than the ones that grow in mainland Europe due to the cooler climate and in fact most of the chestnuts we buy at Christmas are grown in either Portugal or France. The tree is at the edge of its natural range here, though climate change could make them more favourable to the UK.

sweet chestnut and wild mushroom risotto

Above: Sweet Chestnut & Wild Mushroom Risotto. An autumn favourite in our home.

How To Identify Ripe Sweet Chestnuts

The spiny casing goes from a lime green to a light brown as the chestnuts ripen, but the best ones will be more green than brown. Unfortunately, many of the largest ripe nuts will be eaten by squirrels before they can hit the ground so it’s important to go foraging early to give yourself the best chance of finding a good batch. Remember to take a thick pair of gardening gloves with you for cracking the casing open, as the spines can make the casing impenetrable and painful to handle. Don’t be disheartened if the chestnuts aren’t as big as the casing would suggest, it’s a little luck of the draw when foraging.

Sweet chestnuts are easy to identify as they’re covered in a soft white fuzz that tufts into a point at the top of the nut. Be careful not to mix them up with horse chestnuts (conkers to you and me) which looks very similar but have far less spines, a glossy shell and are more rounded. Another difference is that there are up to three sweet chestnuts in each case, whereas there is typically only one horse chestnut in each case. If you find a nut out of its casing and you’re not confident in identifying it, you can always look at other clues from the tree itself. So, let’s take a look at the video where I go foraging for nuts… 

Now we’ve had a good look at the this tasty wild food, let’s go into a bit more detail about the identifying features of the tree, so that you can be really confident you know what you’re looking at.


How To Identify a Sweet Chestnut Tree

The sweet chestnut (Castanea sativa) is a member of the beech family and can sometimes be confused with the horse chestnut (Aesculus hippocastanum) due to their similarity to the much-loved conker. However, there are some distinct features that set the sweet chestnut apart and will reliably help you identify the tree correctly.

Leaves

When looking for sweet chestnuts the leaves are the first identifier. They have an elongated ovular shape with a strongly serrated edge. The leaves themselves are one of the largest you will find commonly in the countryside and longer than they are wide, growing up to a huge 28cm long and up to 9cm wide. Another clue that you’re looking at a sweet chestnut are the 20 or so pairs of veins packed closely together running down the central vein.  In the spring and summer, the leaves are a thick and glossy green, fading into a mottled amber in autumn before falling off.

You can, of course, look for these distinctive leaves in the forest floor below the tree throughout winter too.

Nut Casings

Unlike the stumpy spikes of conker casings, sweet chestnuts are significantly more prickly with sharp barbs protecting the nuts from pilfering wildlife, though they don’t seem to put squirrels off. So, a thick pair of gardening gloves is essential when trying to break them open. The technical term for the spiny casing is cupules and this shell goes from a bright vibrant green to a lighter brown as they begin to mature and decay on the ground. You will start spotting the small, young cupules as early as July.

You can tell when the chestnuts are ripe because the casing will be large and green, heading towards a lighter brown colour. They will begin to split open as they ripen, and you can often see parts of the chestnut through the cracks in the casing as they grow. The cupules typically fall over a two week period around the middle of October and you will often see bits of brown casing around the tree showing the squirrels and mice have been hard at work.

Bark

On younger trees the bark is a smooth brown or deep forest green. However older sweet chestnuts develop deep fissures running lengthways up the tree which have a tendency to twist as they grow creating a spiral of fissures around the trunk which is incredibly beautiful and distinctive. Along with the fallen nut cases, this is the most reliable indicator of a mature sweet chestnut, especially going into winter when the trees lose their leaves.

Flowers

Sweet chestnuts have long light yellow catkins that flower around June, with both the male and female parts growing together on the same tree. A catkin will contain small female flowers at the base, which become the young nut cases once they are pollinated.

how to identify sweet chestnut

Top Left: Early summer flowers. Top Right: Large leaves with a serrated edge. Bottom Left: Mature trees have a twist ini the trunk. Bottom Right: The prickly nut cases of autumn.

If you’d like to know more about how to identify common trees in the British countryside, then you could join the thousands of students already on my FREE online tree identification course, where you can learn through videos, downloadable ID sheets and photo galleries. You can enroll for your free place on the course right here.


How To Cook Sweet Chestnuts

One of the uses utilised by the Romans is using ground roasted chestnuts to make polenta, a traditional Italian food. Today polenta is generally made from boiled cornmeal but there is no reason you couldn’t make your own polenta with chestnuts. To make a sweet chestnut flour you need a large quantity of chestnuts, probably more than you would be able to forage but there is no reason you couldn’t try to make it with shop-bought chestnuts. If you’ve never tried polenta before, it has a porridge-like consistency when hot but can be cooled down into a solid block that can be cubed and fried and goes really well with stews. You can also try using the flour to thicken bread and cakes to give it a naturally sweet edge.

Another favourite is the roasted chestnut at Christmas, if this is something you haven’t tried I would strongly recommend incorporating roasted chestnuts into your Christmas traditions. Sweet, toasted chestnuts are such a seasonal delight, but they don’t have to be eaten just at Christmas. In October you can pick them fresh from the tree and cook them there and then in a pan on the campfire or at home in your oven. Another tradition is to substitute the pan for roasting the nuts on a garden spade. They can also be cooked right in their shells in the embers and ash of an open fire. There’s a lot of fun to be had with this ancient method of simple cooking.

campfire cooking sweet chestnuts

Above: The simplest way to cook chestnuts is to roast them right in the embers of your campfire. The nut shells protect the food inside. No need to tin foil.

To roast them in an oven, score a cross on the shells and put them in a conventional oven at 200°c for 30 minutes. Once they are cooked leave them to cool for a minute or two before peeling the shells and eating.

There are so many other ways to incorporate sweet chestnuts into your food. Add roasted chestnut chunks into chocolate brownies for added crunch or into stuffing for Sunday lunch. Try tossing roasted chestnuts in a sweet soy sauce glaze for an afternoon snack. The fantastic thing about them is that chestnuts go so well with both sweet and savoury dishes so really the only limit is your imagination.


Marron Glacés; a French Delicacy

Below are instructions on how to make marron glacés, a traditional French recipe for crystallised chestnuts which was popular in the 18th century. They’re a delicious treat that would make for a unique addition to the Christmas table. The chestnuts require soaking over several days so leave plenty of time to prepare them.

You will need:

  • 500g fresh peeled sweet chestnuts
  • 300ml water
  • 500g caster sugar
  • 1tsp vanilla extract

Method:

  1. Boil the peeled sweet chestnuts in a pan for 10 minutes then drain the water and with your fingers, or a small clean cloth, peel the thin skin away.
  2. In another pan bring the vanilla extract, caster sugar and water to a boil to make a syrup. Make sure you stir continually to avoid any burning at the bottom of the pan. Simmer on a medium heat for 5 minutes.
  3. Stir in the chestnuts and simmer for another 10 minutes. Keep stirring!
  4. Take off the heat and transfer to a clean bowl and leave covered in a cool place overnight. Don’t put it in the fridge or the syrup will set and take longer to boil the next day. Leave them to soak for a minimum of 12 hours.
  5. The next day in a fresh pan, bring to the boil and cook for only 2 minutes before taking off the heat and leaving them to soak again for at least another 18 hours.
  6. Repeat this process three more times (I said you need plenty of time for this one!) until the sugar syrup has been absorbed by the sweet chestnuts.
  7. Transfer the chestnuts to a tray lined with baking paper and cook at 70°c for 1-2 hours with the oven door opened slightly. Check on them regularly; you want the syrup to harden before removing them.
  8. Once cooled they are ready to serve. Enjoy!


Good News; Chestnuts Are Good For You Too

Unsurprisingly sweet chestnuts offer a wealth of nutritional benefits, being a rich source of vitamins and minerals. Chestnuts are a source of carbohydrates and proteins; only 100 grams contains a third of your daily required carbohydrate intake and 44% of your daily required vitamin C intake which promotes the production of white blood cells to boost the immune system.

As well as this chestnuts also contain magnesium which helps strengthen enamel on your teeth and calcium and phosphorus which strengthens bones. You can also find your B vitamins in chestnuts which contribute towards keeping your nervous system and skin healthy as well as helping the body break down food, in fact B vitamins 1 through 6 can be found in chestnuts.

You can read a more about the detailed breakdown of the nutritional value of sweet chestnuts in this article by Health Benefits Times.

 Get further information about the benefits of B vitamins on the NHS website, right here.


Get More Wild Food Recipes & Foraging Videos

If all this talk of wild food has wetted your appetite for more then I have some good news for you. Here at Woodland Classroom we have created a special community, we call our Tribe, who in return for their support get access to exclusive wild food and foraging videos, recipe ideas, blogs, live hang outs and more. Sound good to you?

From as little as the price of a cup of dandelion coffee per month you could join our Tribe and not only be part of a growing and supportive nature connection community but also get a whole heap of perks available only to our Patrons. You can find out more about this community over on Patreon. When you join you’ll get immediate access to the entire back catalog of wild food, bushcraft and nature connection videos and resources we’ve created for our members. Find out more right here.

get access to exclusive foraging videos

Above: A selection of just some of the wild food videos you could access when you join our Tribe on Patreon.

make wild woodland stuffing foraging

Wild Woodland Christmas Stuffing

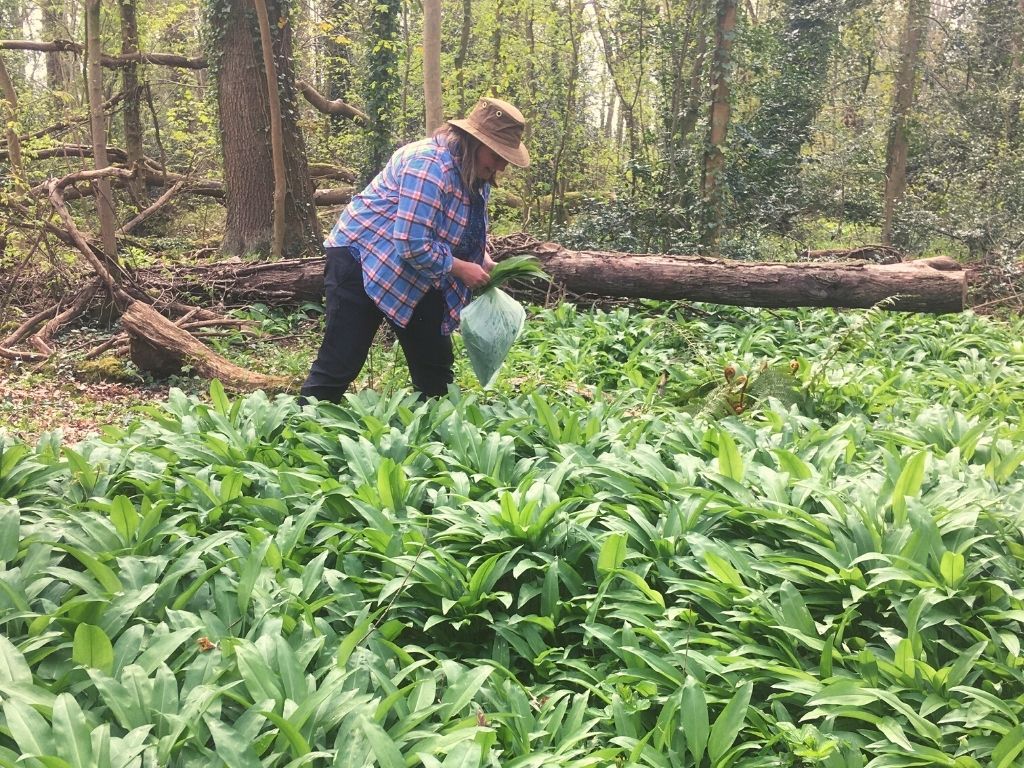
Do you want to bring a little WILD to your Christmas table this year? Learn how to make our delicious Wild Woodland Stuffing which includes foraged ingredients; mixed woodland mushrooms, sweet chestnut, wild garlic bulbs and nettle.

Making this stuffing not only gives you a great excuse to get out in the woods in the run up to Christmas to gather some wild ingredients, but it tastes great and it will be the talk of the table.

This stuffing recipe was created by James and Lea Kendall. We are foragers and outdoor activity leaders based in North Wales. We found that using some of the wild foods that we’d been gathering all year in this stuffing was a satisfying way to celebrate our foraging journey over the past year.

The stuffing gives a strong, earthy flavour. This recipe serves 8 – 10 people, or if you’re a smaller group then there’s enough for turkey and stuffing sandwiches on Boxing Day 🙂

wild woodland christmas stuffing recipe - foraging

INGREDIENTS

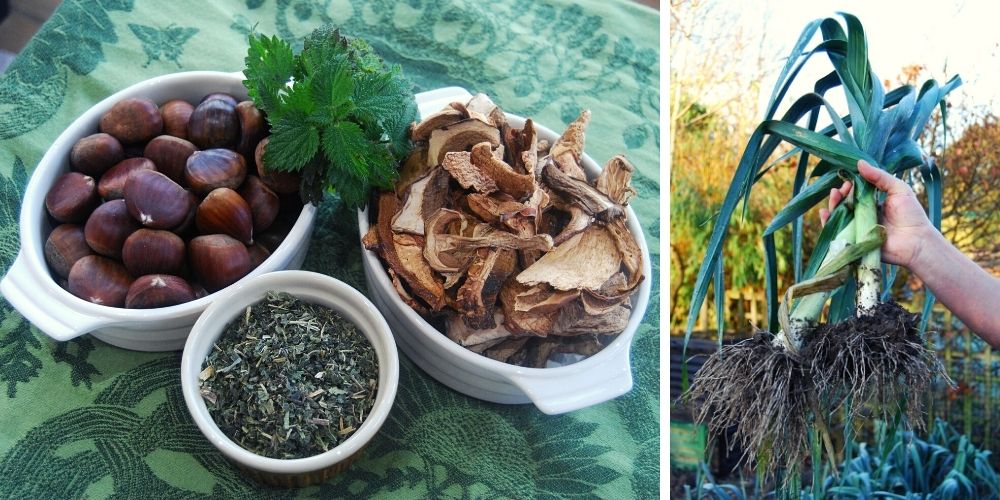
270g breadcrumbs (wholemeal works best)

30g dried wild mushrooms – we used penny buns (ceps), parasols and brown birch boletes

4 bulbs wild garlic, finely chopped, use fewer if you want a less strong garlic flavour

300g cooked and peeled sweet chestnuts, roughly chopped

2 leeks, finely chopped

25g butter, plus extra for greasing the tray

1 tbsp olive oil

15g of fresh nettle tops or dried nettle leaves, finely chopped

2 eggs, beaten

Salt and pepper to taste

make wild food christmas stuffing

METHOD

  1. Preheat oven to 180°C, gas mark 4.
  2. Soak dried mushrooms in 350ml boiling water for 10 minutes so they soften. Drain, keeping the liquid for later, and chop them into small pieces.
  3. Add a few tablespoons of the mushroom liquid to the breadcrumbs, gently mix and leave to soak for 5 minutes until flavoured.
  4. If using fresh nettle tops, pour boiling water over the leaves to kill the stings and leave for 5 mins before draining then chopping finely.
  5. Heat the butter and oil in a pan, add the leeks and garlic and cook until softened. Tip into a bowl and leave to cool slightly.
  6. Stir in the remaining ingredients to the bowl until well mixed up. Season with salt and pepper then form into balls and place onto a buttered tray or dish.
  7. Cook in the oven for 20 minutes until golden and crispy on the outside.

For the ultimate wild Christmas dinner, you could serve this stuffing with roast wild pheasant or partridge.


DISCOVER MORE FORAGING

If you want to get outdoors and learn foraging for yourself then you could come on one of our popular wild food courses.

We host our courses both in the woods in North East Wales and also regularly online through zoom sessions.

Check out our upcoming events to see what wild food courses we’re hosting soon:

VIEW EVENTS & COURSES HERE

wild food & foraging courses north wales

James & Lea host wild food and foraging course in North-East Wales. Get in touch to find out more.

A DEEPER LOOK AT THE FORAGED INGREDIENTS

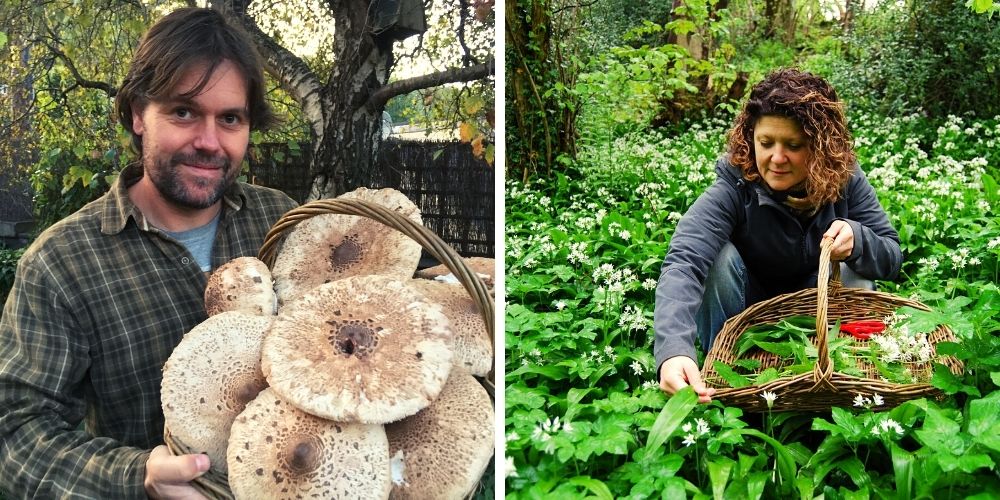
In our recipe we used the following species of wild mushroom; parasol mushroom (Macrolepiota procera), penny bun (Boletus edulis) & brown birch bolete (Leccinum scabrum). These were selected because it’s what we had available dried already. There’s no doubt that the parasols and penny buns have great flavour, however the birch bolete is more bland and not an essential ingredient for your own recipe.

If you don’t have a supply of dried wild mushrooms that you’d foraged back in autumn then you could always buy a pack from the local deli.

When gathering nettles (Urtica dioca) at this time of year, it’s all about beating the frosts so you don’t get withered leaves. Only pick the top four leaves of the nettle and go for the plants which are in good condition and still young. They can be found in December, especially if you look where land has been grazed or cut, so you get nettle regrowth.

Unless you have had the mystic foresight to roast and then freeze some foraged sweet chestnuts back in the autumn, you’re probably going to have to head to the shops again.

wild garlic bulbs foraging

Notice the shape of the bulb; tapering at either end and bulbous in the middle. Length is around 5-6cm.

DIGGING UP WILD GARLIC BULBS – GOOD PRACTISE

If you’re thinking of digging up wild garlic (Allium ursinum) bulbs then bear in mind that you’re are actually removing the wild plant from it’s habitats, not just harvesting the leaves which renew each year. So there’s a coupe of things we need to think about here so we’re exercising good practise as foragers:

  1. It is the law in the UK that you need the landowner’s permission to uproot any wild plant.
  2. You should only dig up bulbs from a spot where you know there to be an abundance of wild garlic in the spring, that way we’re only taking a very small amount of what’s in the ground.
  3. If you dig up any other bulbs that are not wild garlic then they must go back where and as you found them.
wild bluebell bulbs

You can see here that bluebell bulbs are a different shape to wild garlic bulbs too.

Lastly, it’s worth mentioning english bluebell (Hyacinthoides non-scripta) which also grow from bulbs and can often by found in amongst wild garlic at ancient woodland sites. We don’t want to be digging these up and eating them, they are poisonous.

If the bulbs you’re digging up don’t smell strongly of garlic then they’re not what you’re looking for. So, give the bulb a sniff before putting it in your basket. Bear in mind that when handling a lot of garlic your fingers will start smelling of it too so make sure you’re smelling the bulbs and not your fingers 😉

toffee apple slices - campfire cooking

Tired of Marshmallows Over the Campfire? Try This!

Are you looking for a simple but tasty treat that could go head-to-head with marshmallows as the number one campfire snack with kids? Well look no further…

We cook A LOT of marshmallows over the campfire with kids when we host our Forest School sessions and Woodland Birthday Parties. We know children love them, but they are not exactly a nutritionists best friend. They also contain gelatine made from pork or beef and we’re getting a lot more requests from parents who want vegetarian or vegan friendly campfire snacks for their kids when they come out to the woods with us. Last but not least, they’re sticky residue is a nightmare to get out of your clothes. Luckily, we have the solution.

Toffee Apple Slices are our alternative to marshmallows and kids love them! Granted they’re still coated in sugar but kids are getting some fruit down them and this recipe is vegan too. Our favourite sugar to use is coconut blossom sugar, as it less refined and less processed than regular sugar but any soft brown sugar will do the trick. They make a great hot campfire snack anytime of the year, especially in the autumn when you can walk out to an apple tree and pick the fruit straight from the branch.

Ingredients

  • Apples
  • Light or Dark Brown Soft Sugar
  • Cinnamon and Nutmeg – add to taste

Cooking Method

  1. To get a fire that really makes the most mouth-watering toffee apple slices it’s best to let your flames die down and roast your apples over the hot coals – just like you would with a bbq. This will save them from burning.
  2. First gently roast your apple slice over the fire until it begins to go soft and the pulp starts to bubble up.
  3. Next, dip your hot apple slice in a tray of soft brown sugar until it is well coated. Be careful it doesn’t fall off the stick.
  4. Roast your coated apple slice over the fire again until the sugar starts to melt.
  5. Now for the final touch… let your apple slice cool for a minute and the sugar will harden up and give your apple a crispy toffee coating – simply delicious.
  6.  Eat and repeat!
  7. For a slightly spiced variant on this snack then try sprinkling some cinnamon and/or nutmeg into the sugar. Ginger would work well too.

cooking toffee apple slices outdoors

Which Wood Should You Use?

For your roasting stick we would recommend using either a hazel, willow or sycamore stick. At Forest School this can be a whole activity in itself, identifying the tree in the woods, cutting a suitable branch responsibly and reducing the damage to the tree, then practising some basic whittling skills by slicing away the bark near the tip and making a sharp point.

We would recommend using green (fresh) sticks from a tree as they are more resistant to the fire than dead twigs, so will last longer.

sycamore tree - leaf and bud

Sycamore – the winter twig and full leaf.

FUN FACT: Sycamore (Acer pseudoplatanus) actually contains it’s own natural antibacterial and antiviral properties, which is one reason why it is very sought after for use in kitchenware. This makes it a really safe wood to use for roasting sticks when out in the woods with kids.

Full disclosure, I personally can’t stand marshmallows, even though I cook so many, so I was very glad to discover this tasty alternative. Thanks to the Forest School Leader who shared this cooking idea with us at a skill share training day in Derbyshire last year, I can’t remember your name but we’re forever grateful 🙂

Happy cooking everyone.

James


James and Lea Kendall from Woodland Classroom

James & Lea Kendall are the creators of Woodland Classroom. “Through our passion, enthusiasm and experience we help people connect with nature, feel healthier and have meaningful experiences through positive activity and creative play.”

“We are experienced outdoor educators with a background in bushcraft, forest school and nature therapy, who love what we do.”

tasty bread from a dutch oven

My Bushcraft Journal: Part #2 Baking in a Dutch Oven

Baking bread out in the woods has always been one of those mystic arts to me. Something that, like tool sharpening, seems shrouded in mystery. With my ongoing Bushcraft Instructor training I thought it was high time that I made an effort to try it for myself. What’s the worst that could happen?

I also had a 4 litre dutch oven sitting in my shed, which was a Christmas present 2 years ago. I always felt a bit guilty when I came across it. So it was time to do it justice.

I’ve seen it done before but couldn’t for the life of me remember the exact method the teacher used at the time. So when it came to our next bushcraft training sessions I told everyone that I would bake them a loaf for the evening. The challenge was on.

The trick to using a dutch oven, as far as I understood it, was to get an even heat around the whole pot so that your bread would bake all round. So what was needed was a campfire that had been burning for a while to produce a good amount of hot coals, more like what you’d get in a barbecue. It’s this bed of coals and ember that makes an effective cooking fire, rather than roaring flames. I actually brought along some Welsh charcoal for the bake as I wasn’t sure what state the communal fire would be in by the time I came to experiment. This worked really well but I imagine if you use hardwood firewood and burn it down to coals it would be just as good.

cooking bread in a dutch oven for bushcraft

Above: This is not the same loaf as I cooked as it was dark by the time I was baking. You can see though how the coals have been placed on top of the oven lid it help it bake with an even heat.

The good news is that the loaf was a success! In fact it was one of the best loaves I’ve ever tasted, and even better that it was fresh out of the oven. Everyone complimented my on it and the mystery of using a dutch oven is firmly behind me, though I imagine there’s a lot to learn yet. For anyone who wants to give it a go for themselves I’m going to share that tasty recipe with you now….

STOUT & FRUIT SODA BREAD

This recipe fed 6 adults with a very generous slice of bread. They all loved it. Any left over stout can be generously gifted to a camping buddy that likes that sort of thing. I prefer cider myself. Having enjoyed this loaf myself I can say that it was delicious straight out the oven and didn’t even need any butter to improve it though you can try that if you like. It tasted more like a cake than bread 🙂

WHAT YOU NEED

4 litre dutch oven • large mixing bowl • mixing spoon (whittled by yourself preferably) • a metal dish that will sit in the bottom of your oven • 4 small stones (trust me)

INGREDIENTS

2 big overflowing handfuls of strong wholemeal flour

2 big overflowing handfuls of strong plain flour

A half handful of sugar (caster sugar is best as it’s finer)

1 heaped tablespoon of baking powder

1 good pinch of salt

1 big overflowing handful of mixed dry fruit

1 egg

1 can of stout

Keep some extra spare flour left aside for dusting the metal dish

METHOD

Mix up all the dry ingredients together. I did this in advance before the trip and put them in a plastic tub so it would save doing it around the campfire at night.

In your mixing bowl make a well in the middle of the dry mix and add crack the egg in. Then mix with your wooden spoon.

Slowly add the stout until all the dry ingredients are mixed in and you have a ball of dough that holds it shape.

Coat your metal dish in a light layer of your spare flour. This will stop the bread from sticking to the dish.

Place your dough onto the floured dish and sprinkle a little sugar on top.

Now it’s time to use those 4 mysterious small stones. These are placed evenly spaced at the bottom of the dutch oven. The metal dish is then placed on top of these so it sits comfortably. What this does is elevate the dish from the bottom of the dutch oven to allow the air to circulate. This all helps prevent the lower crust from burning.

Place the lid onto the oven and pop it into your campfire.

We surrounded the oven with a ring of charcoal and placed some hot coals evenly on top. This is the part of the process that inly experience can teach you and I’m looking forward to trying this recipe again and seeing if the cooking time changes. I imagine it depends on how hot your fire is and how even the coals are around your oven.

I checked the loaf after 15 minutes and we all agreed it needed longer.

I cooked my loaf for 25-30 minutes but I think i could have got away with taking it out a bit sooner. You will see some burn on the left hand side of the close up picture. This is where there was a flaming log placed right up against the dutch oven so I think it caused that side of the oven to be hotter.

The last tip I was given was to use a clean knife to push into the middle of the loaf. If it comes out clean then the bread is ready.

tasty bread from a dutch oven

Above: The complete loaf. Not bad at all for a first effort. In fact it was one of the best breads I’ve ever tasted.

By the way, did you know that the phrase “the upper crust” comes from a time when those who could afford it would get the more valuable upper section of the loaf rather than the often burnt bottom. So the rich were referred to at the “upper crust.”

I hope this has inspired you to try dutch oven baking for yourself. I’ve definitely got the hook and have made a promise to myself to try a different recipe each time I go camping now. Suddenly the world of outdoor baking has completely open up to me. It’s a real sense of achievement.

Thanks for reading.

James K

Social Share Buttons and Icons powered by Ultimatelysocial